Configuring Learny
Page settings
In Learny LMS, an admin has the most privilege and responsibilities. As an admin, you can access the website page settings option. Here you can update the basic info about your website. For this, you have to navigate:
- Log in to the admin panel.
- Select the "Learny LMS" option from the left menu.
- Choose the "Plugin settings" option from the sub-menu.
- Click on the "Page settings" option.
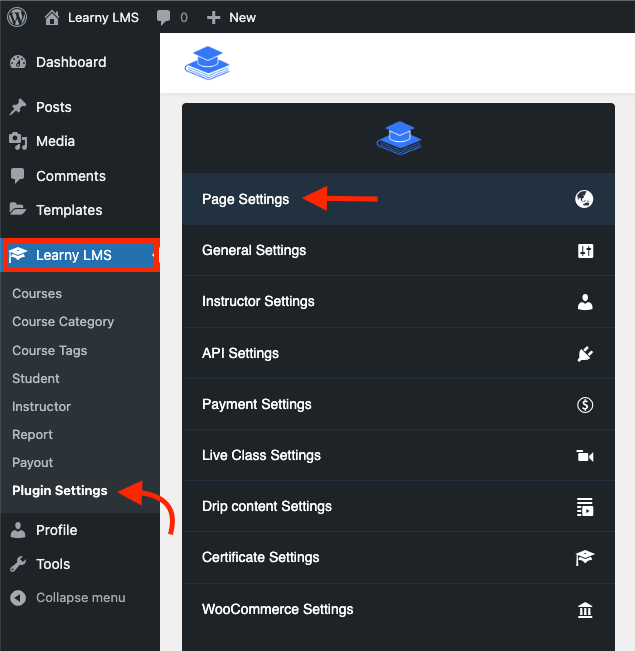
Figure 1. Learny LMS Page Settings
In this settings panel, you have to provide the following information to configure the page setting.
- Set the login and registration page. (You can choose any option from the given option)
- Choose the student Dashboard page.
- Select the Course player page.
- Set the Checkout page.
- Click on the "Update page settings" button.
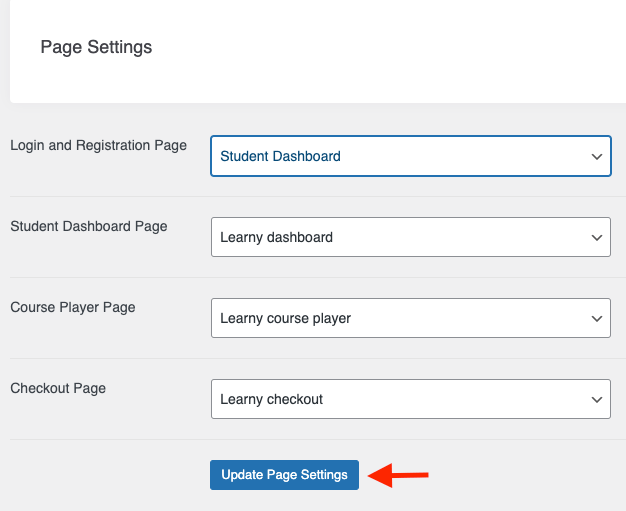
Figure 2. Learny LMS Updating Page Settings
General Settings
You can update basic information about your WordPress website in the general settings option. For this, you have to follow the steps below:
- Select the "Learny LMS" option from the left menu.
- Choose the "Plugin settings" option from the sub-menu.
- Click on the "General settings" option.
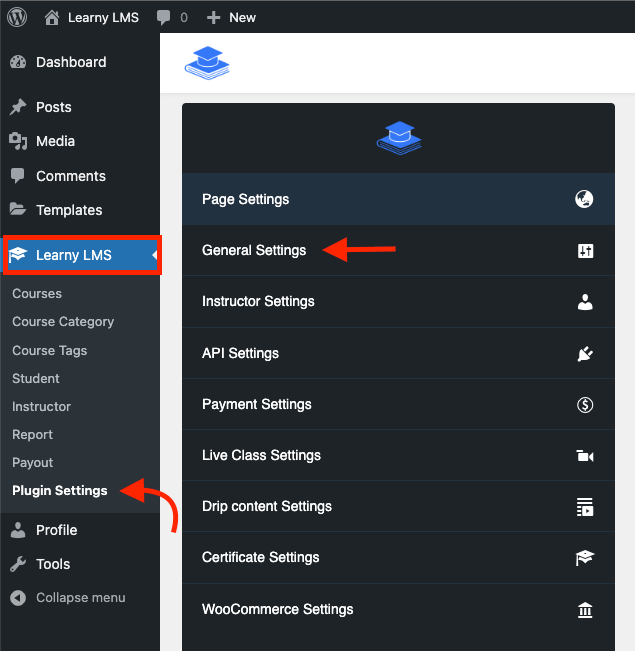
Figure 3. Learny LMS General Settings
In this settings panel, you have to provide the following information to configure the page setting.
- Set your business name.
- Provide business email.
- Set business phone number.
- Set purchase code.
- Upload system logo. (You can upload the image logo from your device)
- Click on the "Update general page settings" option to save your data.
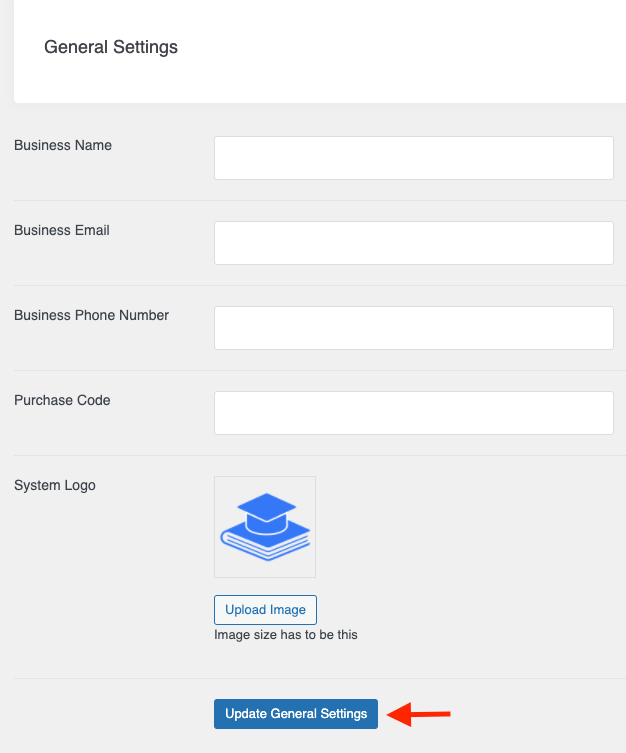
Figure 4. Learny LMS Updating General Settings
Instructor Settings
You can configure instructor settings options from here. For this, you have to navigate:
- Select the "Learny LMS" option from the left menu.
- Choose the "Plugin settings" option from the sub-menu.
- Click on the "Instructor settings" option.
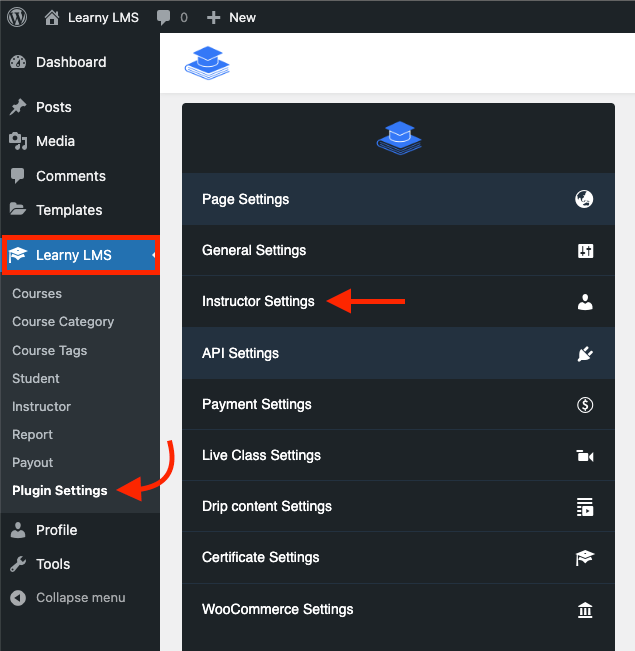
Figure 5. Learny LMS Instructor Settings
In this settings panel, you have to provide the following information to configure the page setting.
- Allow/Disallow the public instructor.
- Provide the instructor application note.
- Set the instructor revenue percentage.
- Set the admin revenue percentage.
- Click on the "Update Instructor Settings" option to save your data.
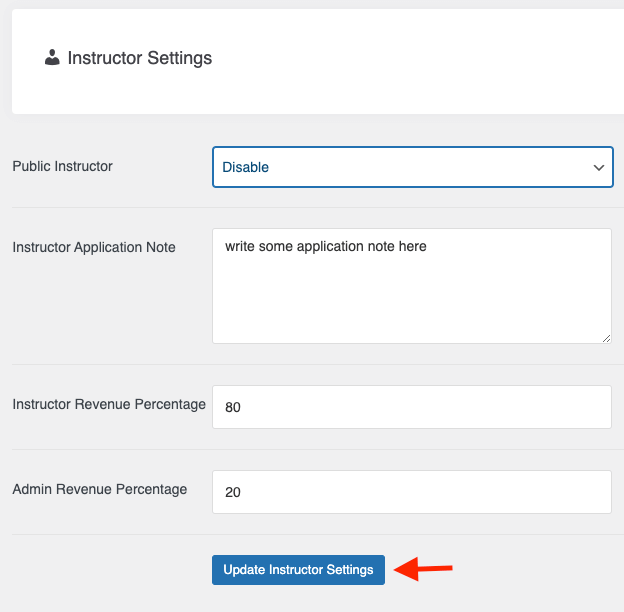
Figure 6. Learny LMS Updatings Instructor Settings
API Settings
To support or run the different platforms in your plugin, you have to provide API (Application Programming Interface) keys. In this settings panel, you have to provide API keys. For this, you have to navigate:
- Select the "Learny LMS" option from the left menu.
- Choose the "Plugin settings" option from the sub-menu.
- Click on the "API settings" option.
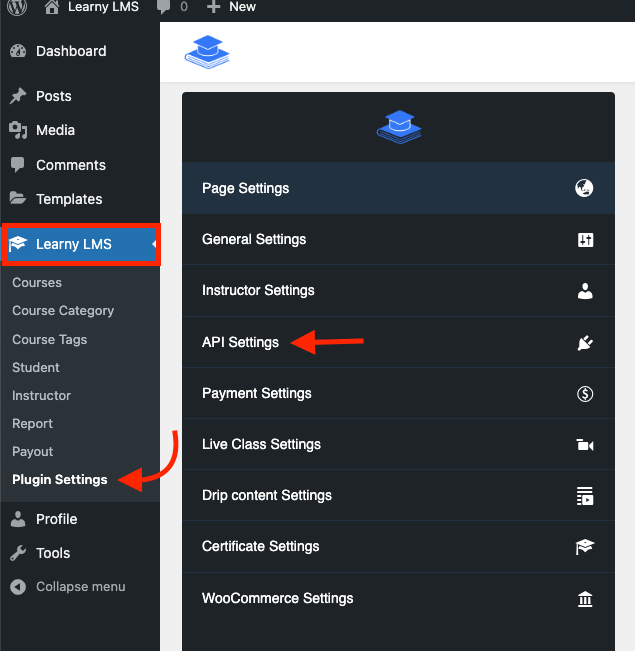
Figure 7. Learny LMS API Settings
Now you have to provide the information below:
- Set the Youtube API key.
- Set the Vimeo API key.
- Click on the "Update API Settings" option.
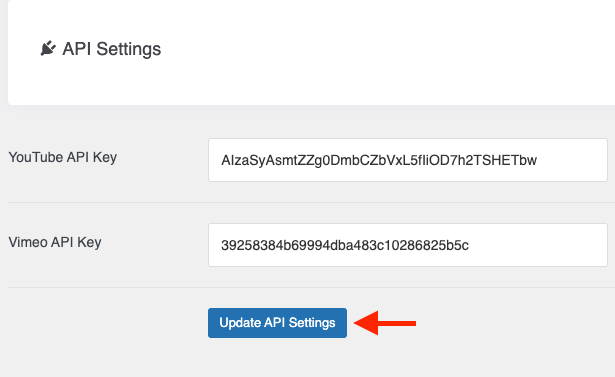
Figure 8. Learny LMS Updating API Settings
Payment Settings
You can configure the payment settings from this settings option. Here, you can change, and update the payment system of your application. For this, you have to follow the steps below:
- Select the "Learny LMS" option from the left menu.
- Choose the "Plugin settings" option from the sub-menu.
- Click on the "Payment settings" option.
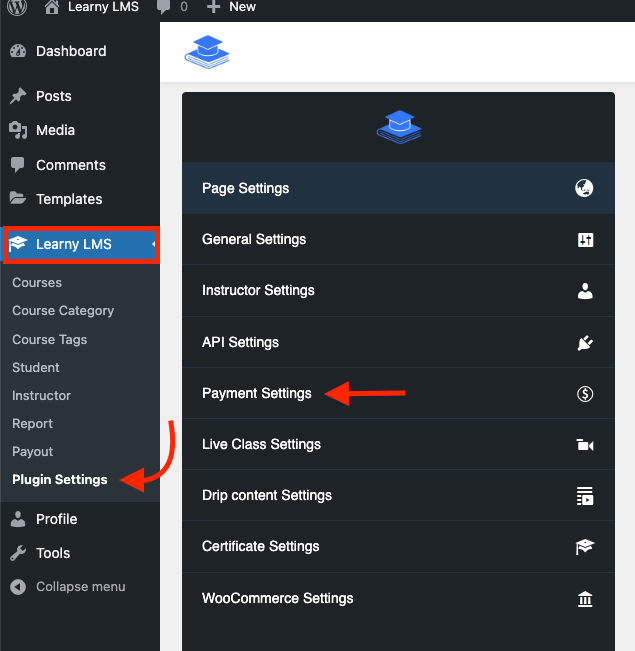
Figure 9. Learny LMS Updating Payment Settings
Now, configure the system currency. You can set any currency you want. Here, you have to:
- Set a system currency
- Set a currency position
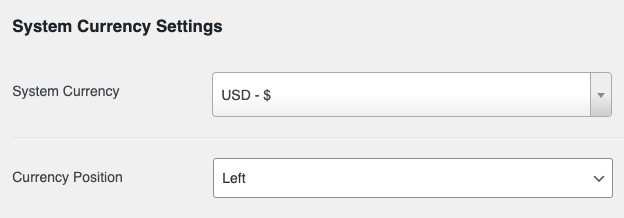
Figure 10. Learny LMS System Currency Settings
Note: Make sure that your "System currency" and other gateway currency are the same.
PayPal gateway:
After configuring the system currency settings, you have to configure the "PayPal settings." For this, you have to:
- Set the activation status of PayPal.
- Select the mode.
- Provide the client ID. (Sandbox)
- Set the secret key. (Sandbox)
- Client ID. (Production)
- Secret key. (Production)
- Click on the "Update Payment Settings" option to save your data.
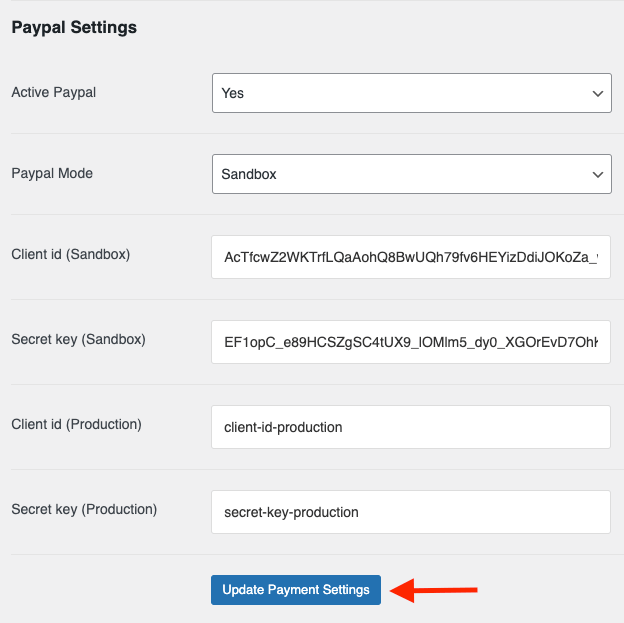
Figure 11. Learny LMS Updating PayPal Payment Settings
To get the "Client ID" and "Secret key" for your PayPal account, you have to follow the steps below:
- Navigate to the "PayPal Developers Website" home page.
- Login to the dashboard.
- You can also log in with your mobile number using OTP.
- Set up the profile.
- Go to the "Your Name" option.
- Go to "Dashboard" in the top right corner.
- Click on the "Create App" to create a new app.
- Provide the details for the new app.
- Now you can see the PayPal Client Id and secret.
Live Class settings
To take an online live class, you have to configure the Learny LMS settings. For this, you can follow the steps below:
- Log in to the site as admin.
- Click on the "Learny LMS" option from the left menu.
- Select the "Plugin Settings" option from the sub-menu.
- Click on the "Live Class Settings" button.
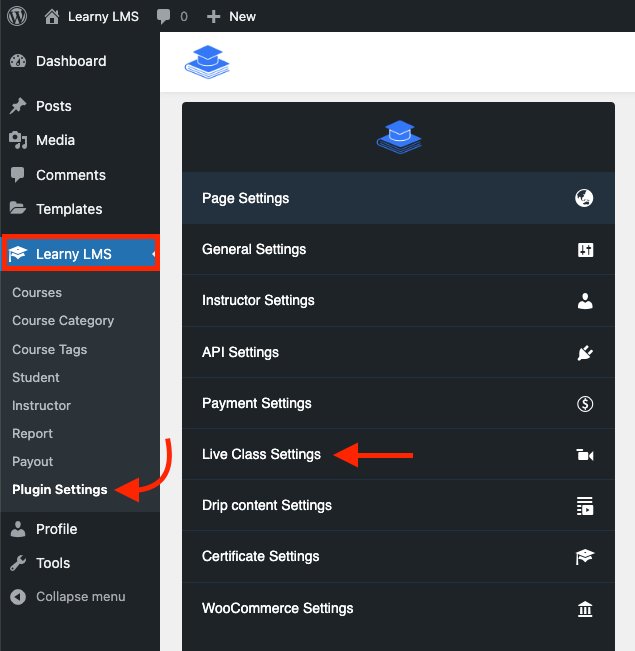
Figure 12. Learny LMS Live Class Settings
- Provide Zoom API keys.
- Provide Zoom Secret Keys.
- Click on the "Update Live Settings" to save your settings.
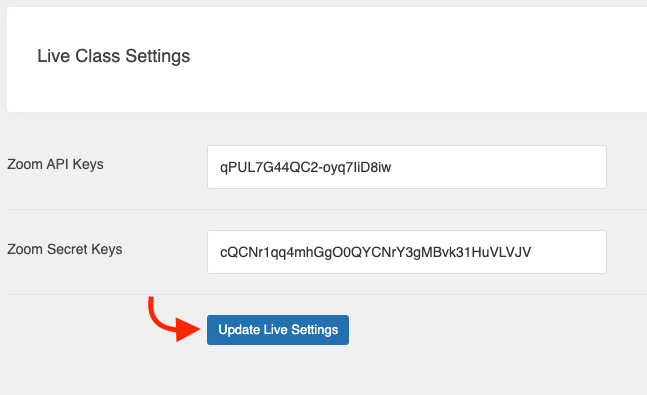
Figure 13. Learny LMS Updating Live Class Settings
Note: To use the Zoom service, you have to install the Zoom streaming service plugin on your WordPress. You can use the Jitsi streaming service without installing any plugin.
How to get Zoom API & Secret keys
To configure and get the service of Zoom live streaming service, you have to provide the Zoom API key and secret key. For this, please follow the steps below to generate the Zoom API and secret keys.
- Navigate to the official Zoom marketplace.
- Select the "Develop" button from the home page.
- Click on the "Build App" button.
- Make sure you are signup or signing in to the official Zoom marketplace.
- Go to your account.
- Select the "Solution" button.
- Click on the "App marketplace" from the dropdown menu.
- Select the "Build App" button from the "Develop" menu.
- Click on the "Create" button in the JWT field.
- Provide the required information and click on the "Continue" button.
- You can see your Zoom API key and secret on the "App Credential" page.
- Copy and paste these keys into your application.
Drip Content Settings
You can lock your new course lessons for your students to complete their previous ones. Also, you can set the time/percentage for unlocking a new lesson. You can easily manage the drip contents on your WordPress plugin within a few clicks. To configure the drip contents, you can follow the steps below:
- Log in to the admin panel.
- Select the "Learny LMS" option from the left menu.
- Choose the "Plugin settings" option from the sub-menu.
- Click on the "Drip content settings" option.
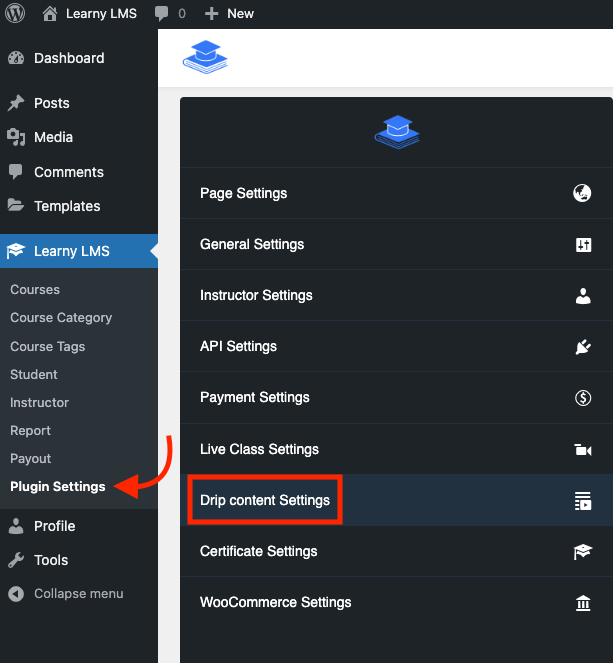
Figure 14. Learny LMS Drip Content Settings
- Choose the lesson completion role. (If you choose percentage-wise, this feature will work as a percentage. If you choose video duration-wise, this feature will work as provided seconds.)
- Set a minimum percentage/time for drip content methods. (If you select percentage-wise, you have to provide a minimum percentage. If you choose video duration-wise, you have to provide a minimum of seconds)
- Click on the "Update drip content settings" button to save your configuration.
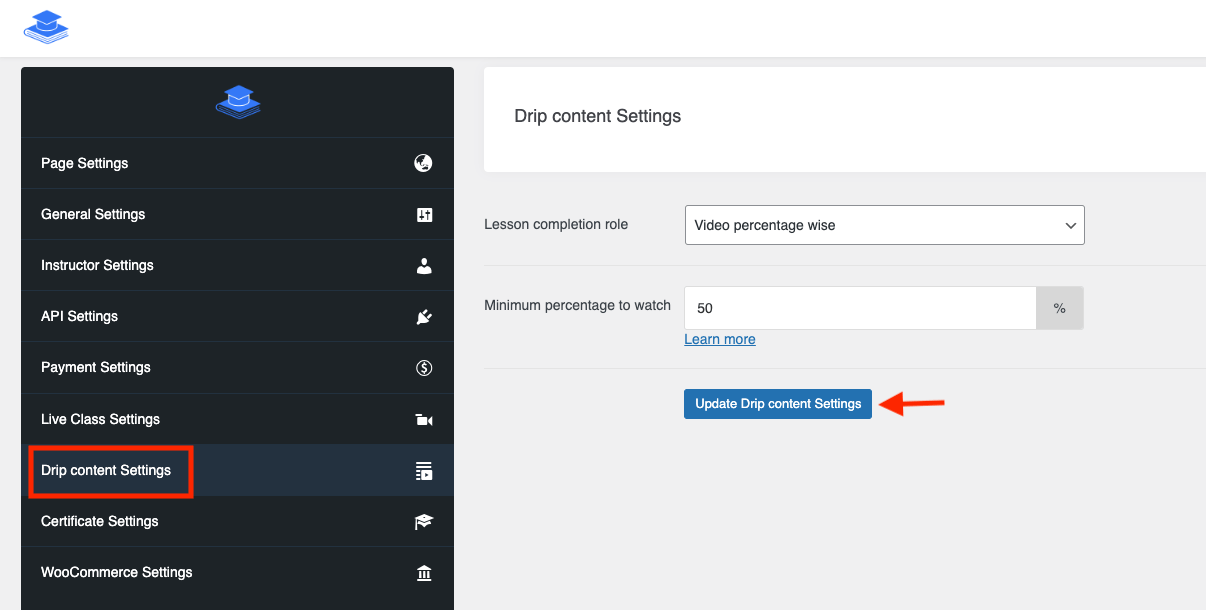
Figure 15. Learny LMS Drip Content Settings
Note: You have to calculate your lesson time into seconds if you choose video duration-wise.
There are two kinds of lesson completion roles in the drip content settings. They are-
- Percentage-wise.
- Video duration-wise.
Percentage-wise:
If you choose your completion roles as a percentage and set a minimum percentage to watch. Your lesson duration time will be work percentage-wise.
Example: Let's say, your lesson duration time is one minute, and you choose the completion role as a percentage. You set 50% to the minimum watch.
In this condition,
After watching for 30 seconds a lesson, your students can unlock a new lesson. Watch the calculation below for a better understanding:
60 seconds÷50% = 30 seconds [1 minute= 60 seconds]
Video duration-wise:
If you choose your completion roles as video duration-wise and set a minimum of seconds to watch. Your lesson duration time will work video duration-wise.
Example: If your lesson duration time is 5 minutes. You choose the completion role as video time duration, and you set 180 seconds.
Your students can unlock a new lesson after watching for 3 minutes. Because,
60 seconds x3 = 180 seconds = 3 minutes [1 minute= 60 seconds]
Note: The previous lesson will automatically be marked as watched after unlocking a new lesson. (If you activate drip content features otherwise your students have to mark the lesson manually after watching)
Certificates Settings
Provide a customized certificate to your course students on Learny LMS. You can generate a certificate and your students have to complete the course 100% of course progress to get the course certificate. You can customize the certificate by dragging and dropping it. You can add your own certificate template on Learny.
To generate the certificate, You can follow the simple steps below:
- Log in to your WordPress site as an admin.
- Click the "Learny LMS" option from the left menu.
- Select the "Plugin Settings" option from the left menu.
- Click on the "Certificate Settings" from the sub-menu.
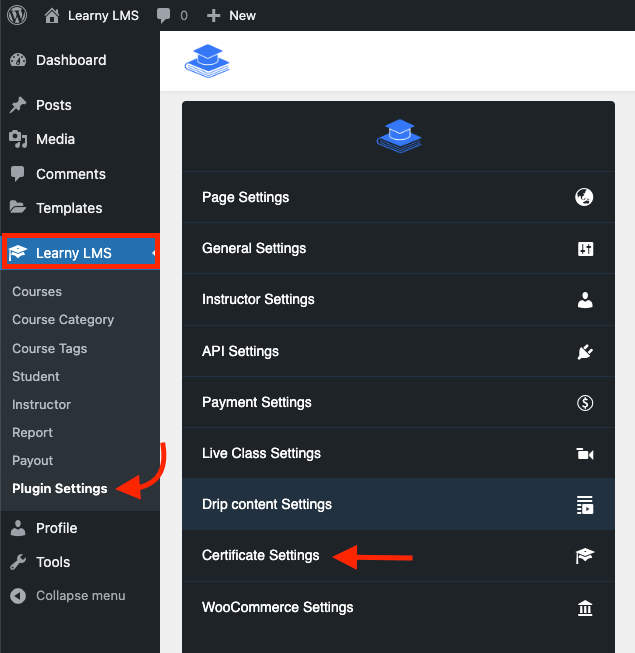
Figure 16. Learny LMS Certificate Settings
- Provide the certificate template text. ("Student" and "Course" mean student name and course title on the certificate)
- Click on the "Save" button.
- Select the "Update text position" button. (If you want to customize the certificate text position)
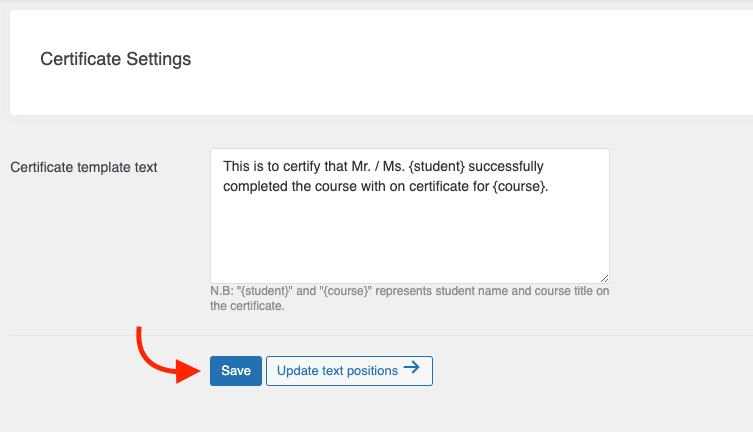
Figure 17. Learny LMS Saving Certificate Template Text
- Change the text position by drag and drop.
- Click on the "Change template" button. (If you want to customize the certificate template)
- Select the "Save change" button to store your certificate.
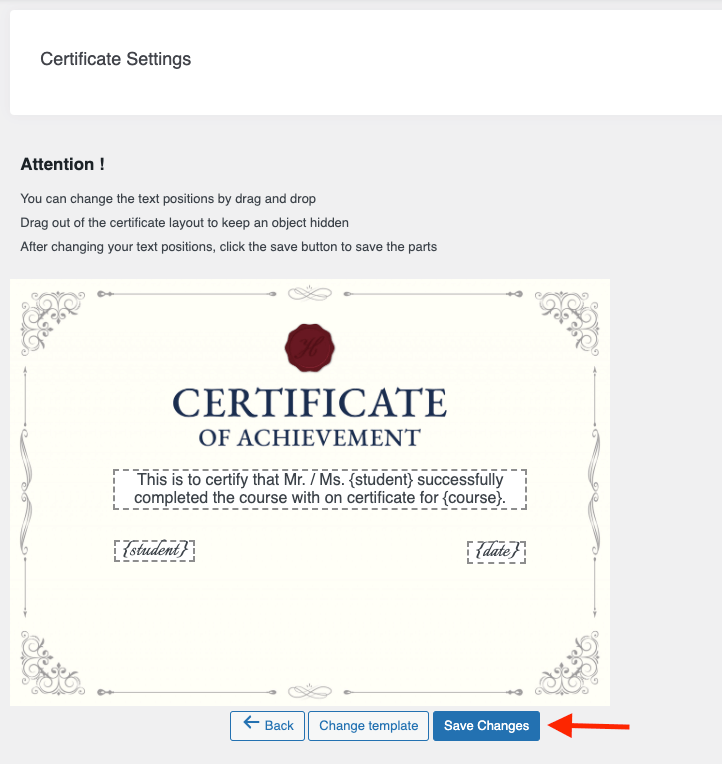
Figure 18. Learny LMS Saving Certificate
To remove a text position from the certificate, you have to select that text position and drag it out from the certificate. Then click on the "Save change" button to store your updated data.
WooCommerce Settings
WooCommerce is the most popular e-commerce plugin. To configure this setting, you have to install this plugin to your WordPress. After that, you have to navigate:
- Select the "Learny LMS" option from the left menu.
- Choose the "Plugin settings" option from the sub-menu.
- Click on the "WooCommerce settings" option.
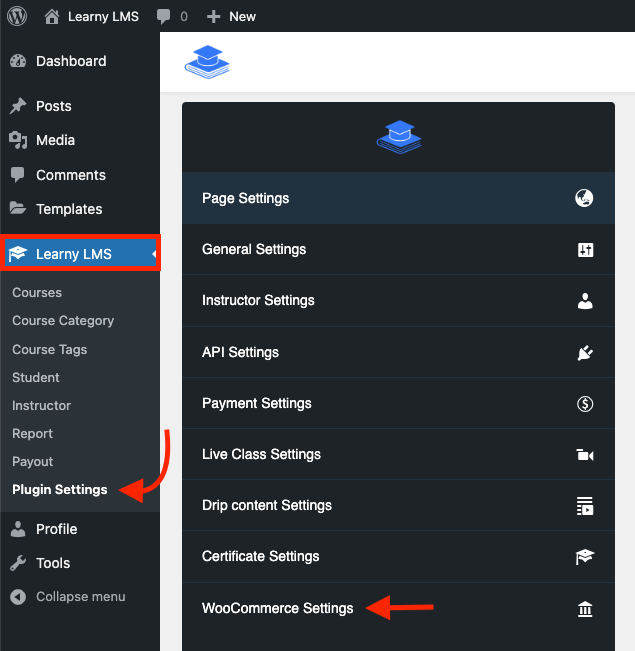
Figure 19. Learny LMS WooCommerce Settings
Now, you can import your premium courses to the WooCommerce site as products. For this, you have to click on the "Synchronize Learny Courses" option.
To import "Completed" orders from WooCommerce, you have to click on the "Synchronize Learny Orders" option.
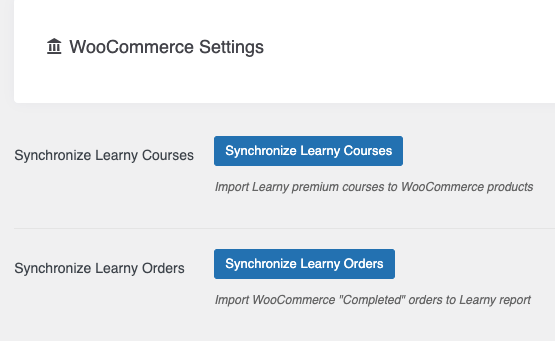
Figure 20. Learny LMS Updating WooCommerce Settings
Was this article helpful to you?
Contact us and we will get back to you as soon as possible

