Creating class
In Mastery, an admin and instructor can create a lesson or a class for the students. Also, they can create many lessons under one subject and one class.
Admin panel:
As an admin, to create a class, you have to navigate:
- Login to the admin panel.
- Select the "Class" option from the left menu.
In this panel, you can:
- Manage class
- Lesson
- Activation status
- View class in the frontend frontend
- Mark class as pending review
- Approve teacher's request
To manage the published class, you have to follow the following steps below:
- Login to the admin panel.
- Select the "Class" option from the left menu.
- Choose the "All classes" option from the sub-menu.
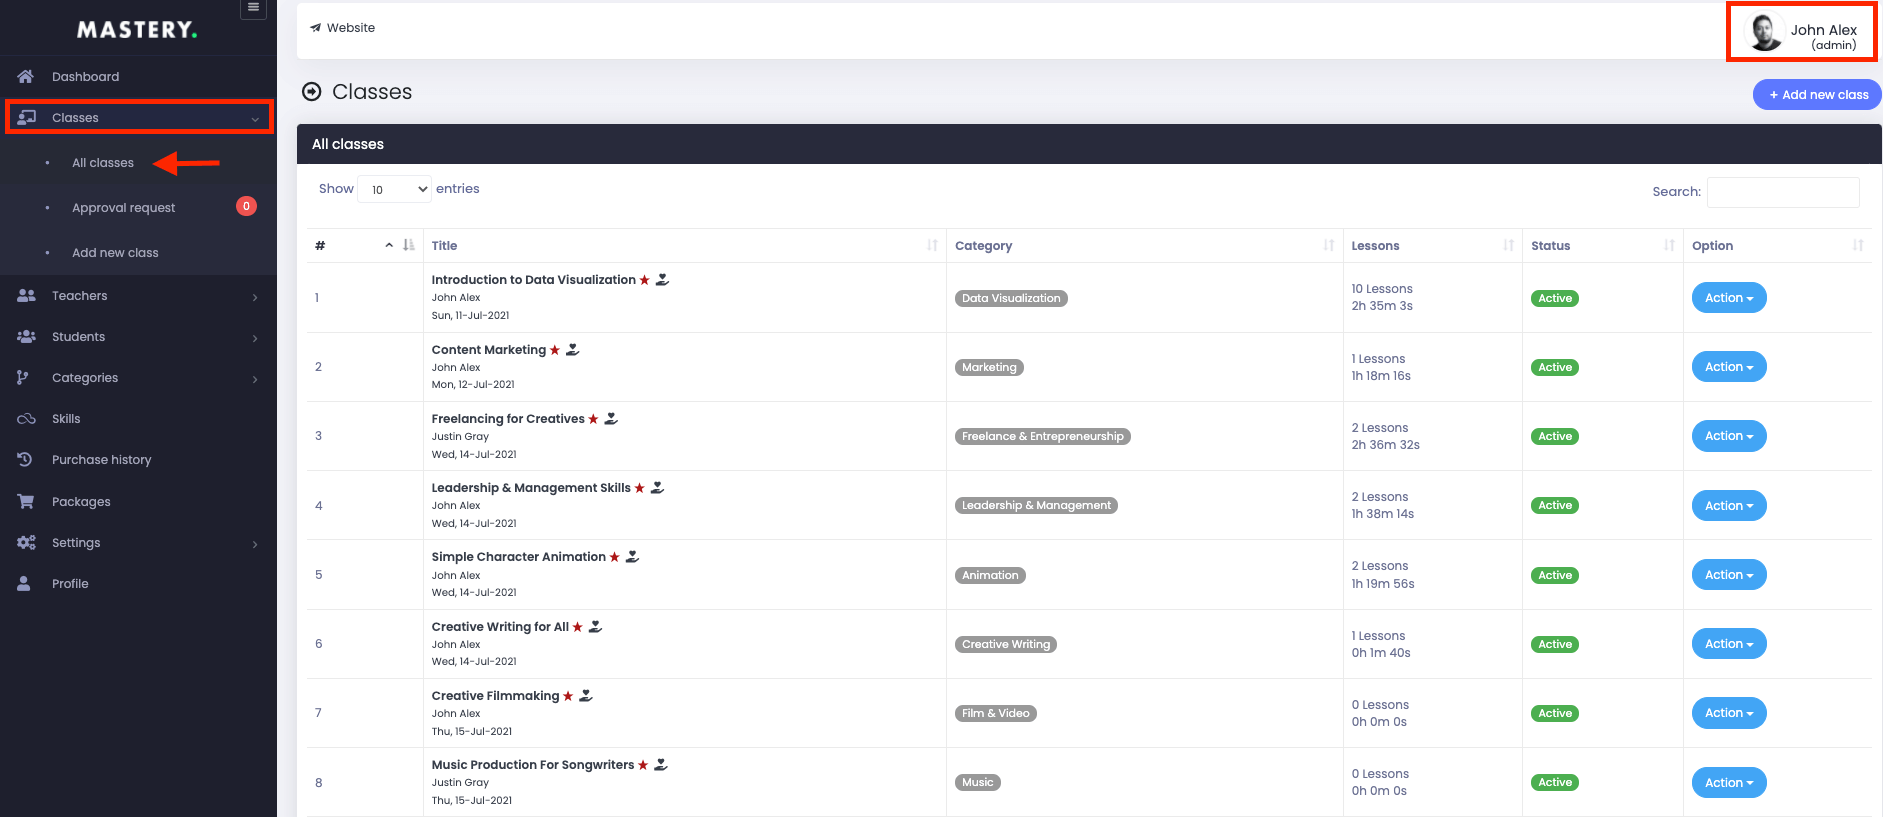
Figure 1. Mastery LMS All Classes
Here, you can overview:
- Class title
- Category
- Lesson
- Status
- "Action" panel for more option
In the "Action" panel, you can:
- View class in frontend
- Update class
- Change activation status
- Mark a class for pending review
- Delete the class
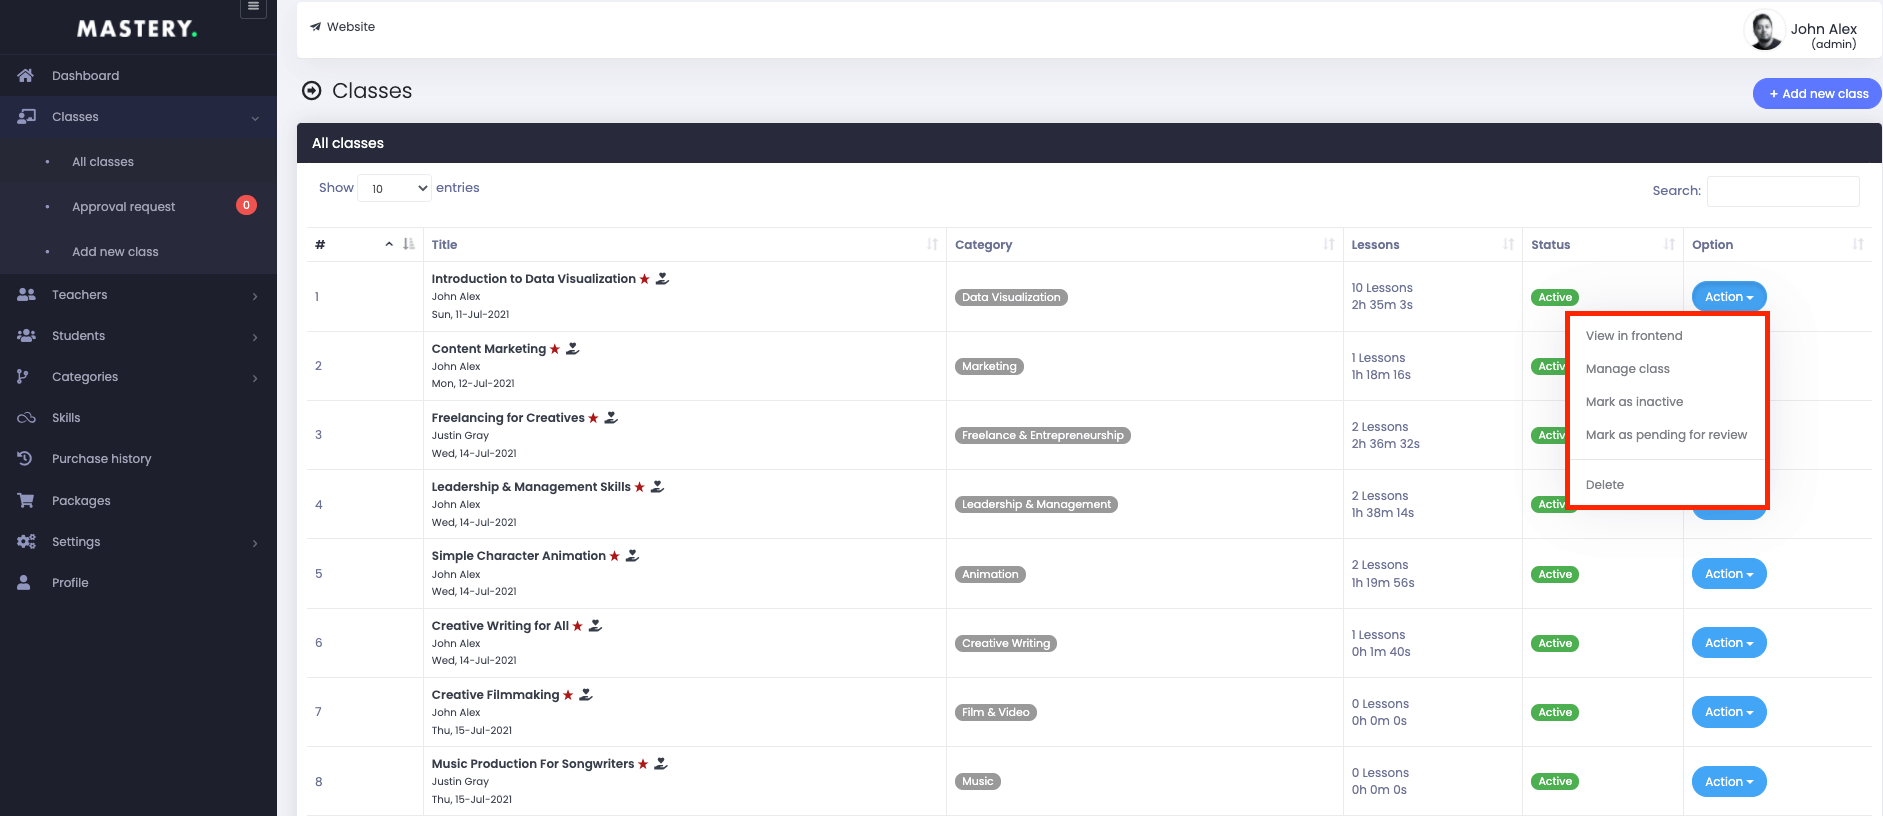
Figure 2. Mastery LMS Class Options
To overview your class in the frontend, you have to click the "View in frontend" button from "Action."
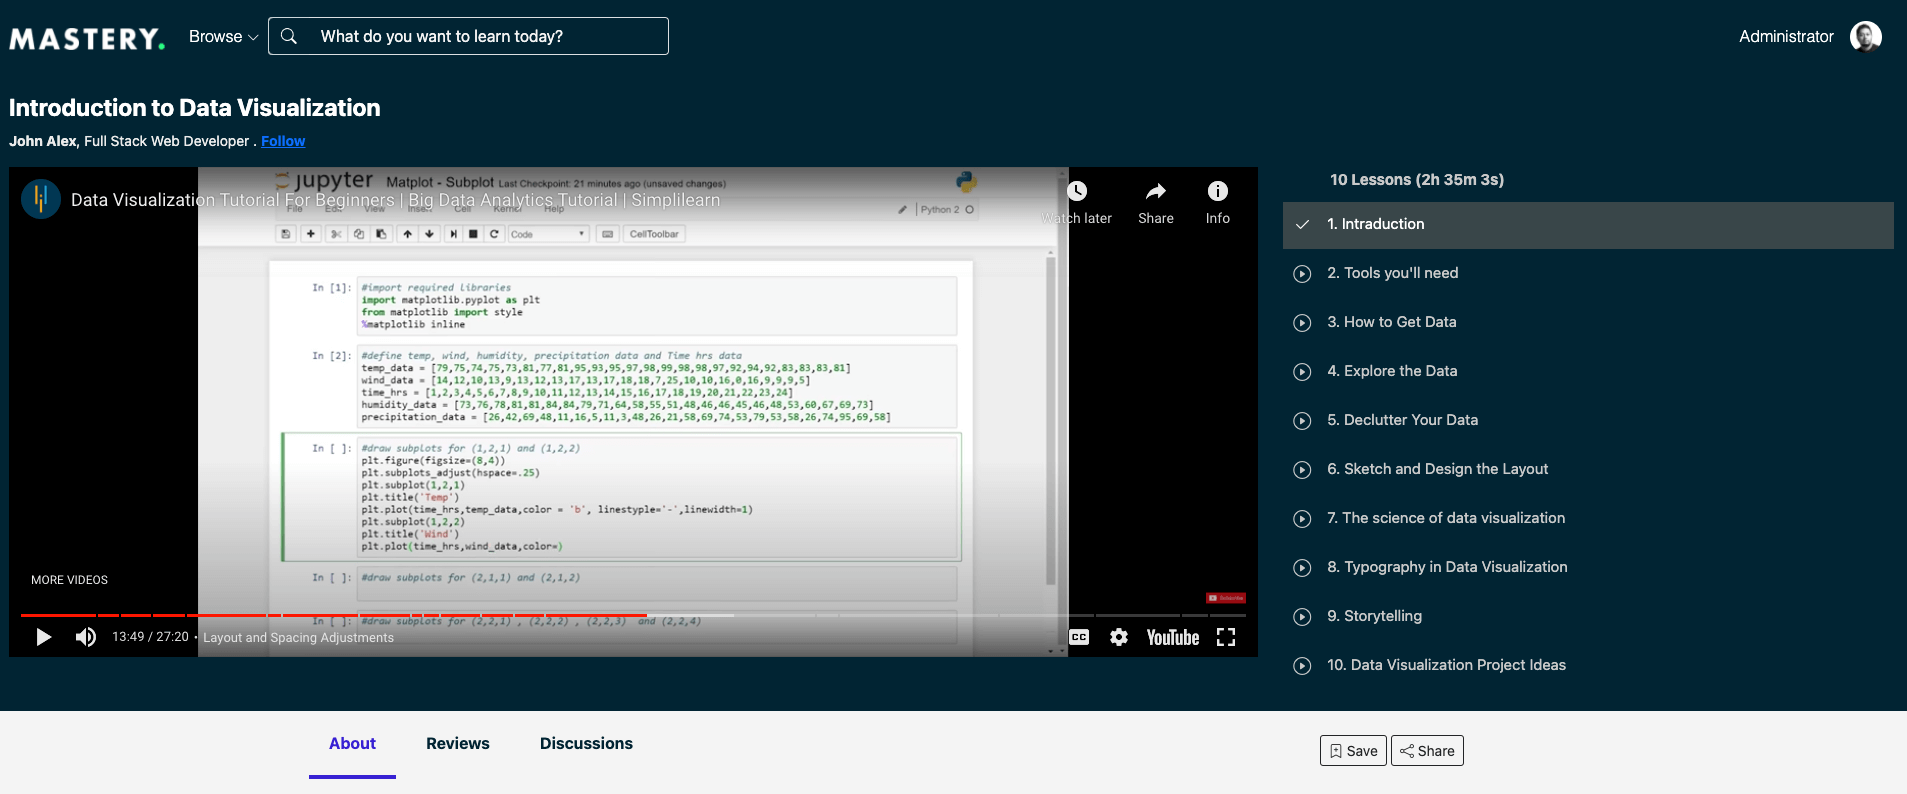
Figure 3. Mastery LMS Class Frontend
Here, you can preview:
- Class
- Lesson
- Class summary
- Class discussion
- "Save" and "Share" option
To update the class, you have to navigate:
- Select the "Manage class" button from the "Acton" panel.
- Open the "Class information" panel.
Now, you have to update:
- Class title.
- Category.
- level.
- Skills. (You can add more than one skill)
- Highlight the class. (You can consider your as free/subscription-based, mark as featured, recommended on the website, or add the class as a home page slider)
- Class thumbnail. (You can select from your device)
- Class banner. (You can select from your device)
- Short description.
- Long description.
After providing the information, you have to select the "Save change" button to save your data.
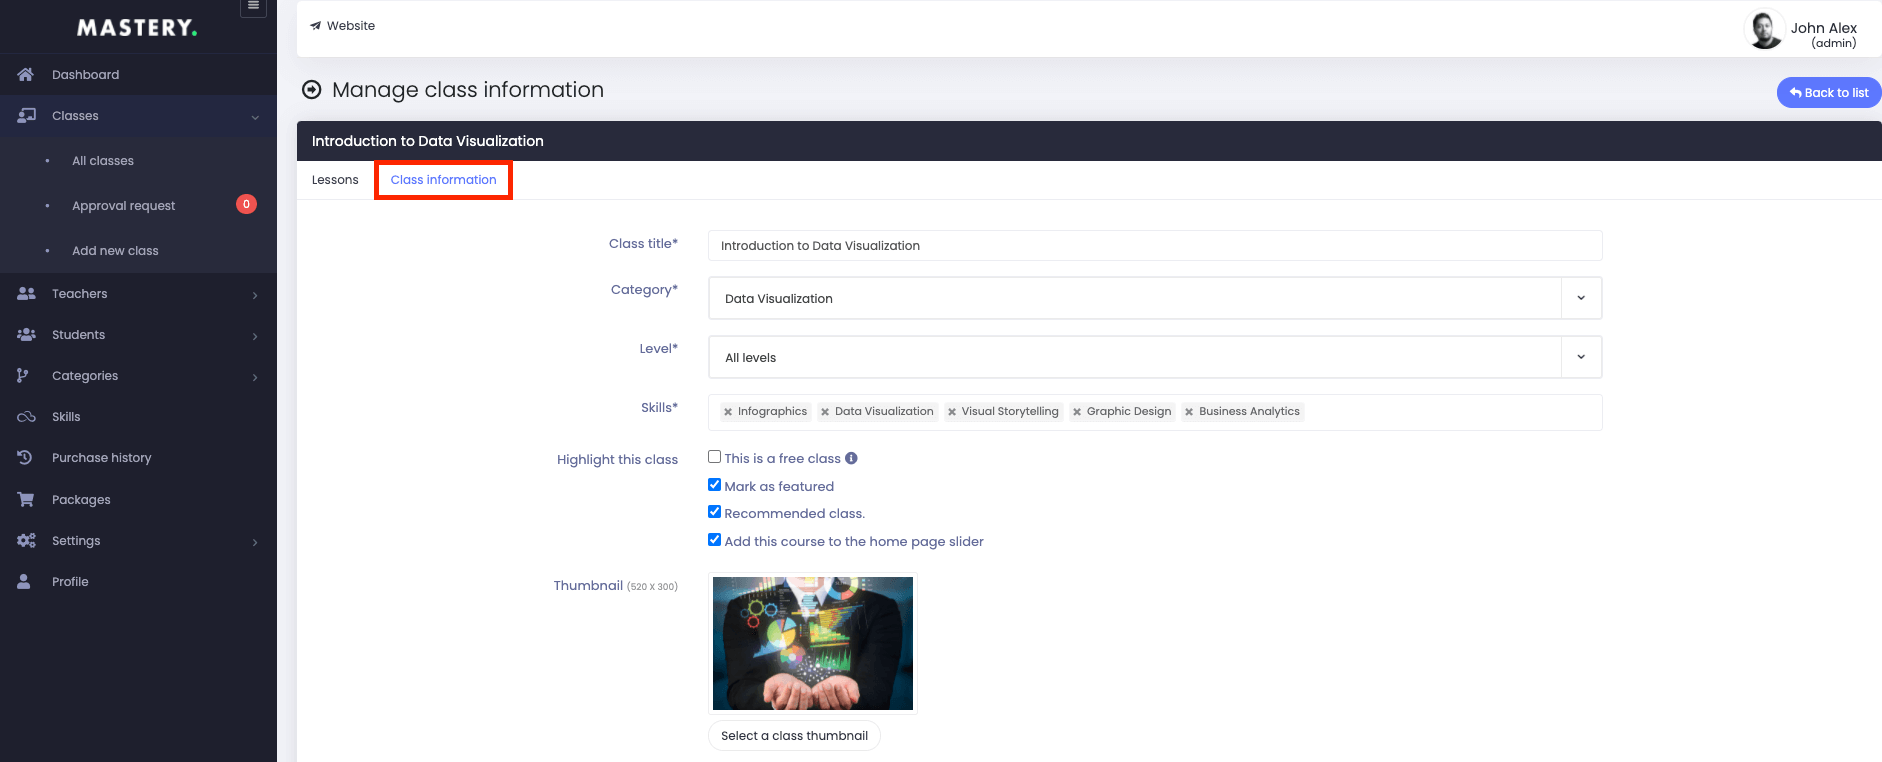

Figure 4. Mastery LMS Managing Class
Note: If you add the class for free in the "highlight the class" option, all the lessons will be considered free.
To change the activation status of a class, you have to follow the steps below:
- Select the "Mark as active/inactive" button from the "All class" panel.
- Click on the "Yes" button for confirmation.
As an admin, you can select a class pending review. For this, you have to navigate:
- Select the "Mark as pending for review" button from the "All class" panel.
- Click on the "Yes" button for confirmation.
To delete a class, you have to select the "Delete" button from "Action." Then select the "Yes" button to save your information.
To add a new class in the Mastery, you have to follow the steps:
- Login to the admin panel.
- Select the "Class" option from the left menu.
- Choose the "Add new classes" option from the sub-menu.
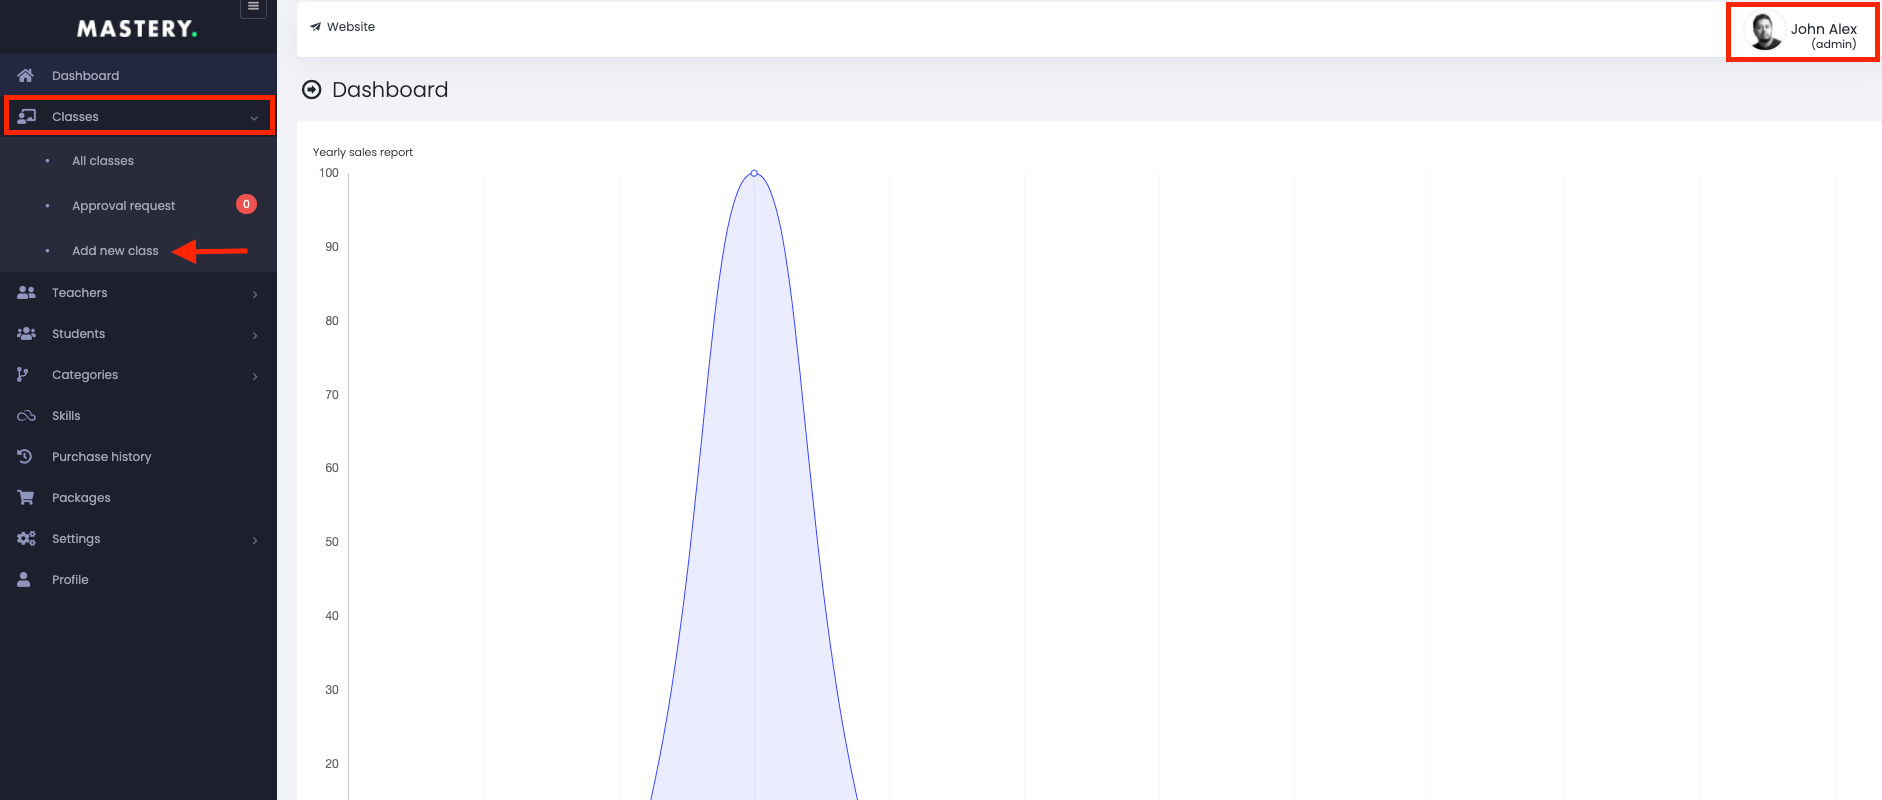
Figure 5. Mastery LMS Adding New Class
In this panel, you can create a new class for the student. For this, you have to provide:
- Class title
- Category
- level
- Skills (You can add more than one skill)
- Highlight the class (You can consider your as free/subscription-based, mark as featured, recommended on the website, or add the class as a home page slider)
- Class thumbnail (You can select from your device)
- Class banner (You can select from your device)
- Short description
- Long description
After providing the information, you have to select the "Save and next" button to save your data.
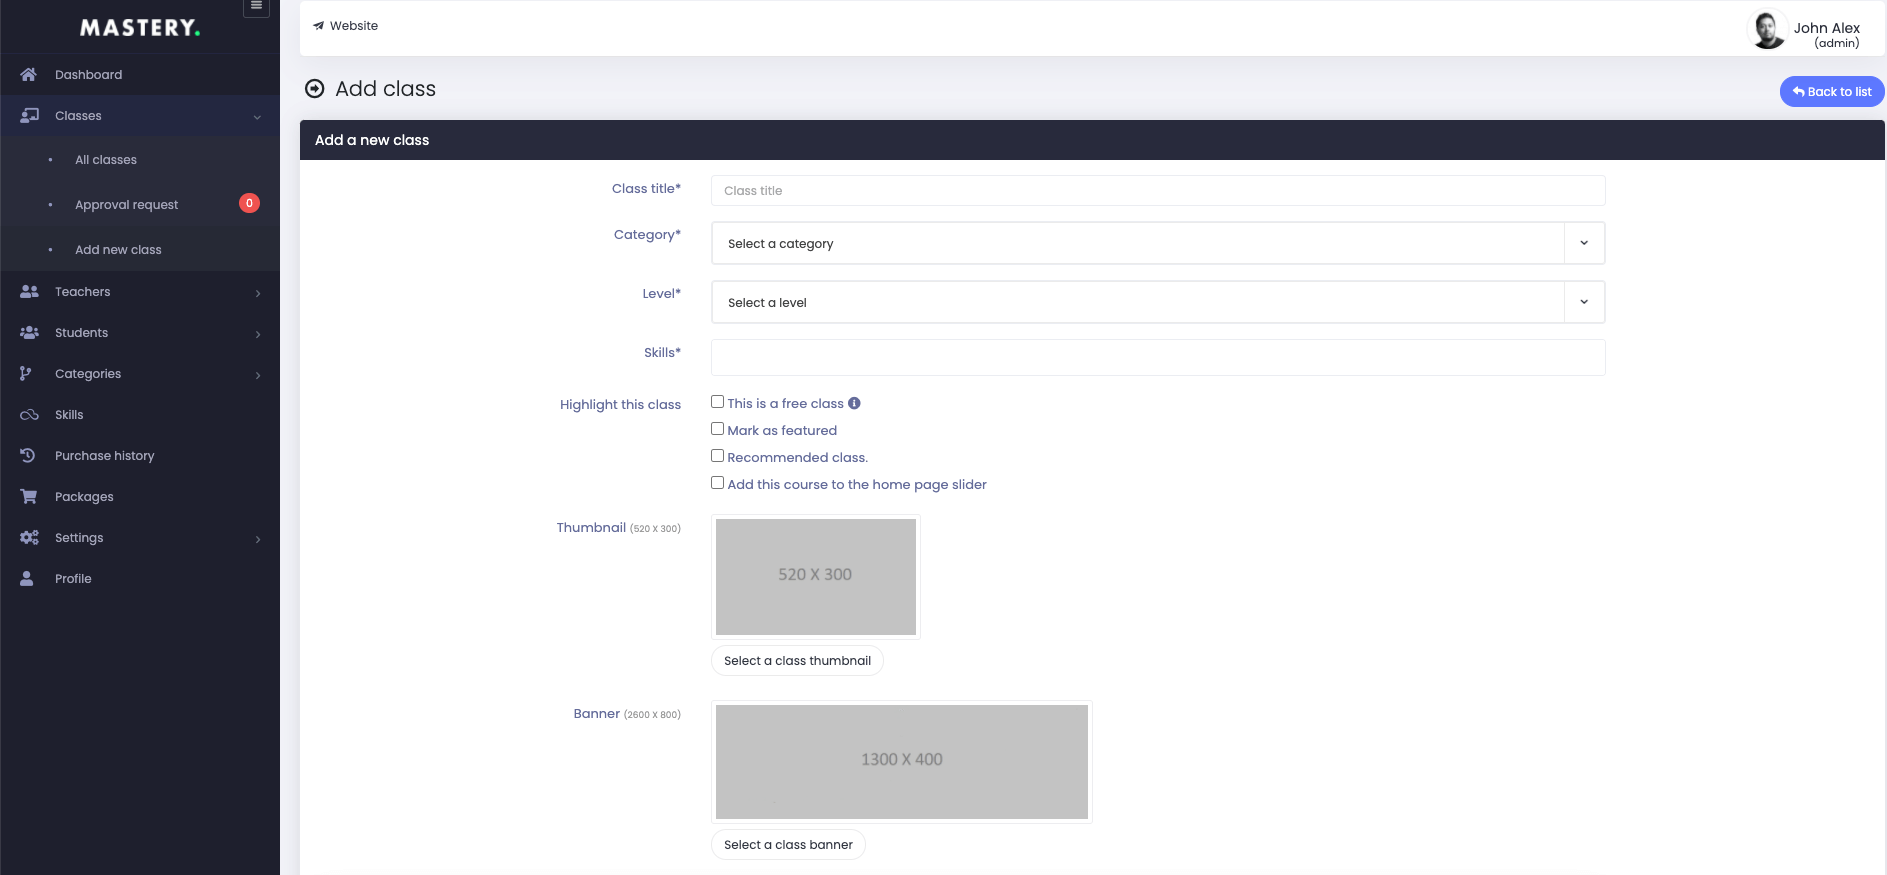

Figure 6. Mastery LMS Saving New Class
Teacher Panel:
To create a class, you teachers have to navigate:
- Login to the teacher panel.
- Select the "Class" panel.
In this panel, they can manage:
- Class
- Lesson
- Activation status
- Overview class in the frontend
- Request admin for the class
To manage their published class, they have to follow the following steps below:
- Login to the teacher panel.
- Select the "Class" option from the left menu.
- Choose the "All classes" option from the sub-menu.
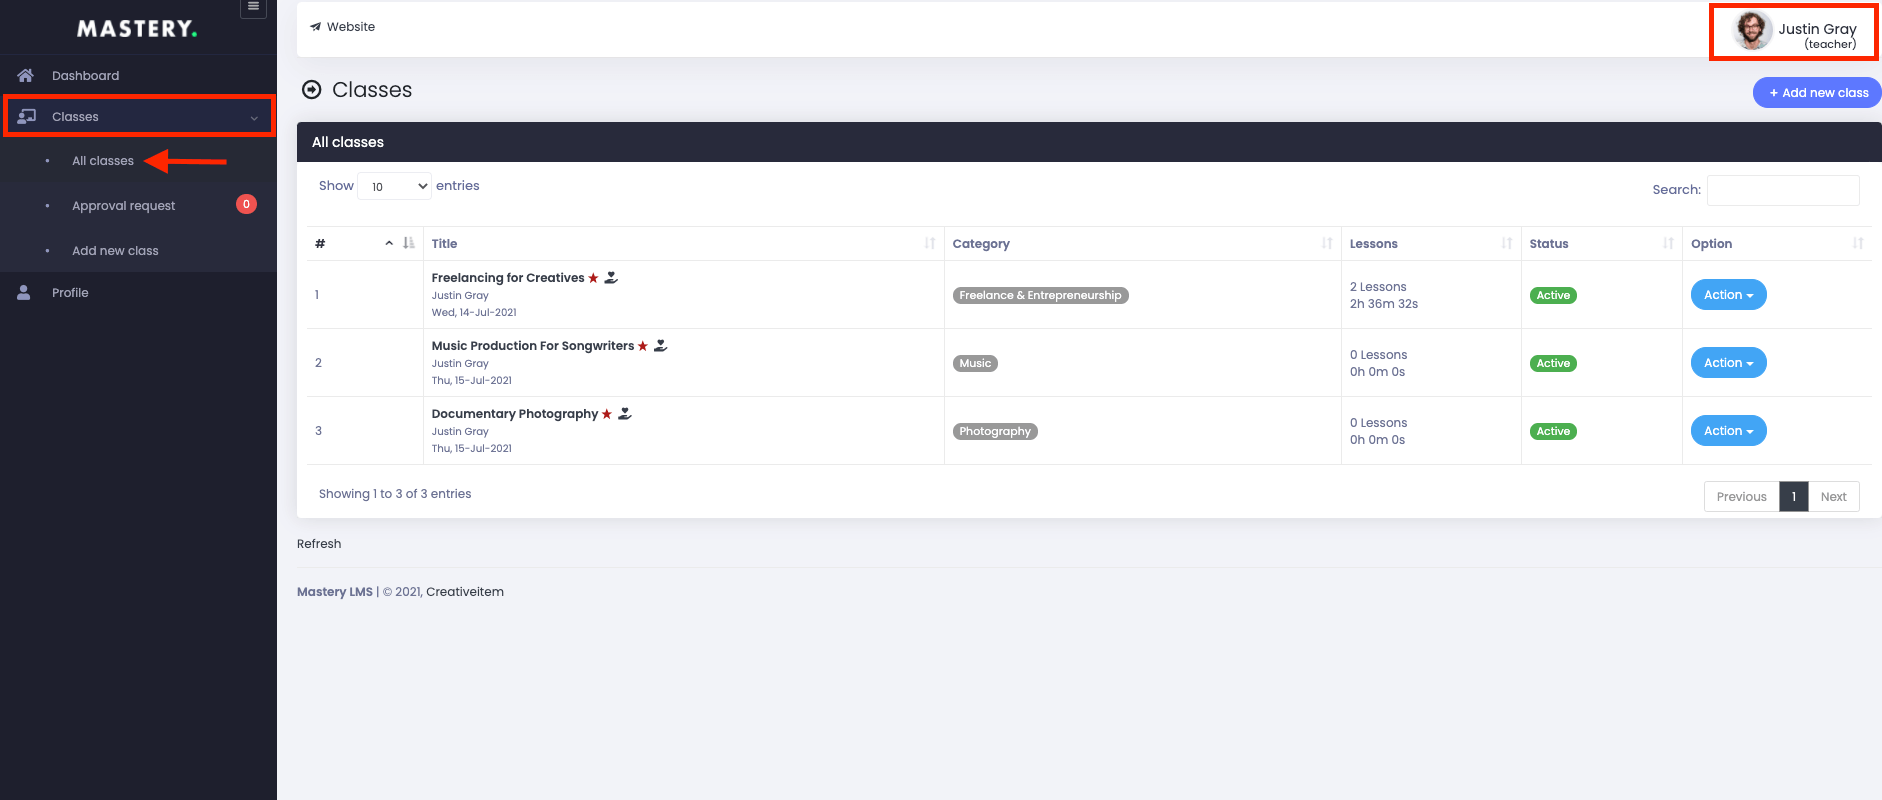
Figure 7. Mastery LMS All Classes (Instructor)
Here, your teacher can overview your:
- Class title
- Category
- Lesson
- Status
- "Action" panel for more option
In the "Action" panel, they can:
- View class in frontend
- Update class
- Change activation status
- Delete the class

Figure 8. Mastery LMS Class Options (Instructor)
To overview your teacher's class in the frontend, they have to click the "View in frontend" button from "Action."
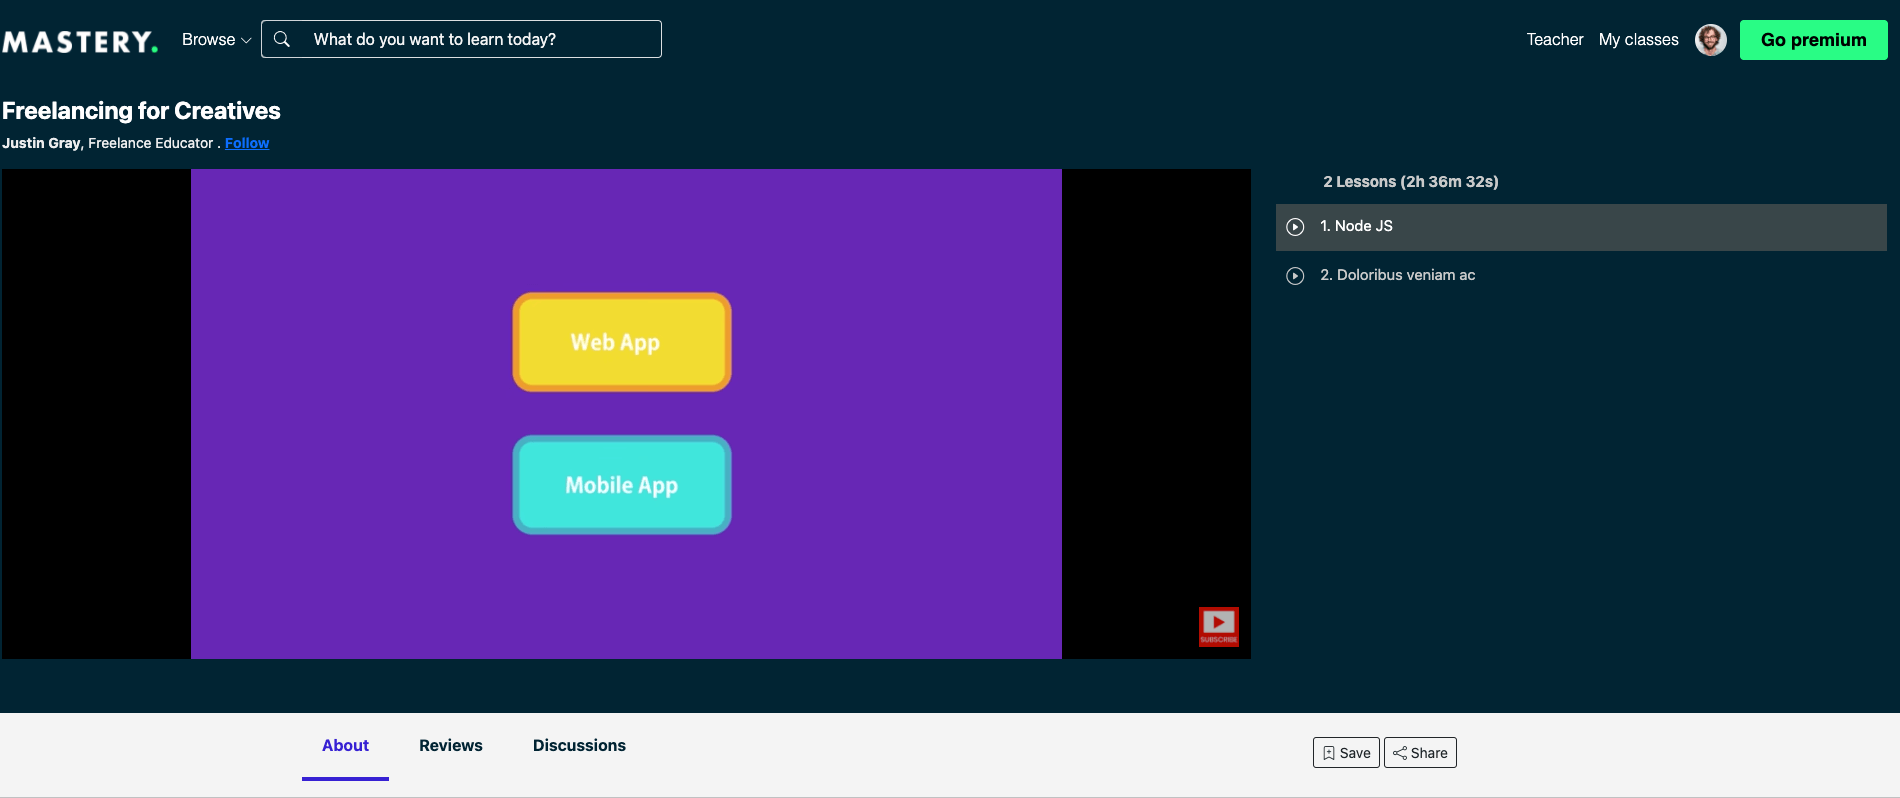
Figure 9. Mastery LMS Class Frontend (Instructor)
Here, your teachers can preview:
- Class
- Lesson
- Class summary
- Class discussion
- "Save" and "Share" option
To update the class, they have to navigate:
- Select the "Manage class" button from the "Acton" panel.
- Choose the "Class information" panel.
Now, your teacher has to provide the following information to update the class:
- Class title
- Category
- level
- Skills (They can add more than one skill)
- Highlight the class (They can consider your as free/subscription-based, mark as featured, recommended on the website, or add the class as a home page slider)
- Class thumbnail (They can select from your device)
- Class banner (They can select from your device)
- Short description
- Long description
After providing the information, your teachers have to select the "Save change" button to save your data.
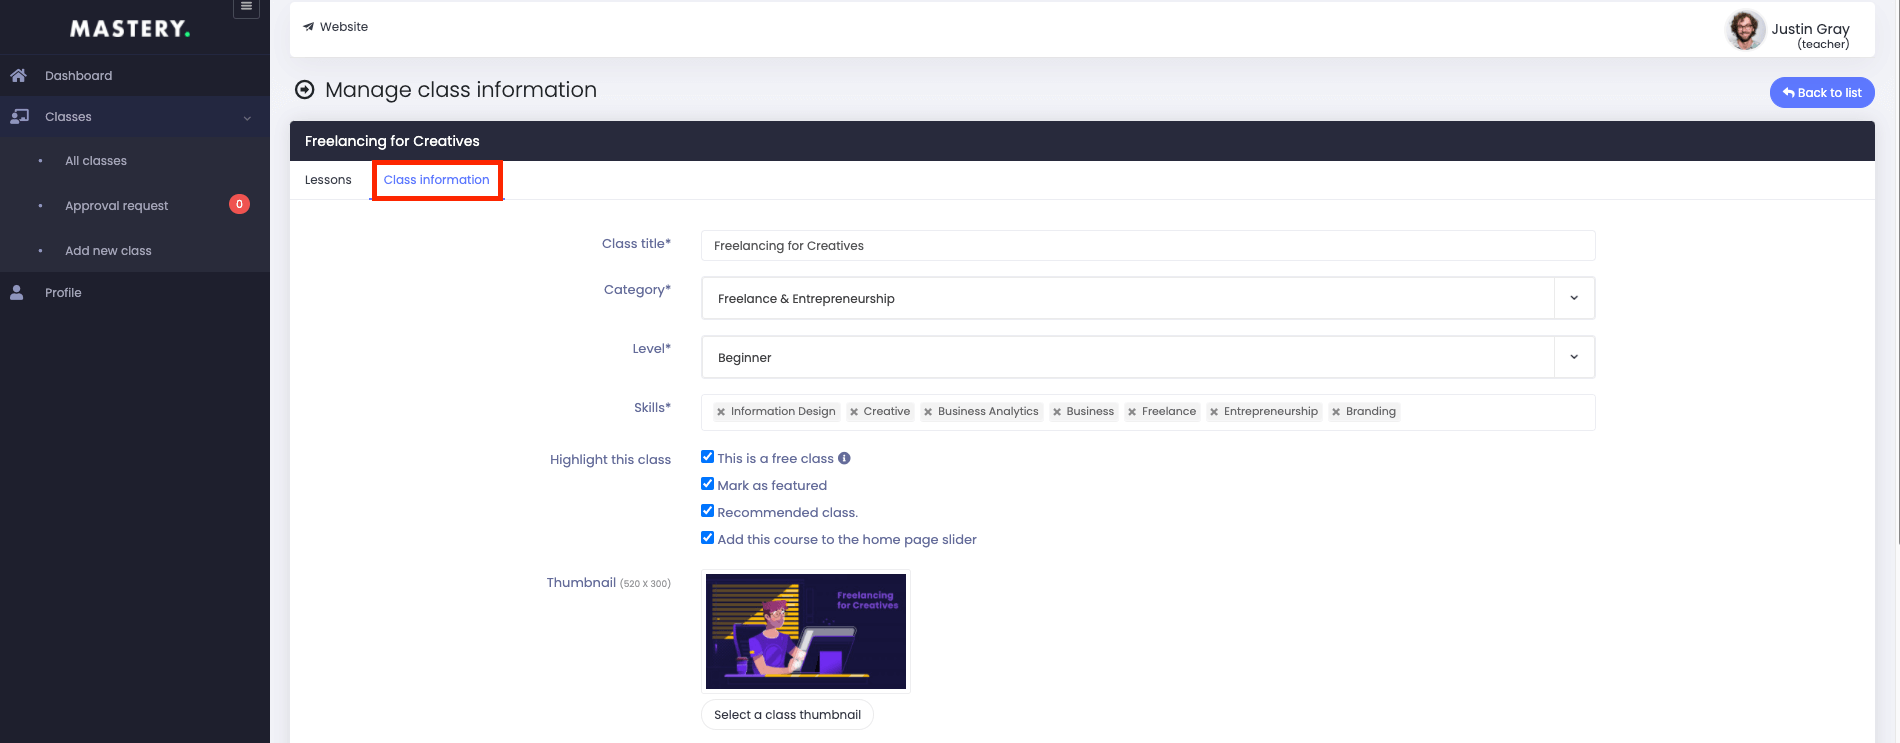

Figure 10. Mastery LMS Managing Class
Note: If your teachers add the class for free in the "highlight the class" option, all the lessons will be considered free.
To change the activation status of their class, they have to select:
- "Mark as active/inactive" button from the "All class" option.
- Click on the "Yes" button for confirmation.
To delete their class, they have to select the "Delete" button from "Action." Now, select the "Yes" button to confirm the action.
To add a new class in the Mastery, your teachers have to follow the steps:
- Login to the teacher panel.
- Select the "Class" panel.
- Choose the "Add new classes" panel.

Figure 11. Mastery LMS Adding New Class (Instructor)
In this panel, your teachers can create a new class for the student. For this, they have to provide:
- Class title
- Category
- level
- Skills (They can add more than one skill)
- Highlight the class (They can consider your as free/subscription-based, mark as featured, recommended on the website, or add the class as a home page slider)
- Class thumbnail (They can select from your device)
- Class banner (They can select from your device)
- Short description
- Long description
After providing the information, your teachers have to select the "Save and next" button to save their data.
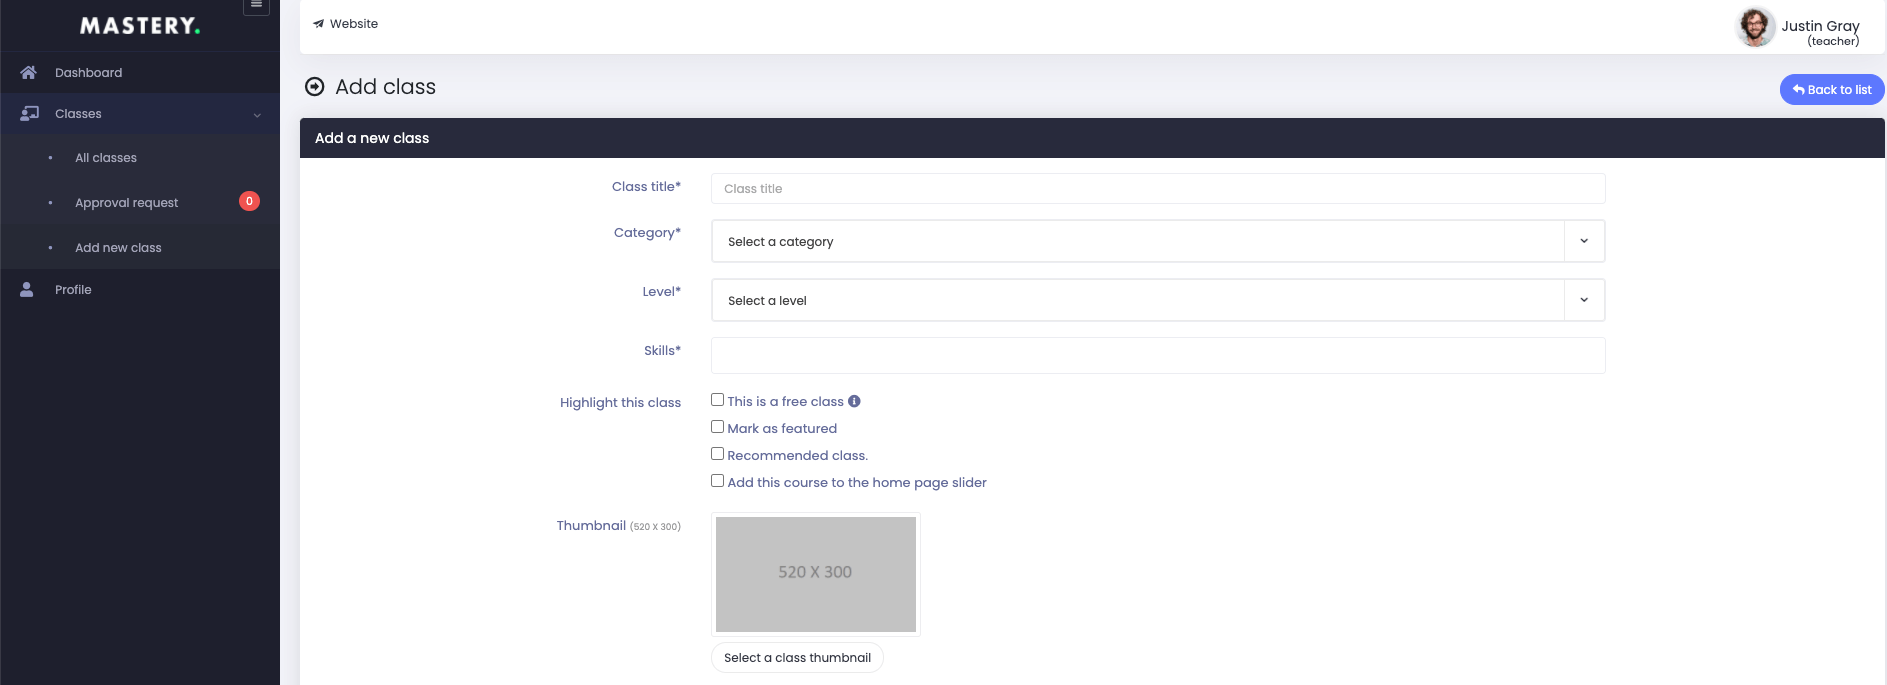

Figure 12. Mastery LMS Saving New Class (Instructor)
Note: After creating the class, their new class will be pending for admin's review. If the admin approves your request, the teacher's class will be ready for students.
Was this article helpful to you?
Contact us and we will get back to you as soon as possible

