Online course
In ekattor, you can enhance the feature of your school. You can add the online course to run your academic activities more efficiently. For this, you can use the "Online course" addon for this feature. As a superadmin, you can create, modify or delete the course, lesson, quiz, and assign instructors with this Addon.
To enhance this feature, you have to install this addon on your application. Now, you have to navigate:
- Before installing the process, we highly recommend you check your application version. For this, you have to navigate to the "About" section from the "Settings" button.
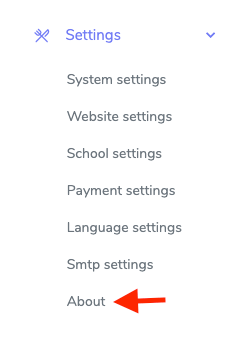
Figure 1. Ekattor ERP Checking Application Version
- If you are running the mentioned version, then you are ready to install this addon.
- Download the addon you want to install on your application from Codecanyon.
- Unzip the downloaded file.
- You will get two folders inside the file. One for documentation and the other for the addon folder.
- Do not try to remove or rename any folder.
- Go back to the application and log in as an admin.
- Select the "Back office" option from the left menu.
- Choose the "Addon manager" option from the sub-menu.
- Click on the "Add new addon."
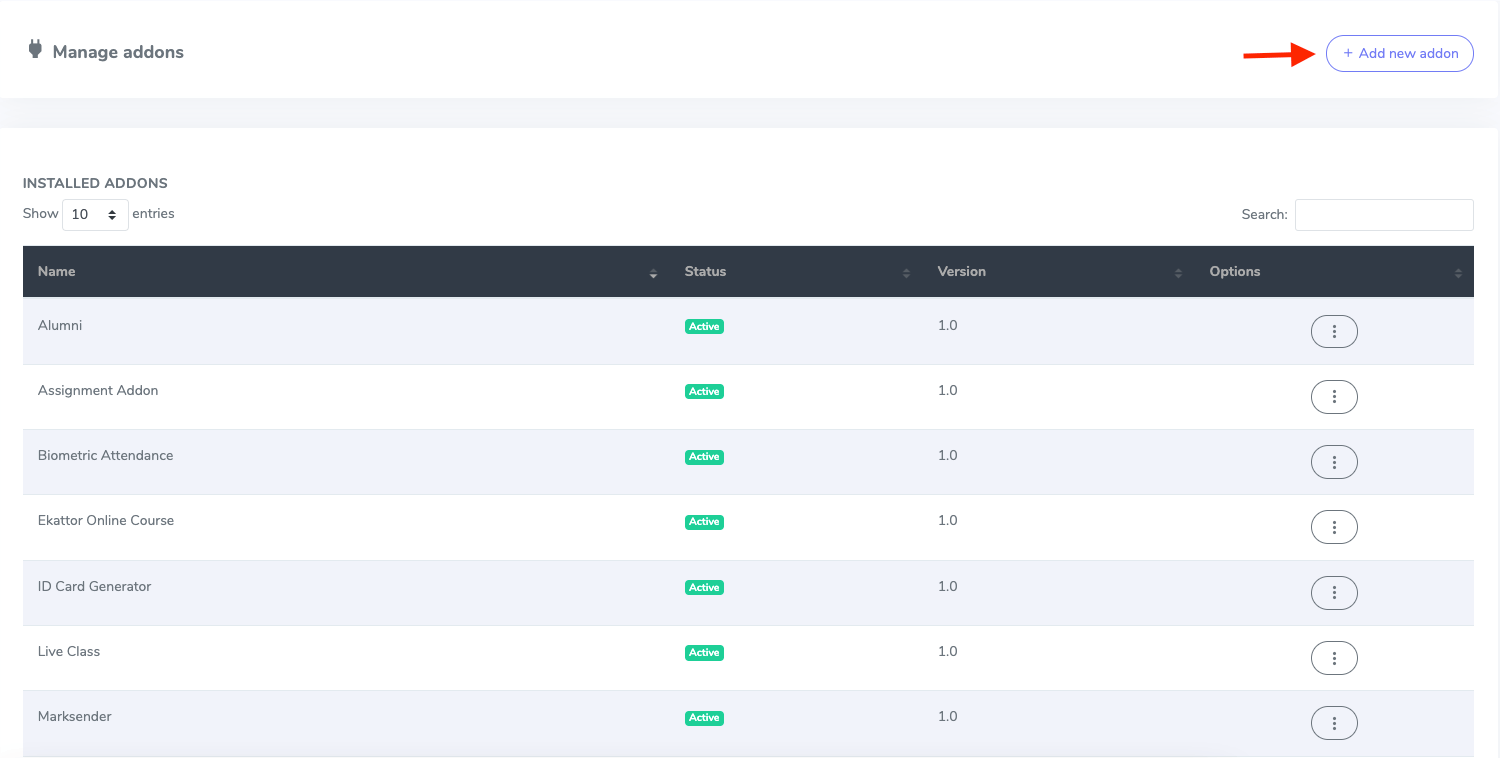
Figure 2. Ekattor ERP Adding New Addon
- Provide the purchase code.
- Upload the zip file from your device.
- Click on the "Install addon" button.
- You will get a success message notification.
Superadmin's Panel:
After installing the addon, as a superadmin, you have to navigate:
- Log in to the superadmin panel.
- Select the "Online course" option from the left menu.
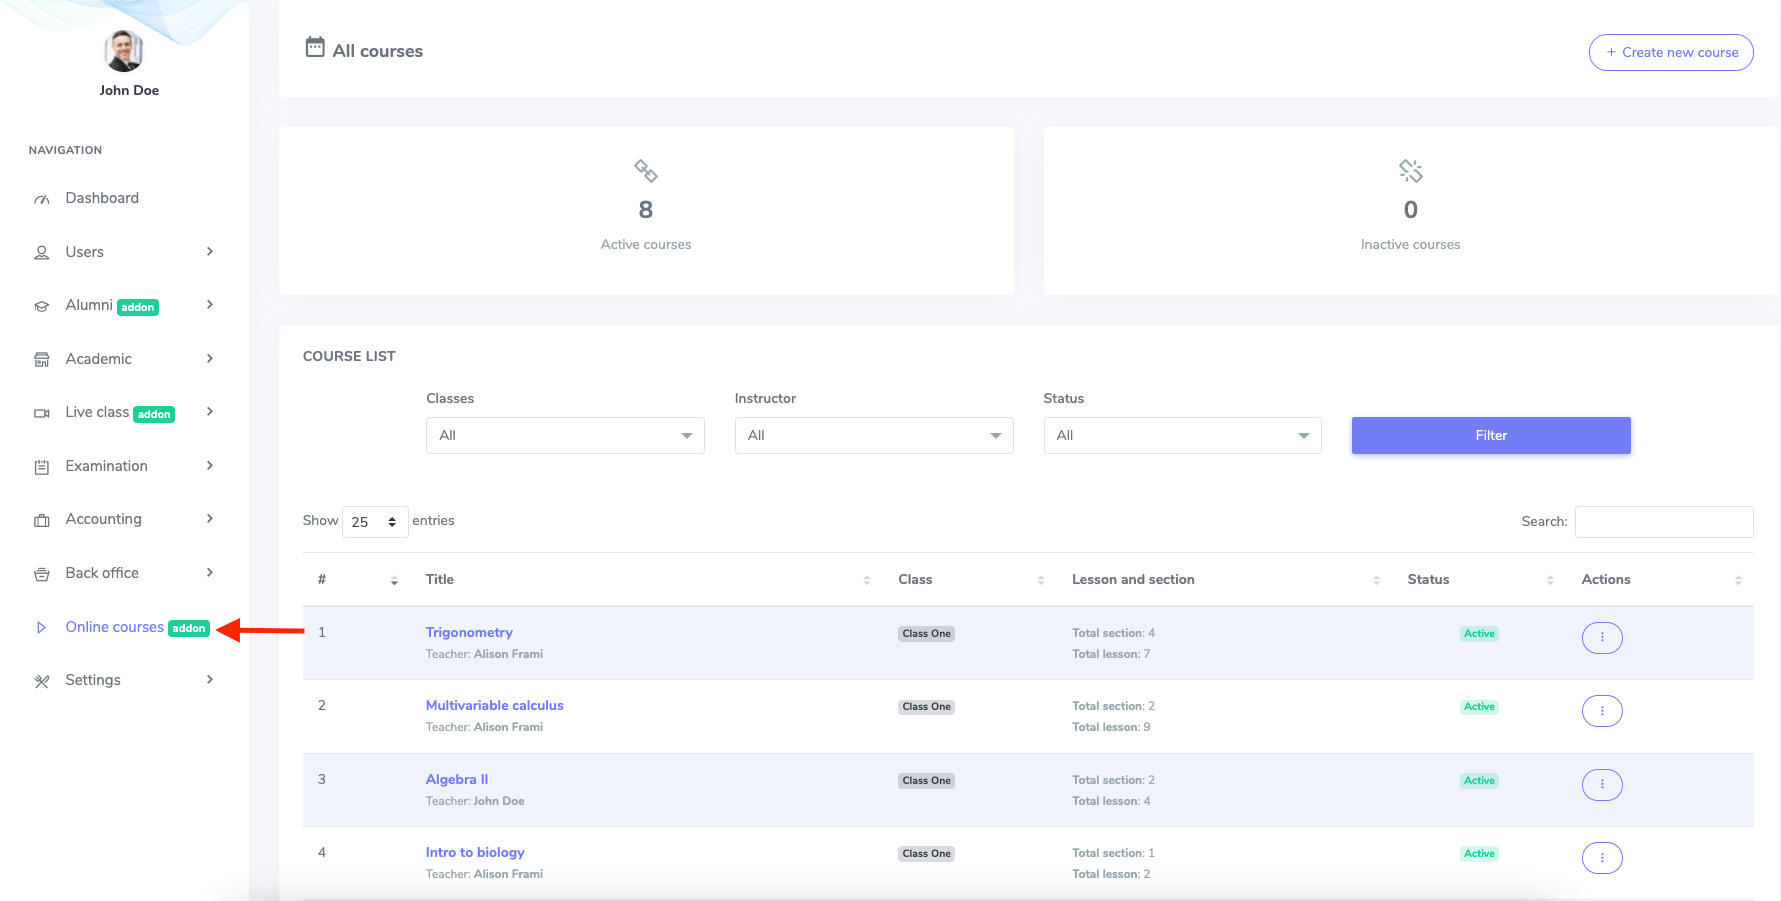
Figure 3. Ekattor ERP Online Course
To create a new online course, you have to select the "Select new course" button.
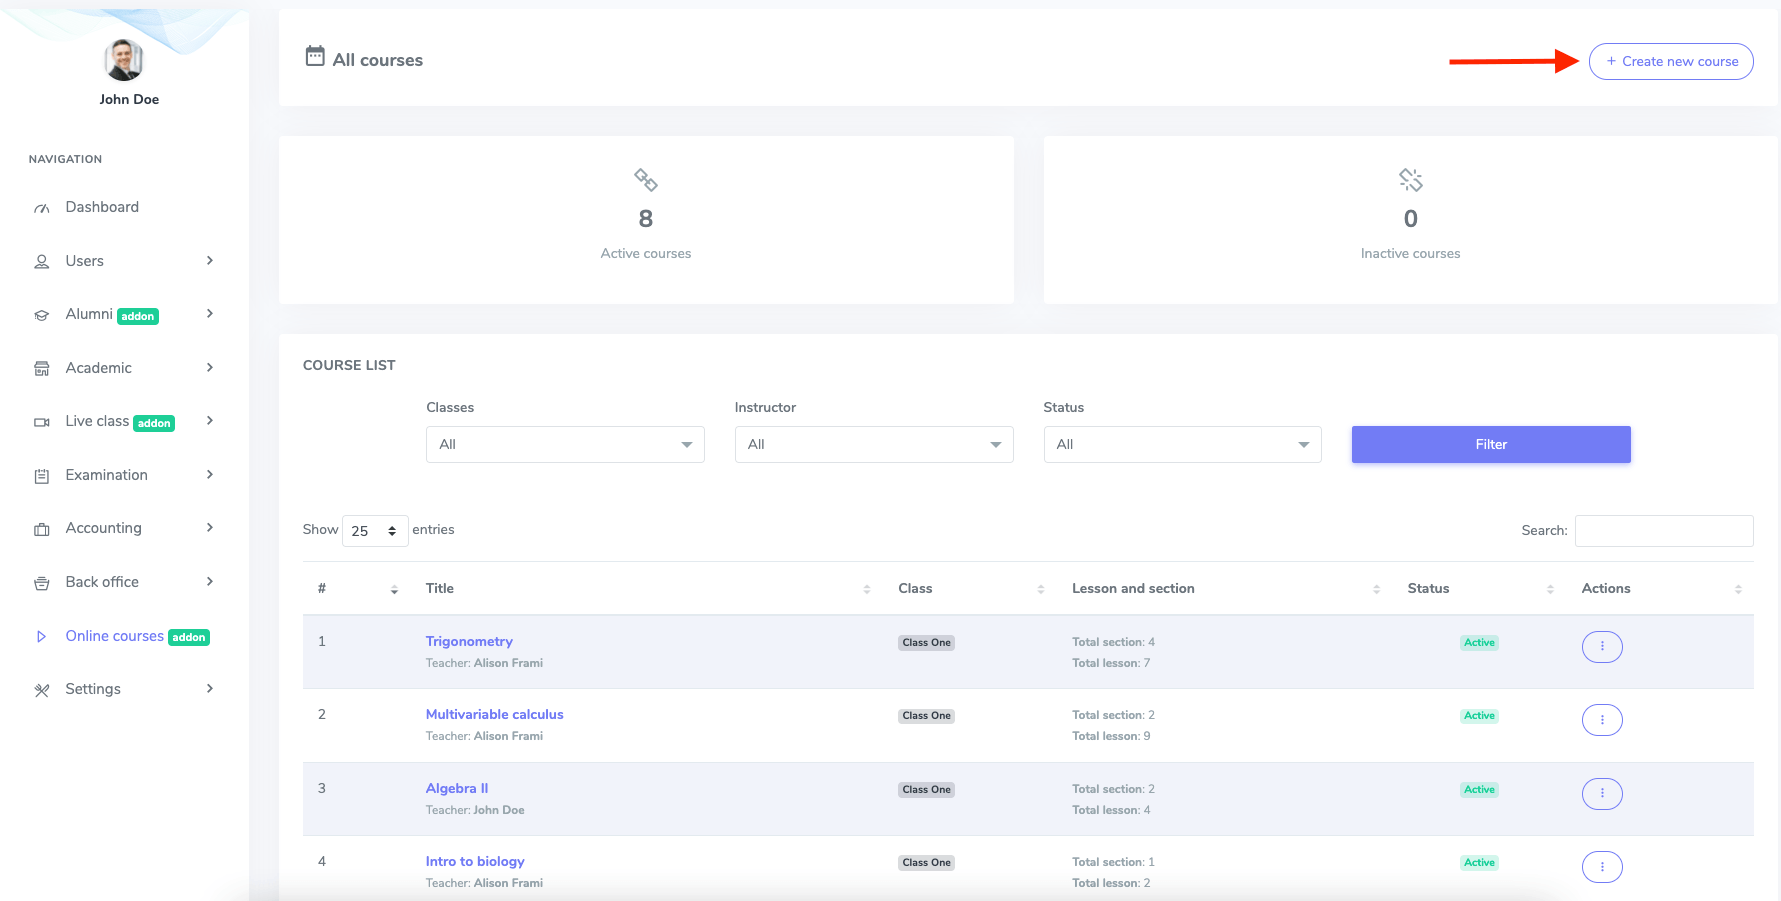
Figure 4. Ekattor ERP Creating a New Course
After that, you have to configure the "COURSE ADDING FORM". They are:
1. Basic:
In this form, you have to provide the basic information about your course. Here you have to provide:
- Course title
- Course description
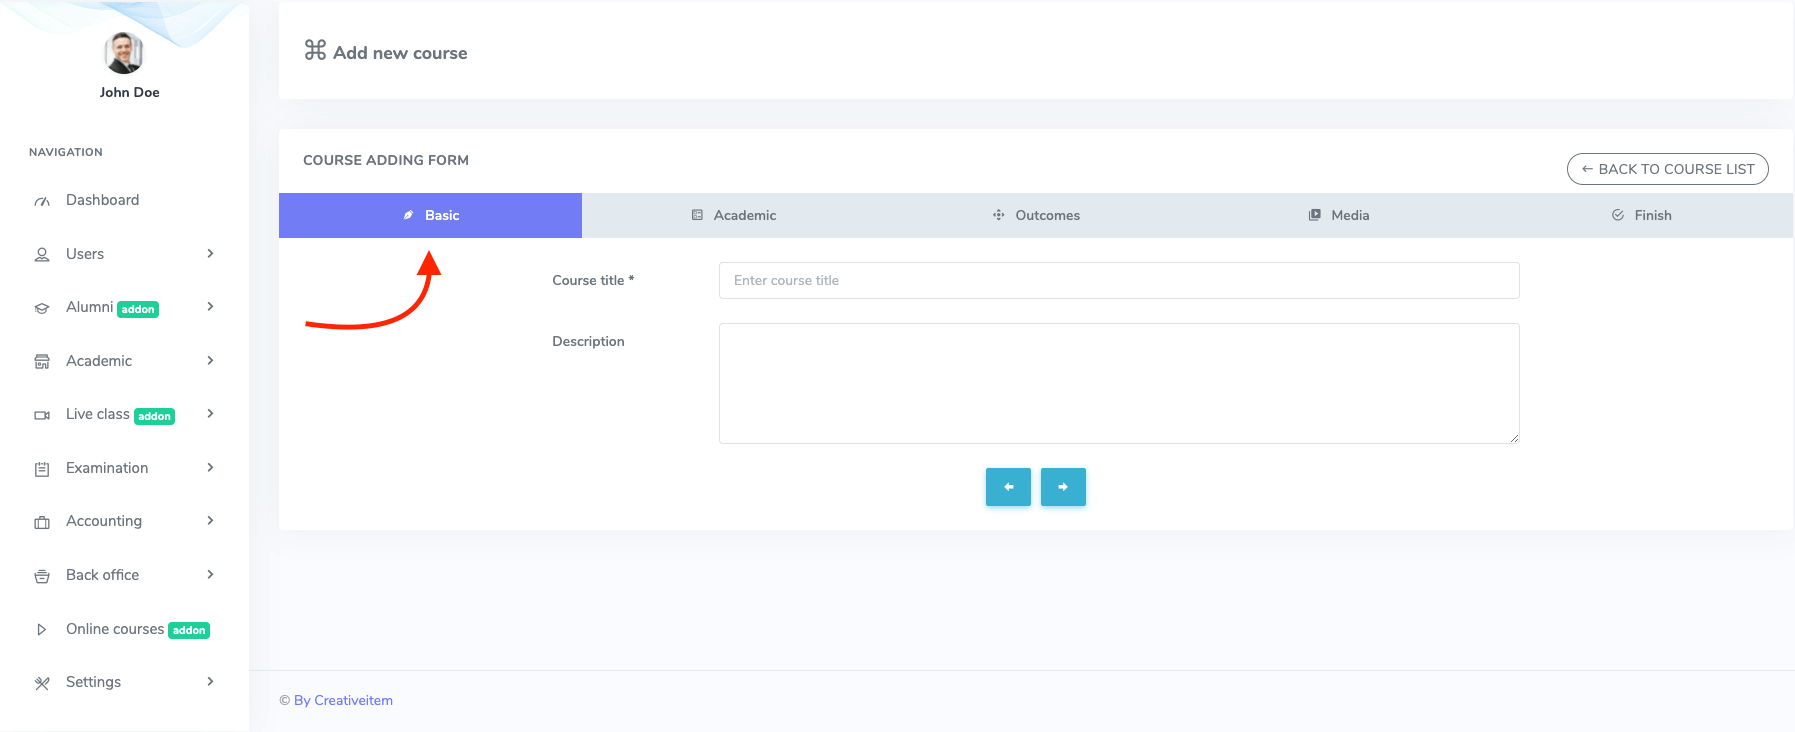
Figure 5. Ekattor ERP Basic Course Form
2. Academic:
After completing the basic information, you have to complete the academic form. Here, you have to select:
- Class
- Subject
- Instructor
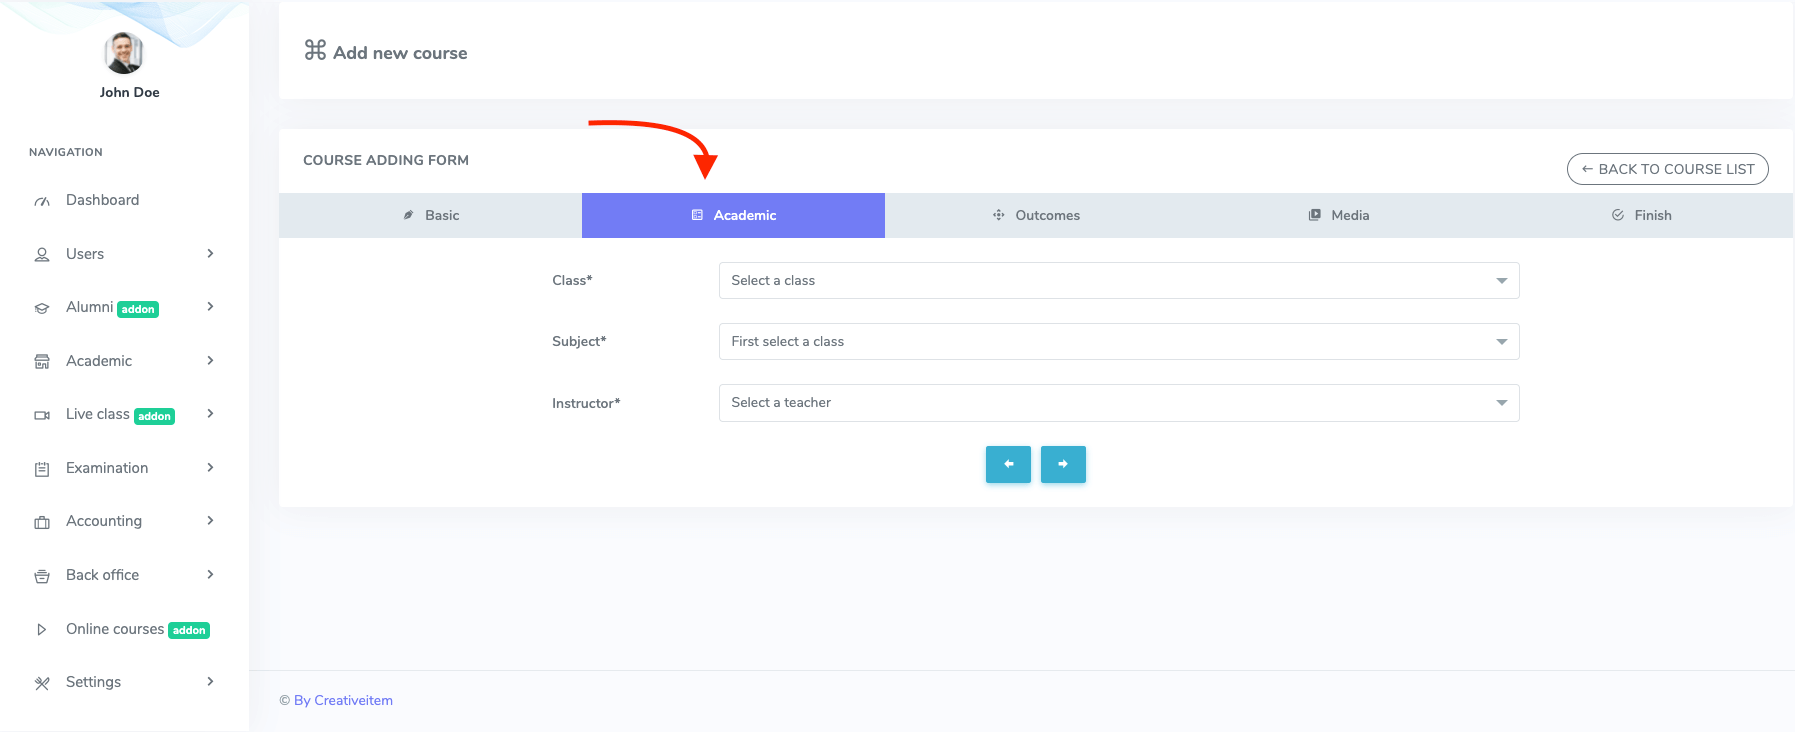
Figure 6. Ekattor ERP Academic Course Form
3. Outcome:
In this form, you have to describe the course. After that, you can move to the next record.
4. Media:
After completing the outcome, you have to complete the media form. Here, you have to provide:
- Course overview provider (You can play the course on Youtube, Vimeo, HTML5)
- Course overview URL
- Course thumbnail (You can select the image from your device)
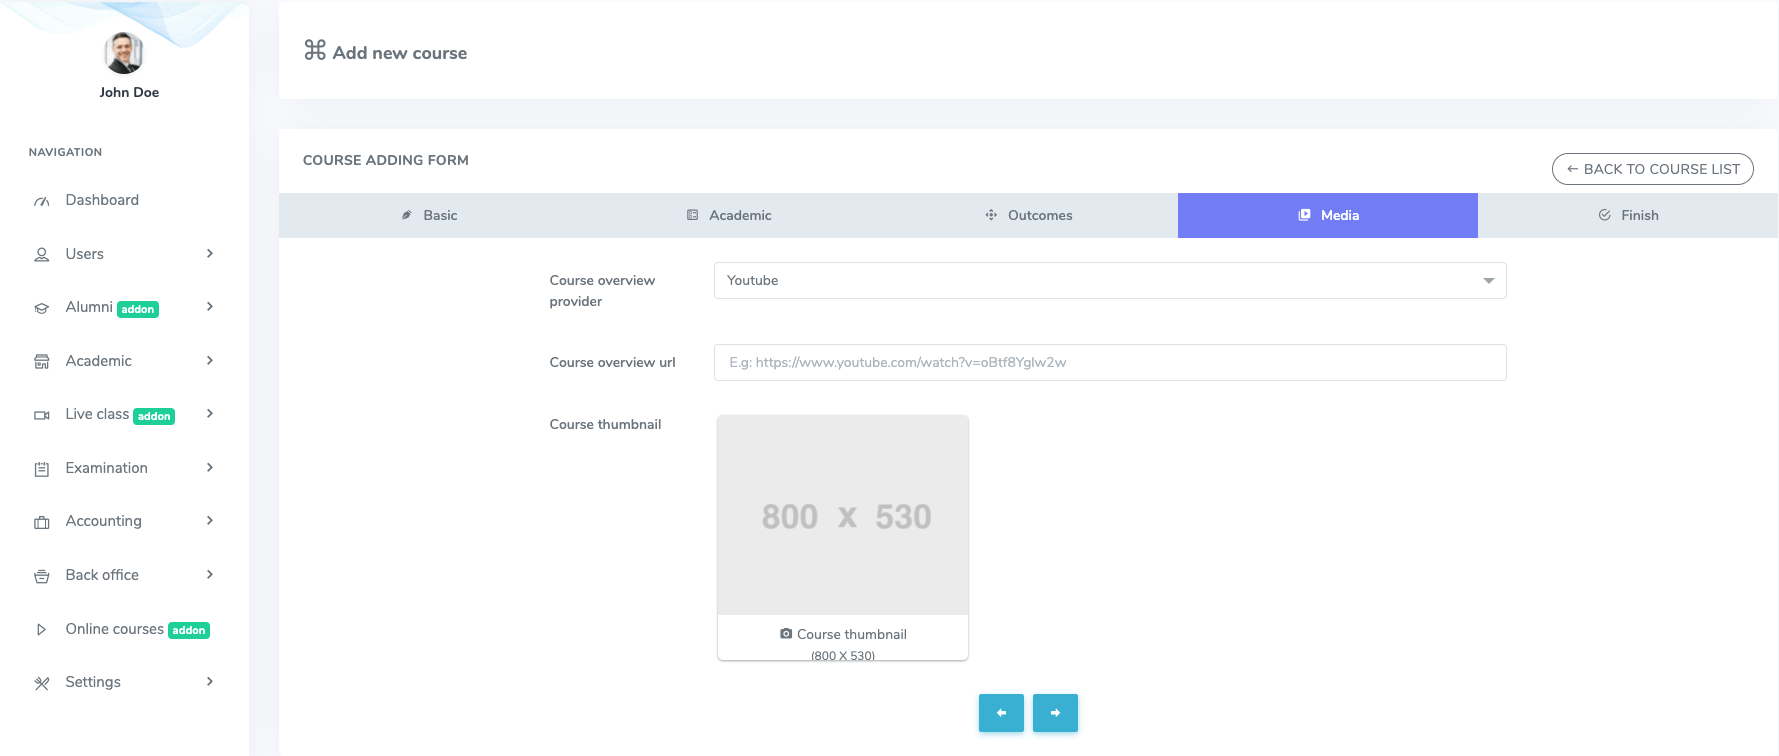
Figure 7. Ekattor ERP Media Course Form
After providing the data, you have to select the "Submit" button from the "Finish" option.
You can "Filter" the course by providing the required information. You can also overview:
- The course list
- The course title
- Lesson and section
- Lesson status
- "Action" bar
In this section, you can preview the course on fronter. For this, you have to select "View course on fronter."
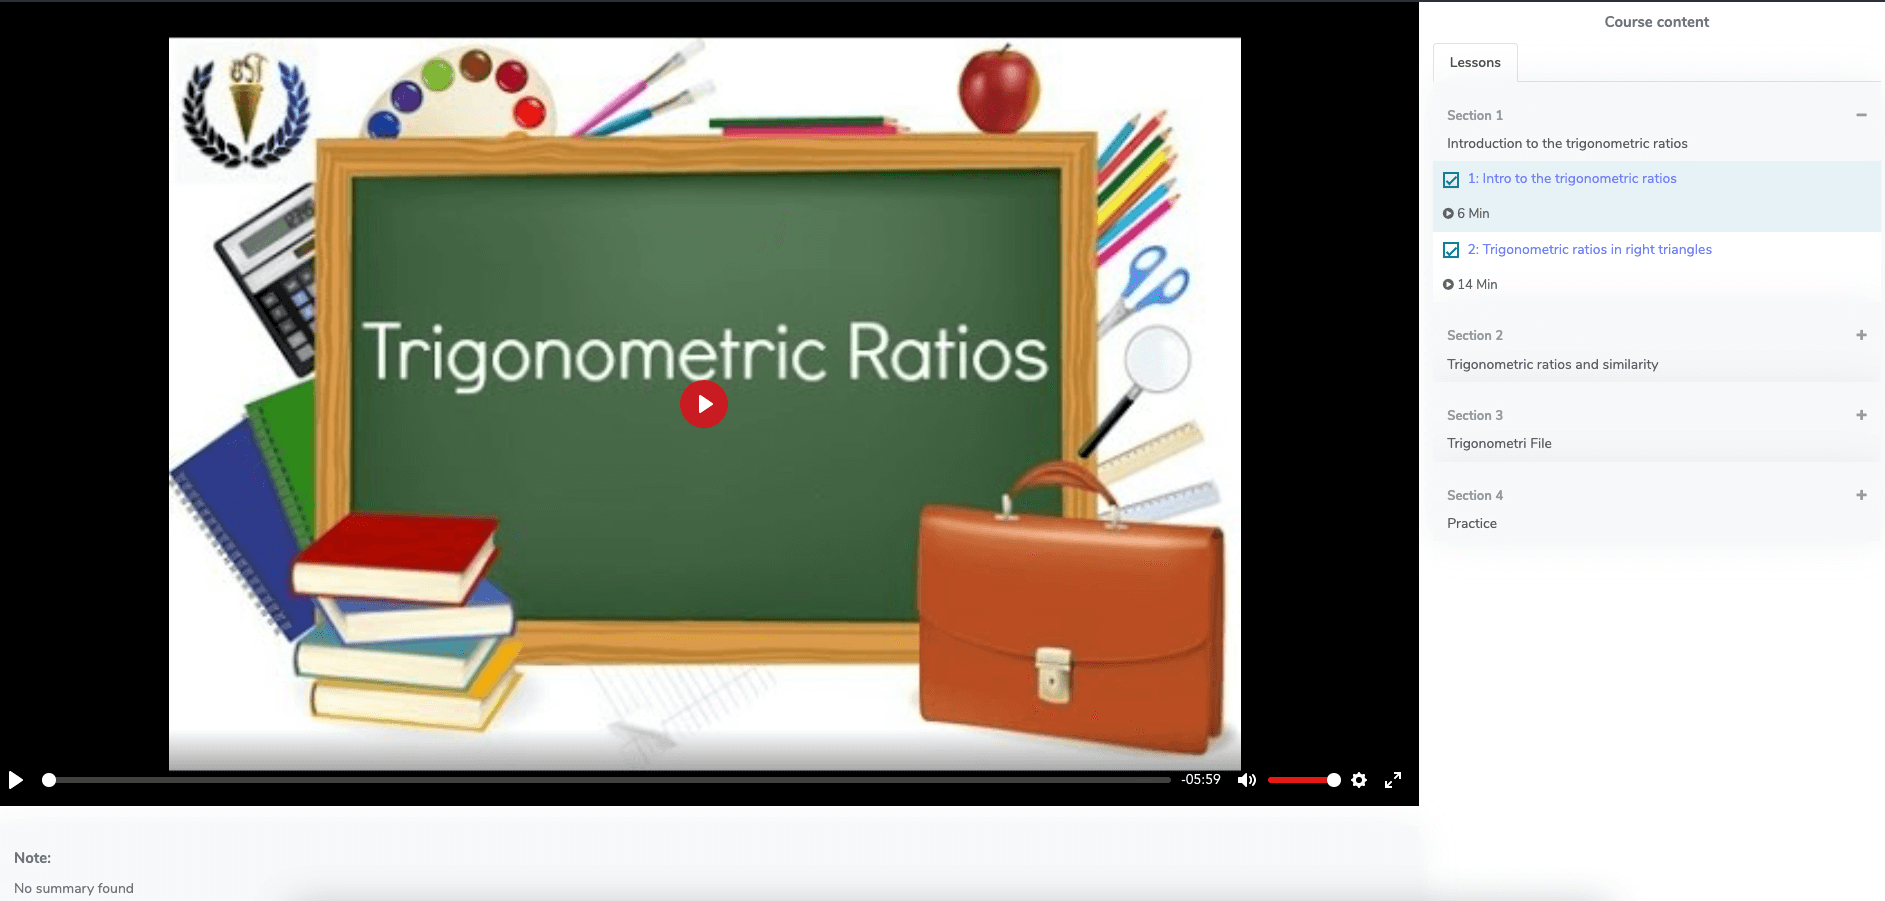
Figure 8. Ekattor ERP Course Frontend
To update and modify the course, you have to select the "Edit this course" from the "Action" button.
To update the course, you have to set the "COURSE EDITING FORM." They are:
1. Curriculum:
You can add a section in this panel. For this, you have to select the "Add section."
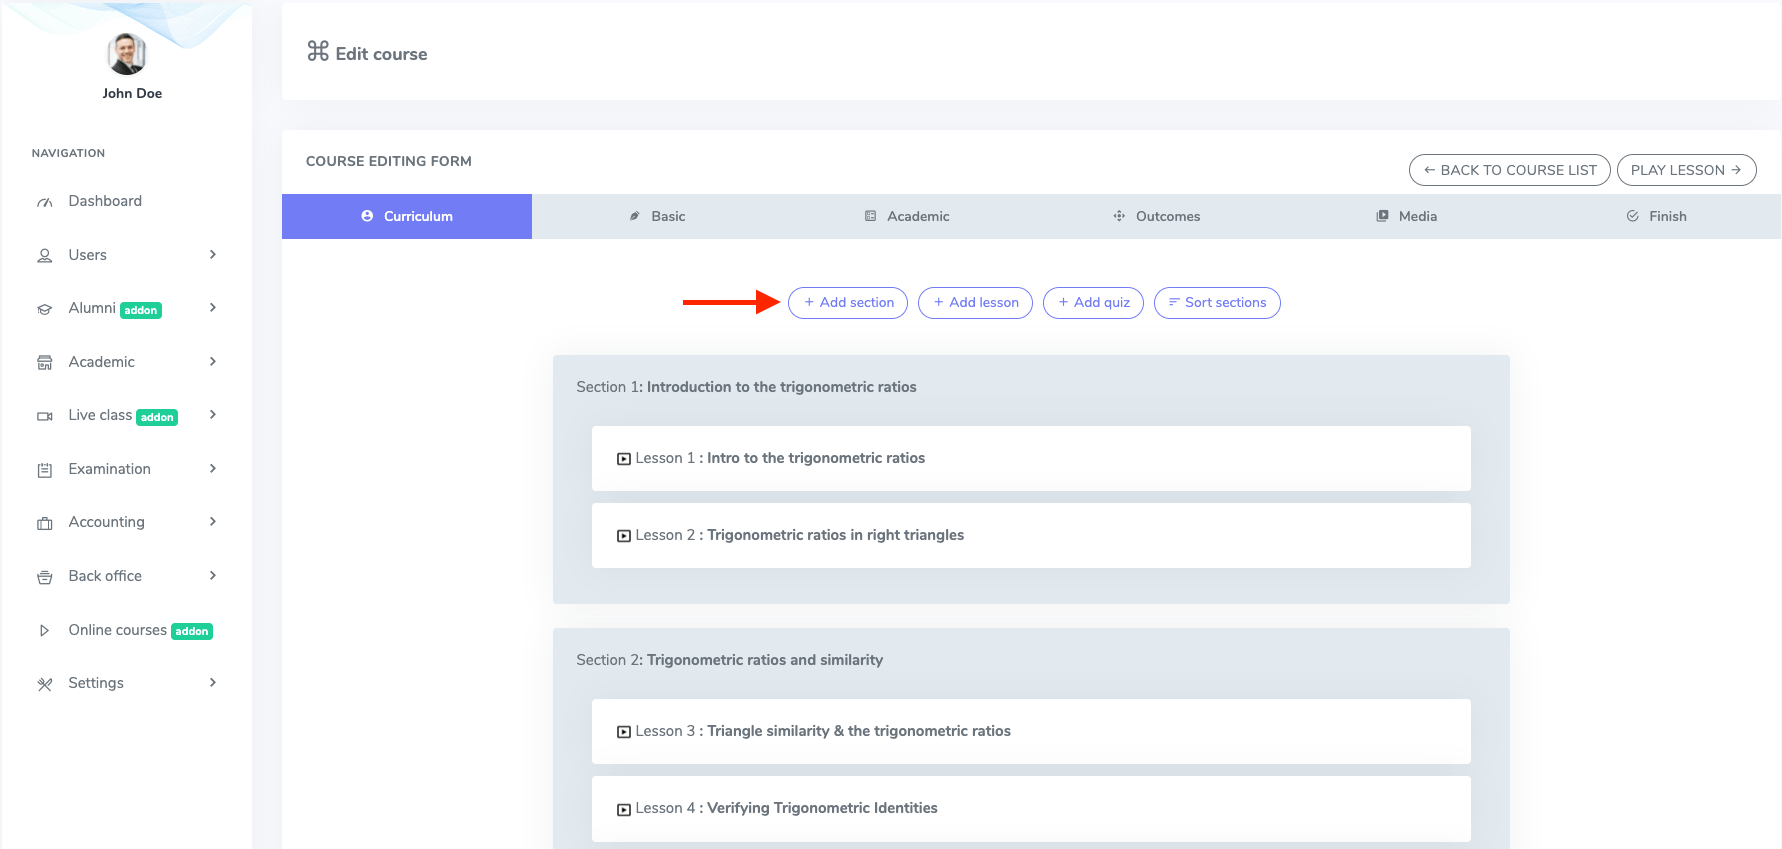
Figure 9. Ekattor ERP Adding Section
In this form, you have to provide a section name. Then, select the "Submit" button.
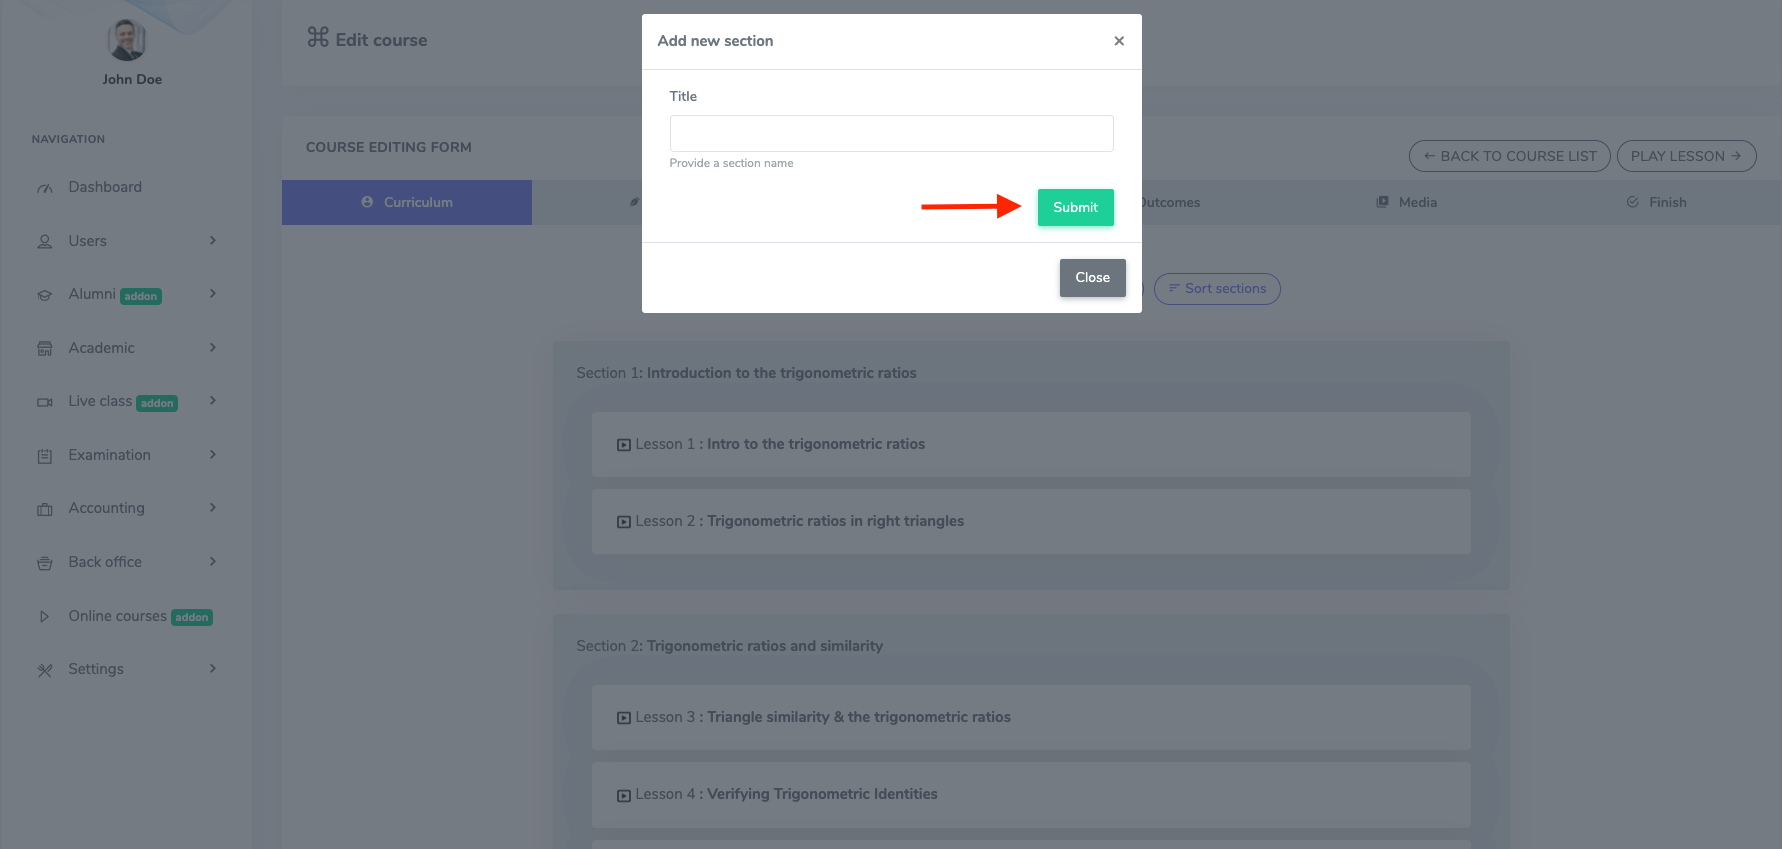
Figure 10. Ekattor ERP Submitting Section
To create a new lesson, you have to provide the required information and select the "Add lesson" button.
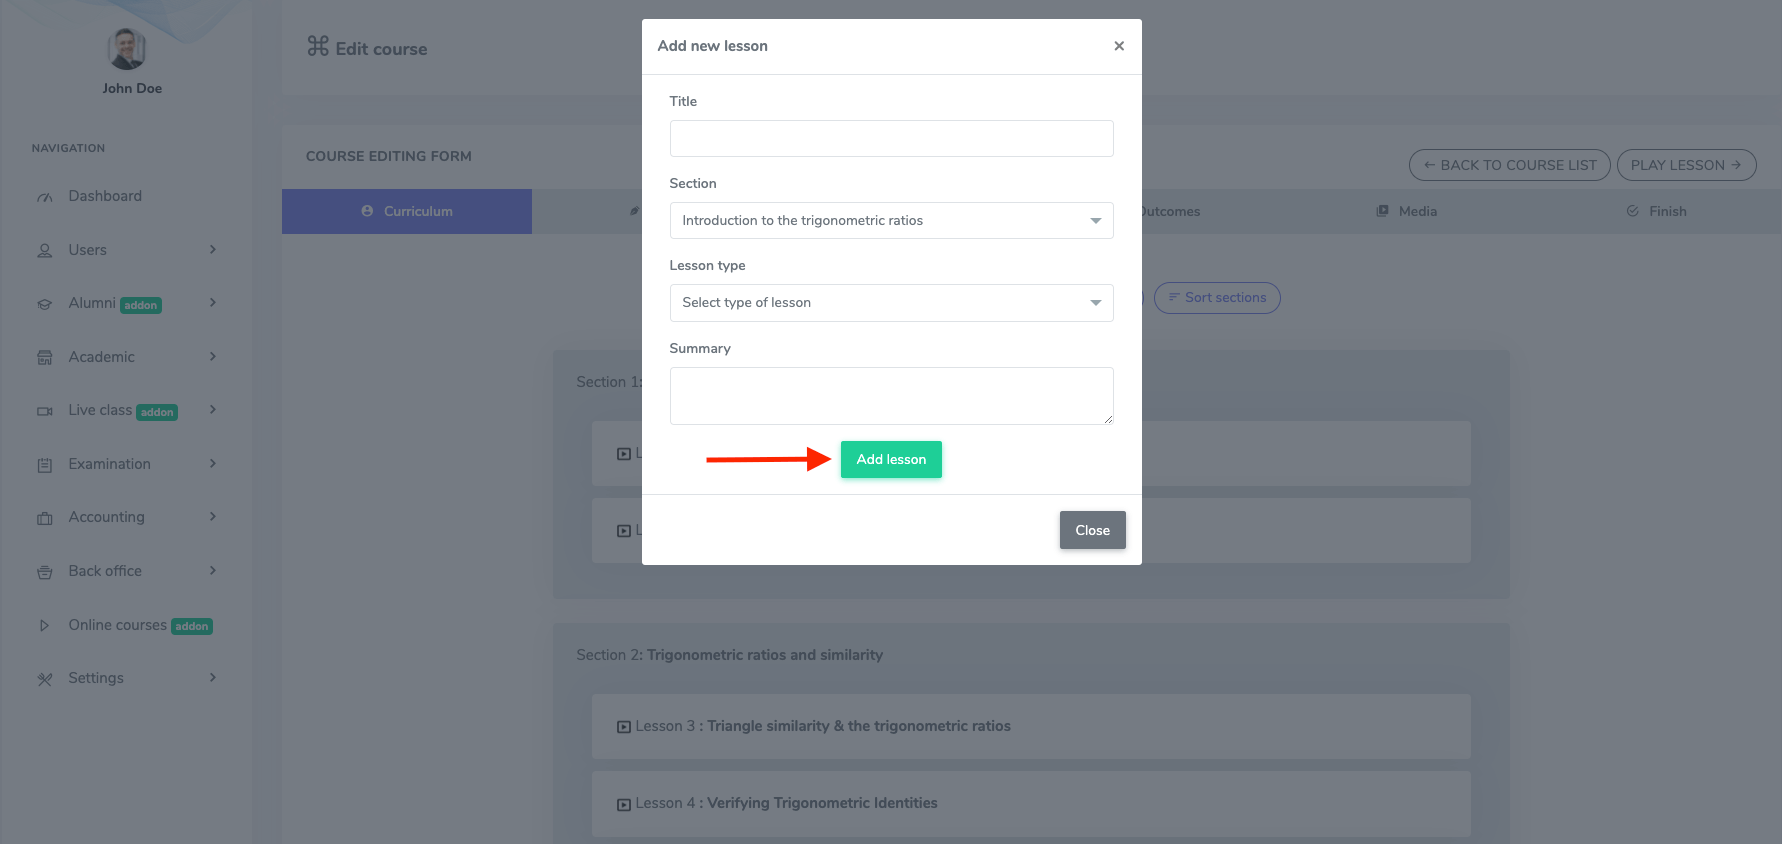
Figure 11. Ekattor ERP Adding Lesson-1
In this form, you have to provide:
- Lesson title
- Section
- Lesson type(You can select the different kinds of platforms)
- Lesson summary
After that, select the "Add lesson" button.
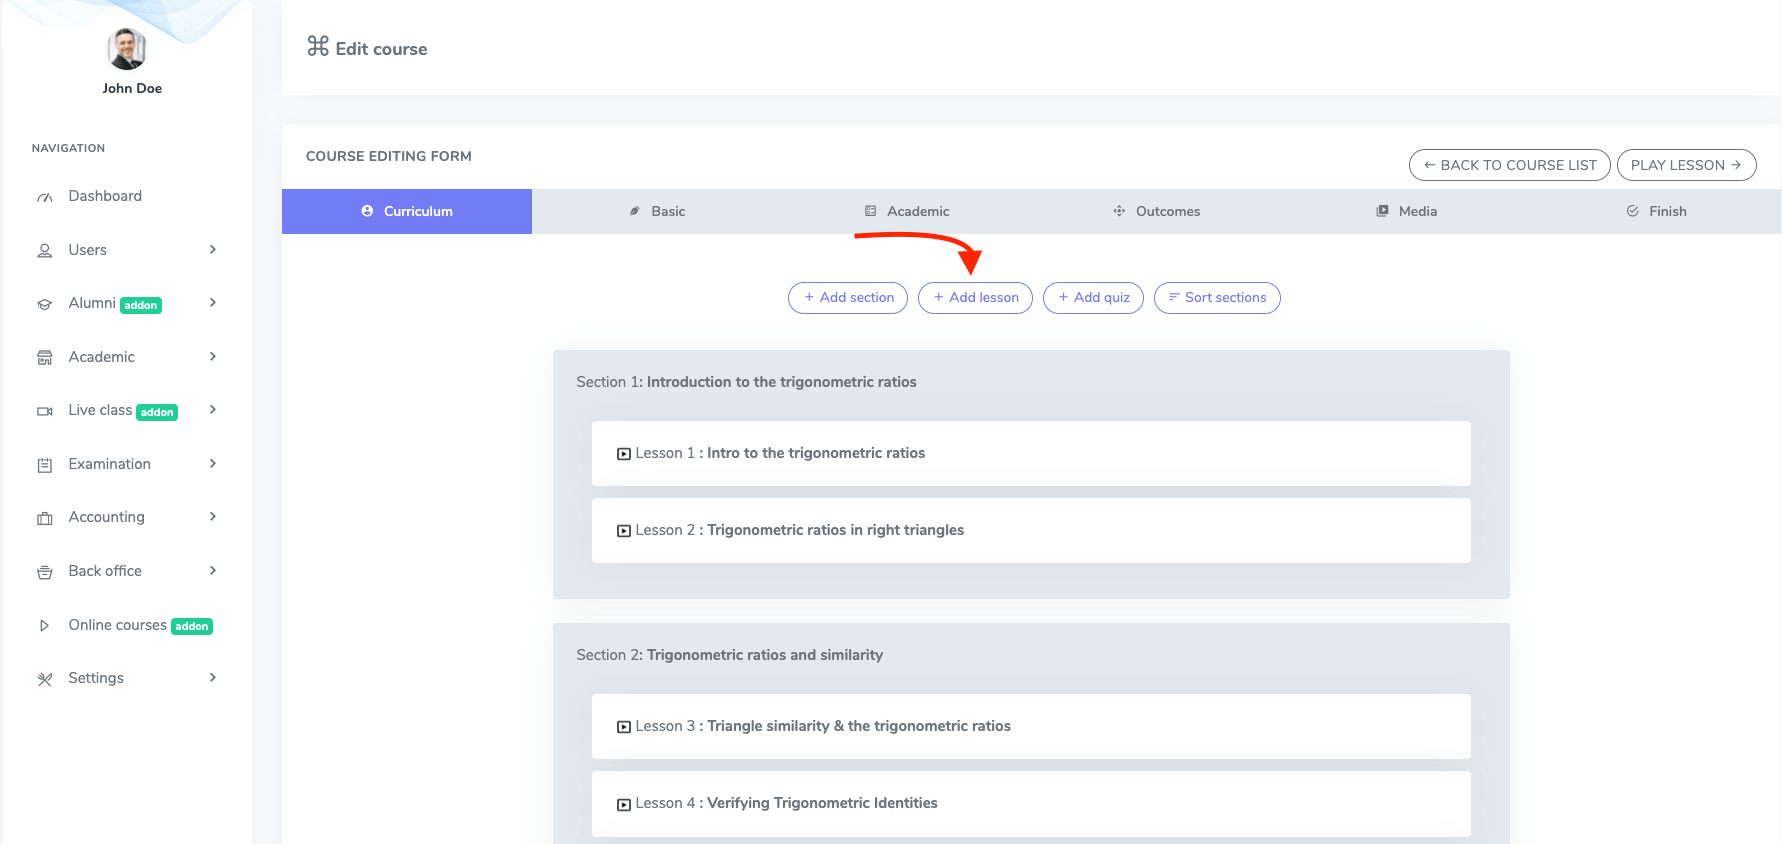
Figure 12. Ekattor ERP Adding Lesson-2
You can also create and update the quiz. For this, you have to select the "Add quiz" button.
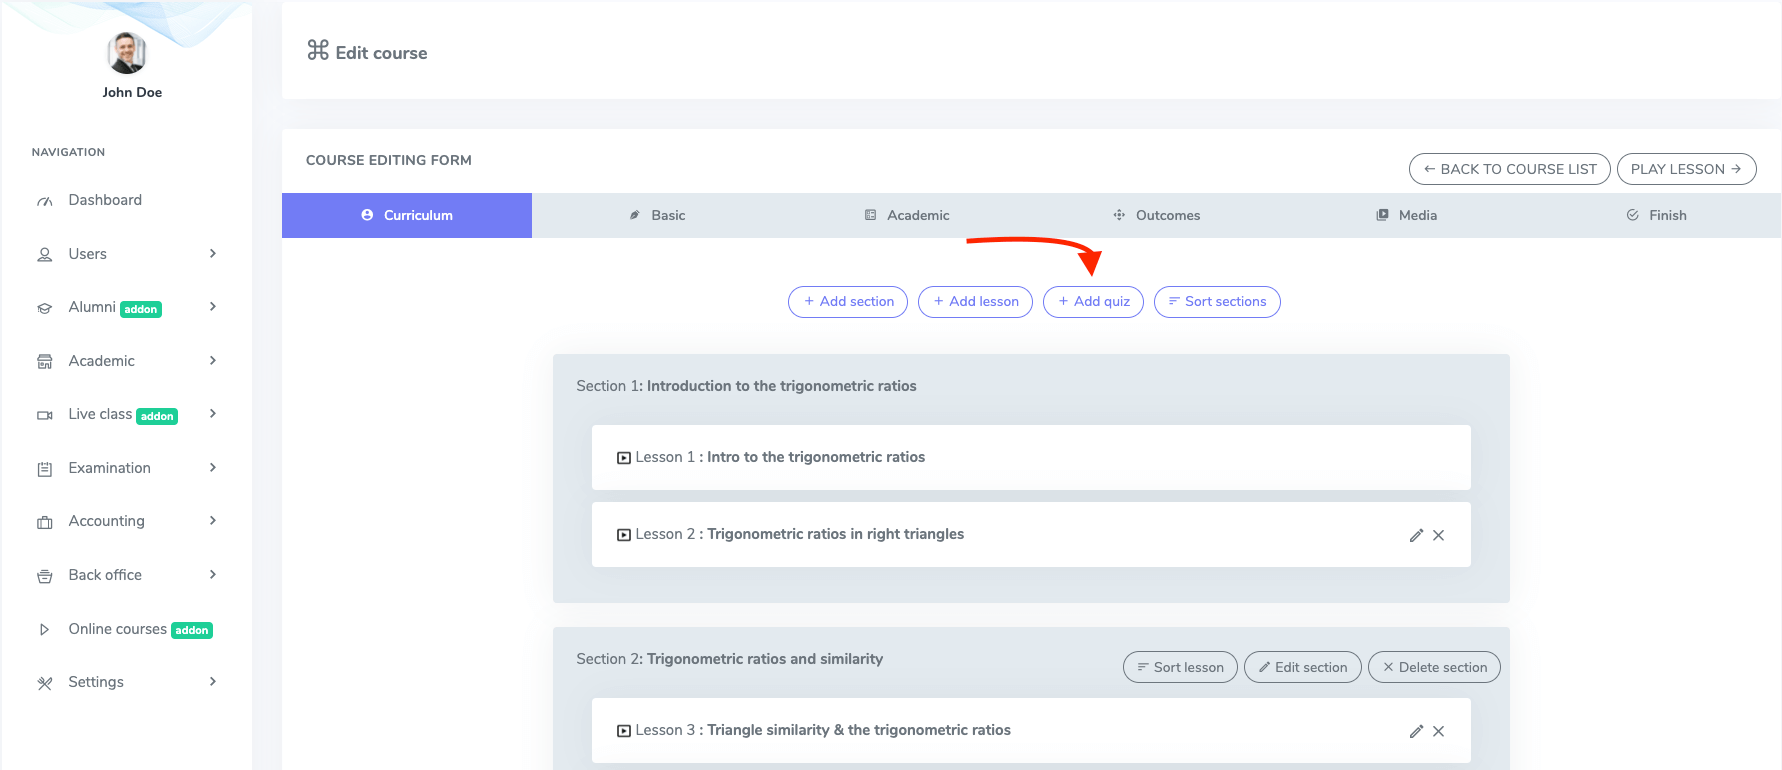
Figure 13. Ekattor ERP Adding Quiz
Now you have to provide:
- Quiz title
- Section
- Instruction
To save the update, select the "Submit" button.
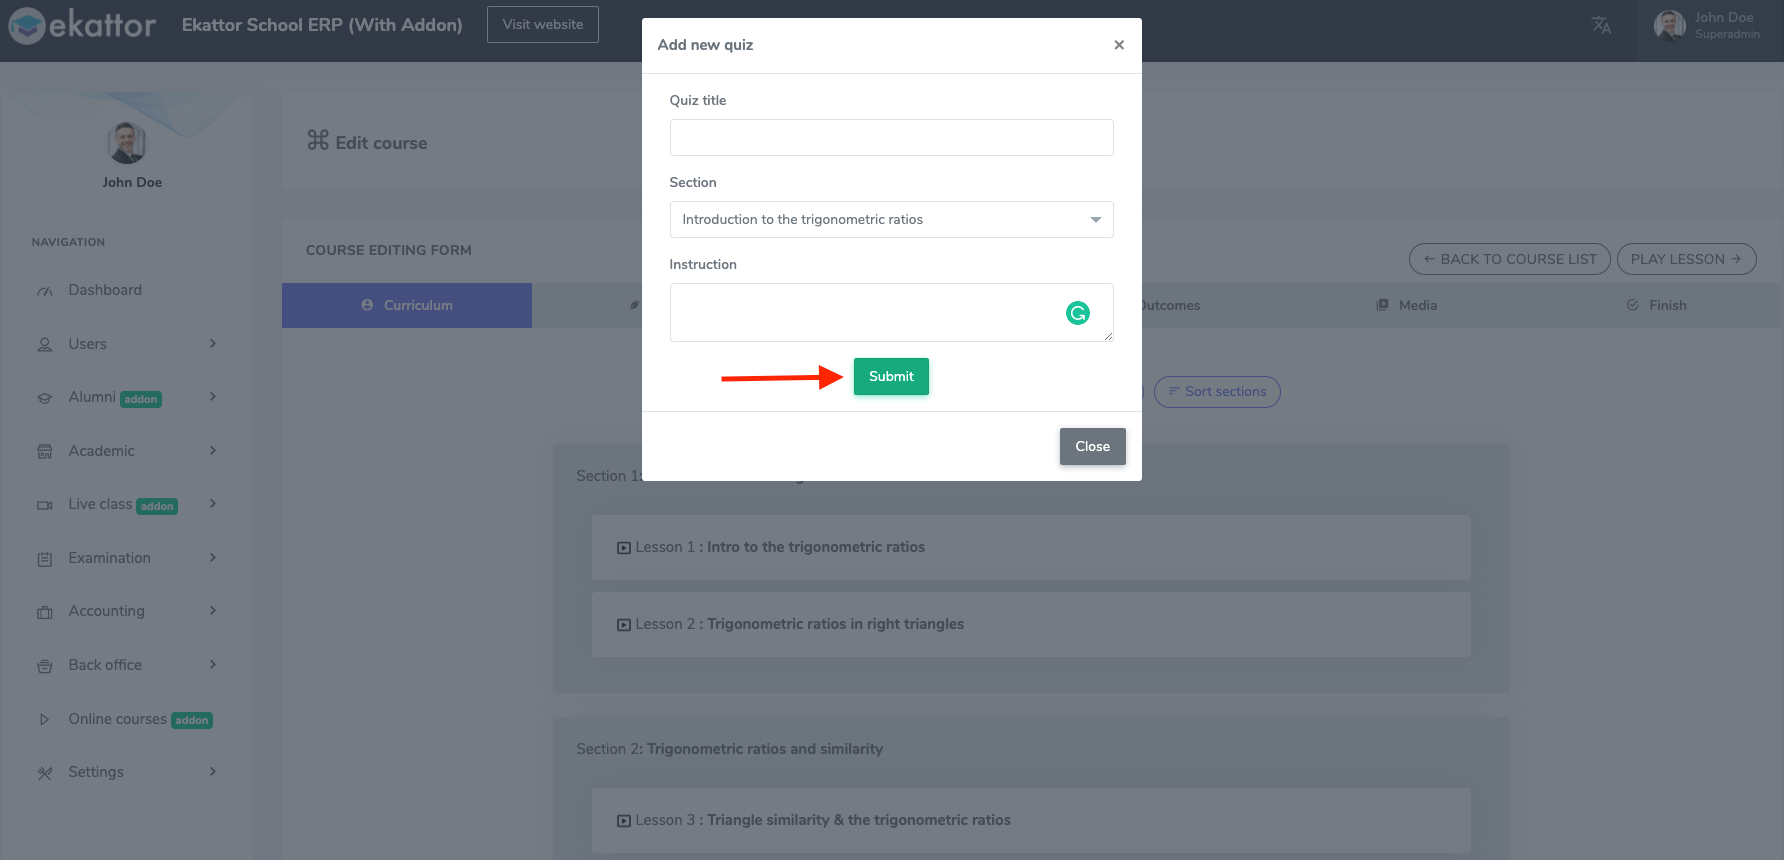
Figure 14. Ekattor ERP Submitting New Quiz
You can also change the sort of your course lesson from this panel. Select the "Sort section" from the curriculum panel.
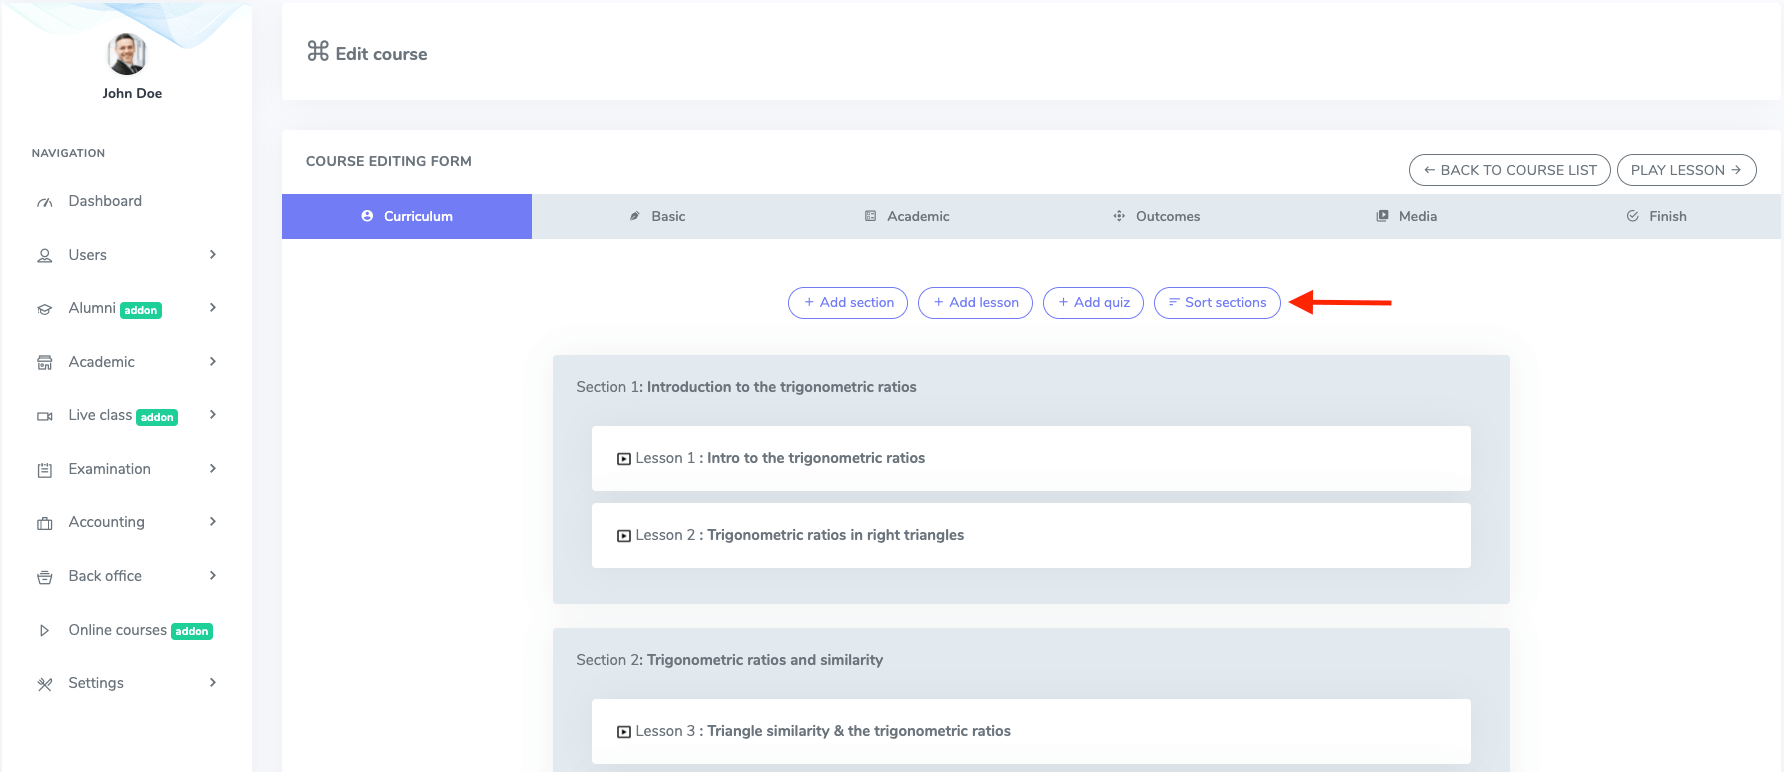
Figure 15. Ekattor ERP Sorting Section
After that, you can sort the section as you want. To save your sort, click the "Update sorting" button.
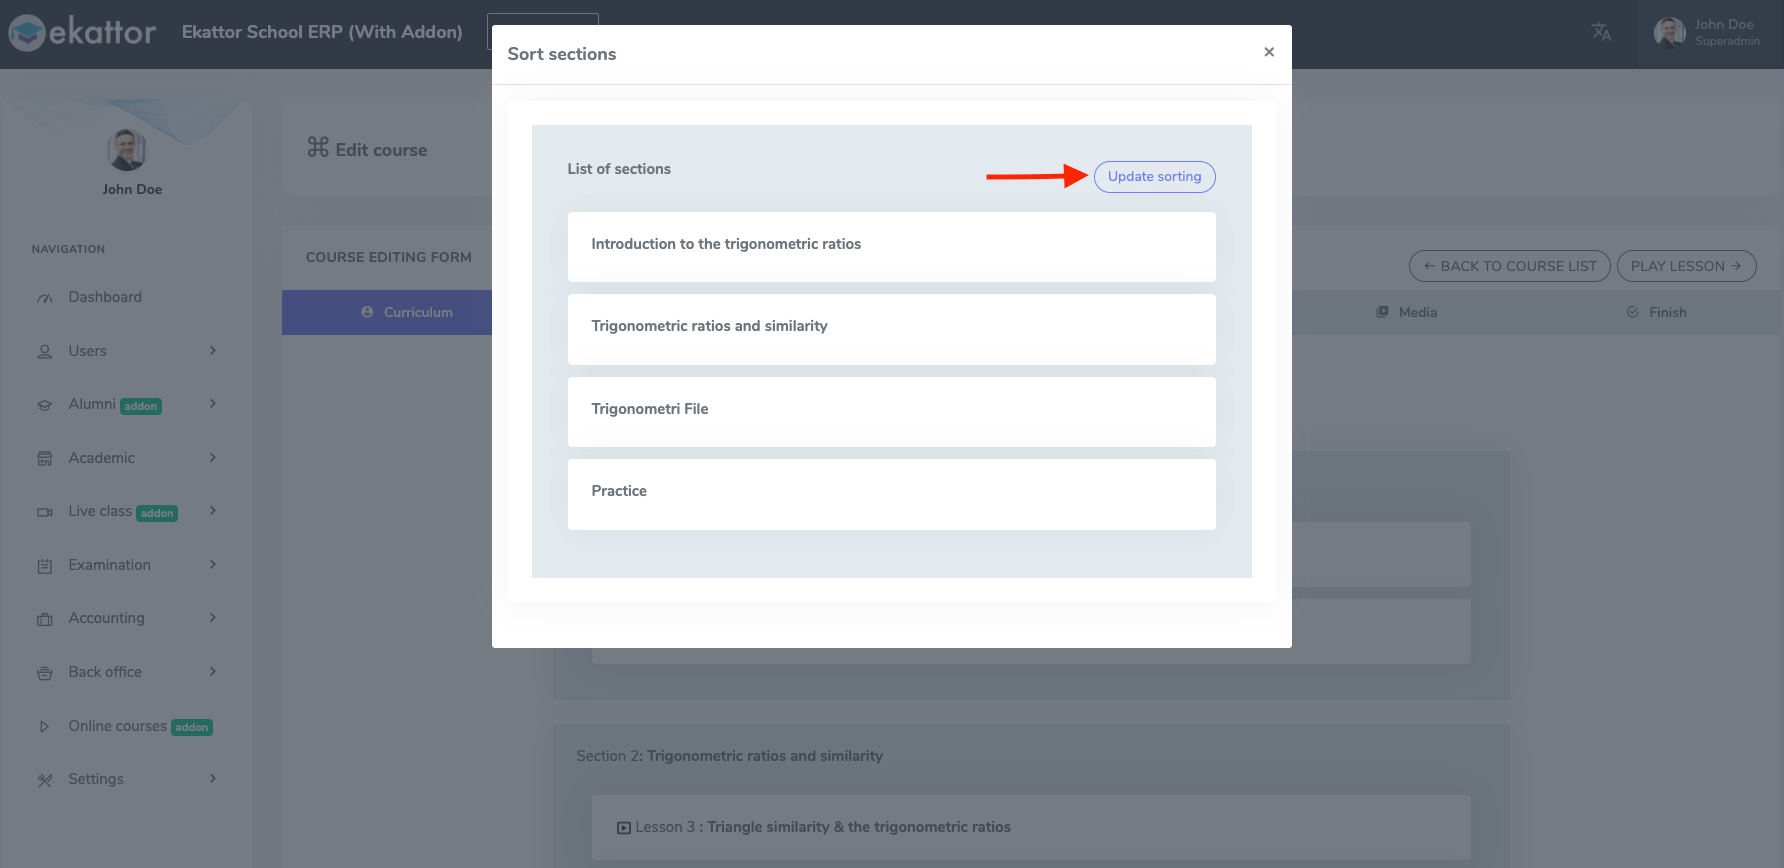
Figure 16. Ekattor ERP Update sorting
You can also update the section from the individual section. Here you can:
- Sort
- Edit
- Delete/remove the section.
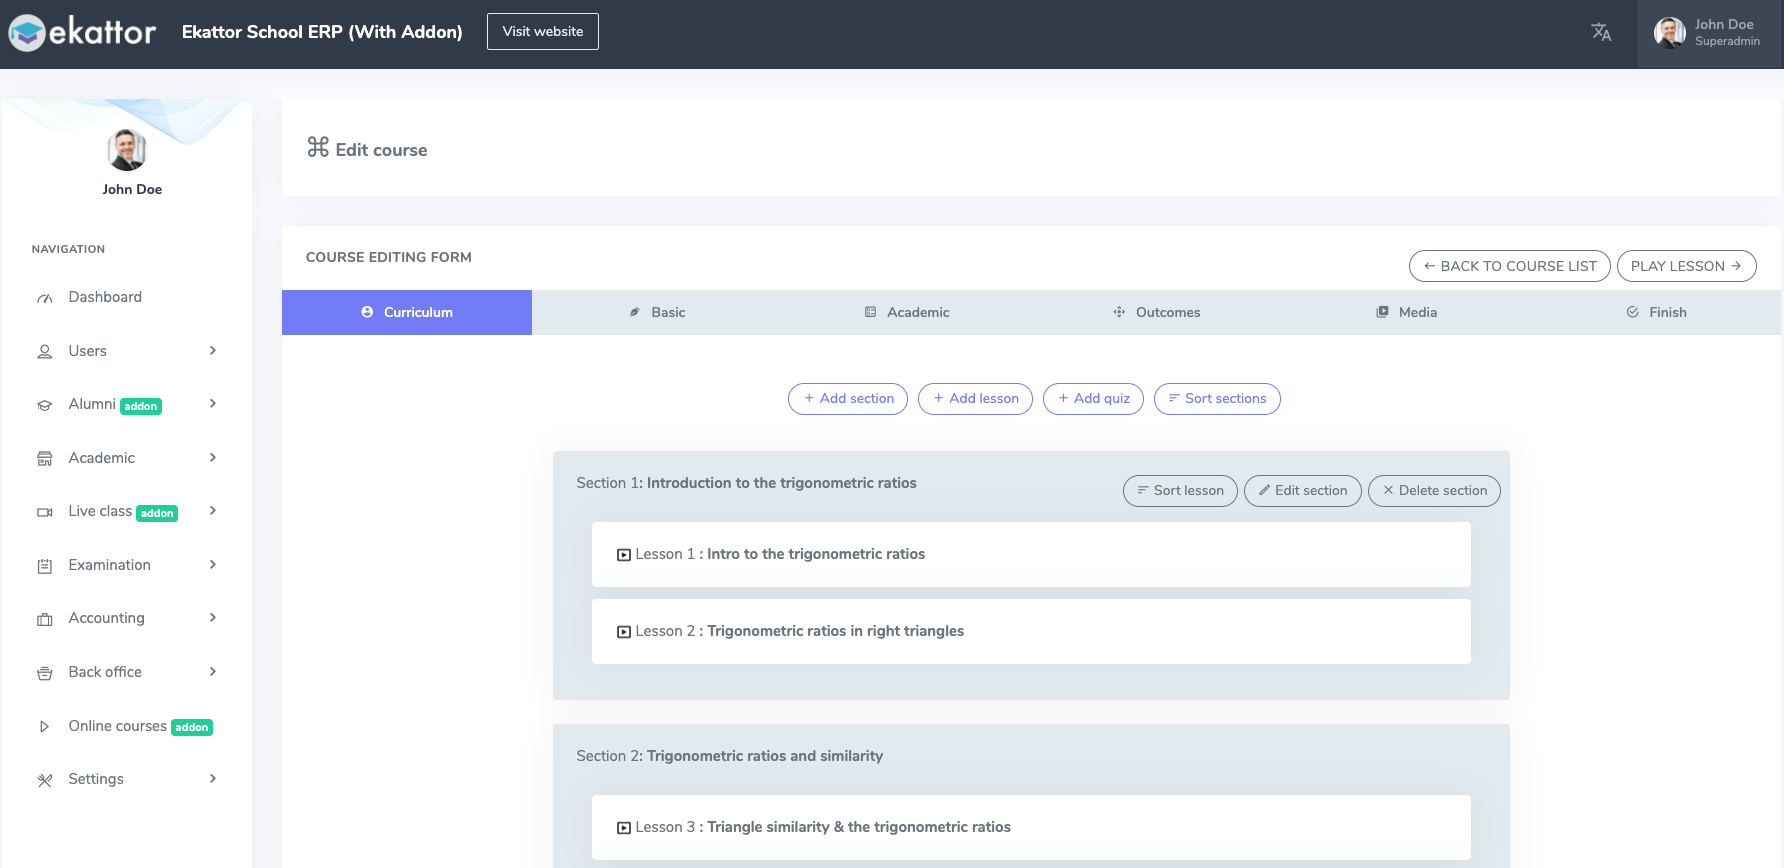
Figure 17. Ekattor ERP Section's option
To update a lesson, you have to navigate:
- Select a lesson.
- Click on the "Edit" option.
Now, you have to provide:
- Lesson title
- Lesson section
- Lesson type(You can select different types of lessons)
- Lesson provider (You can choose different types of provider)
- Video URL
- Duration
- Lesson summary
After providing the information, you have to select the "Update lesson" button.
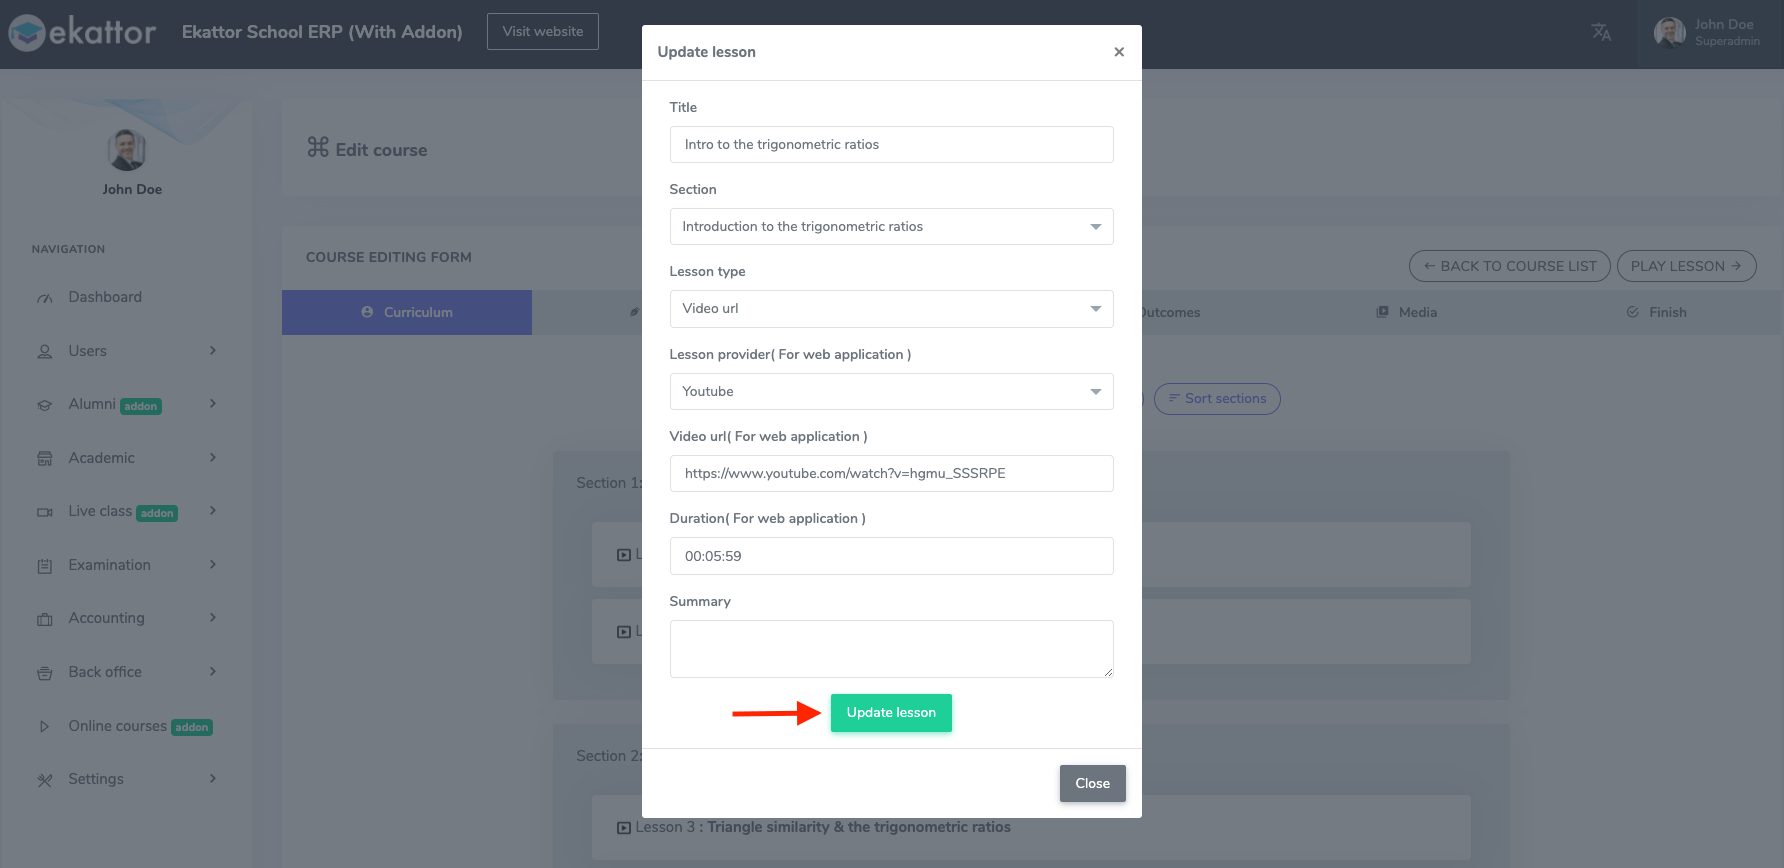
Figure 18. Ekattor ERP Updating Lesson
To remove a lesson, you have to select the "x" button. Then click the "Continue" button for confirmation.
2. Basic:
In this form, you have to provide the basic information about your course. You have to provide:
- Course
- Title
- Description
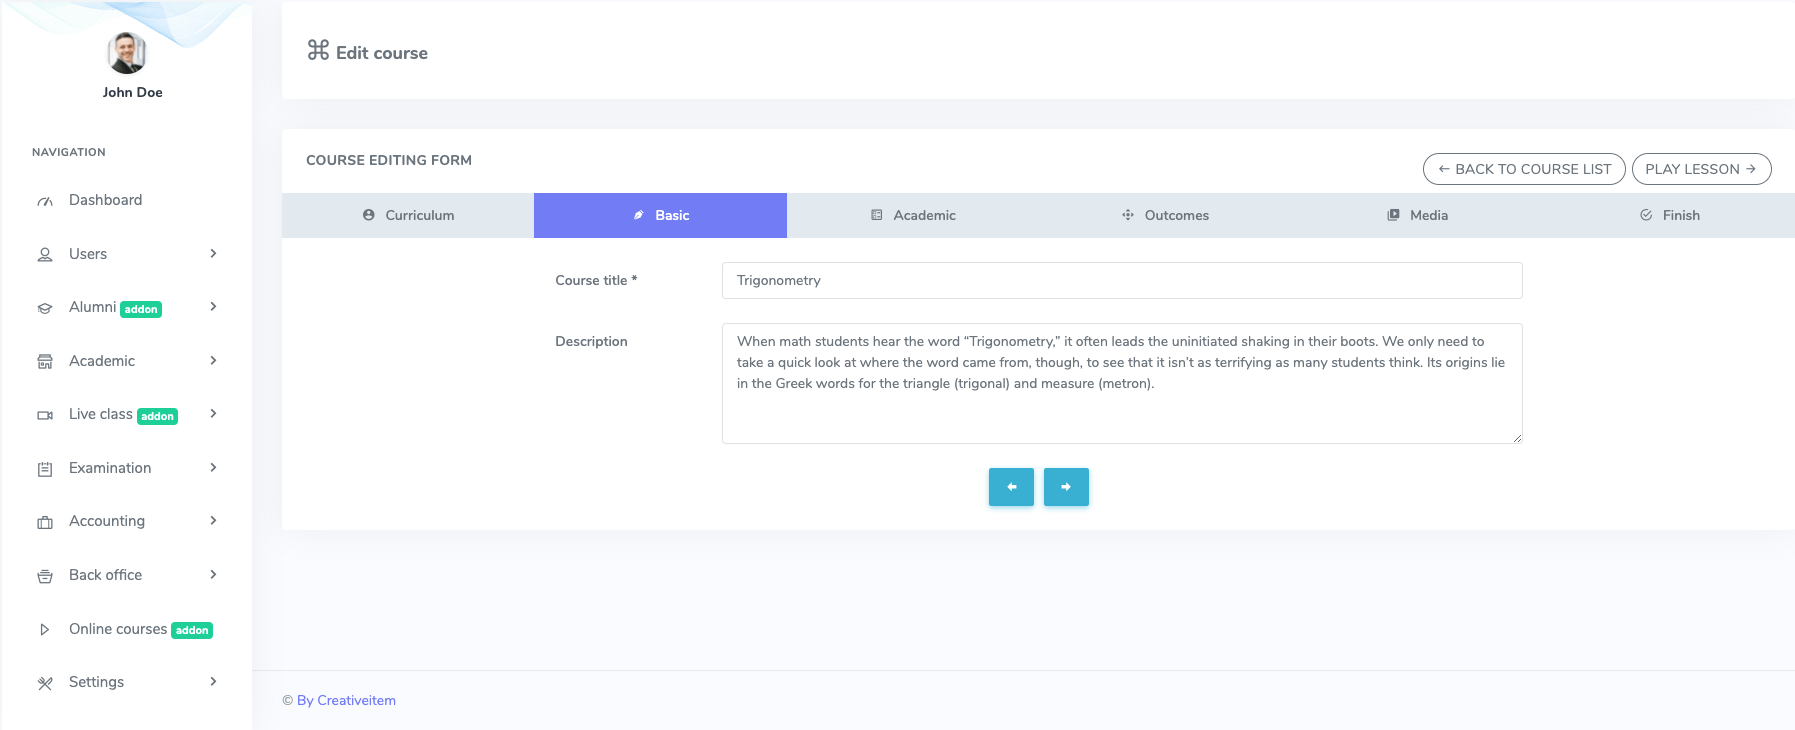
Figure 19. Ekattor ERP Editing Basic Course Form
3. Academic:
After completing the basic information, you have to complete the academic form. Here, you have to select:
- Class
- Subject
- Instructor
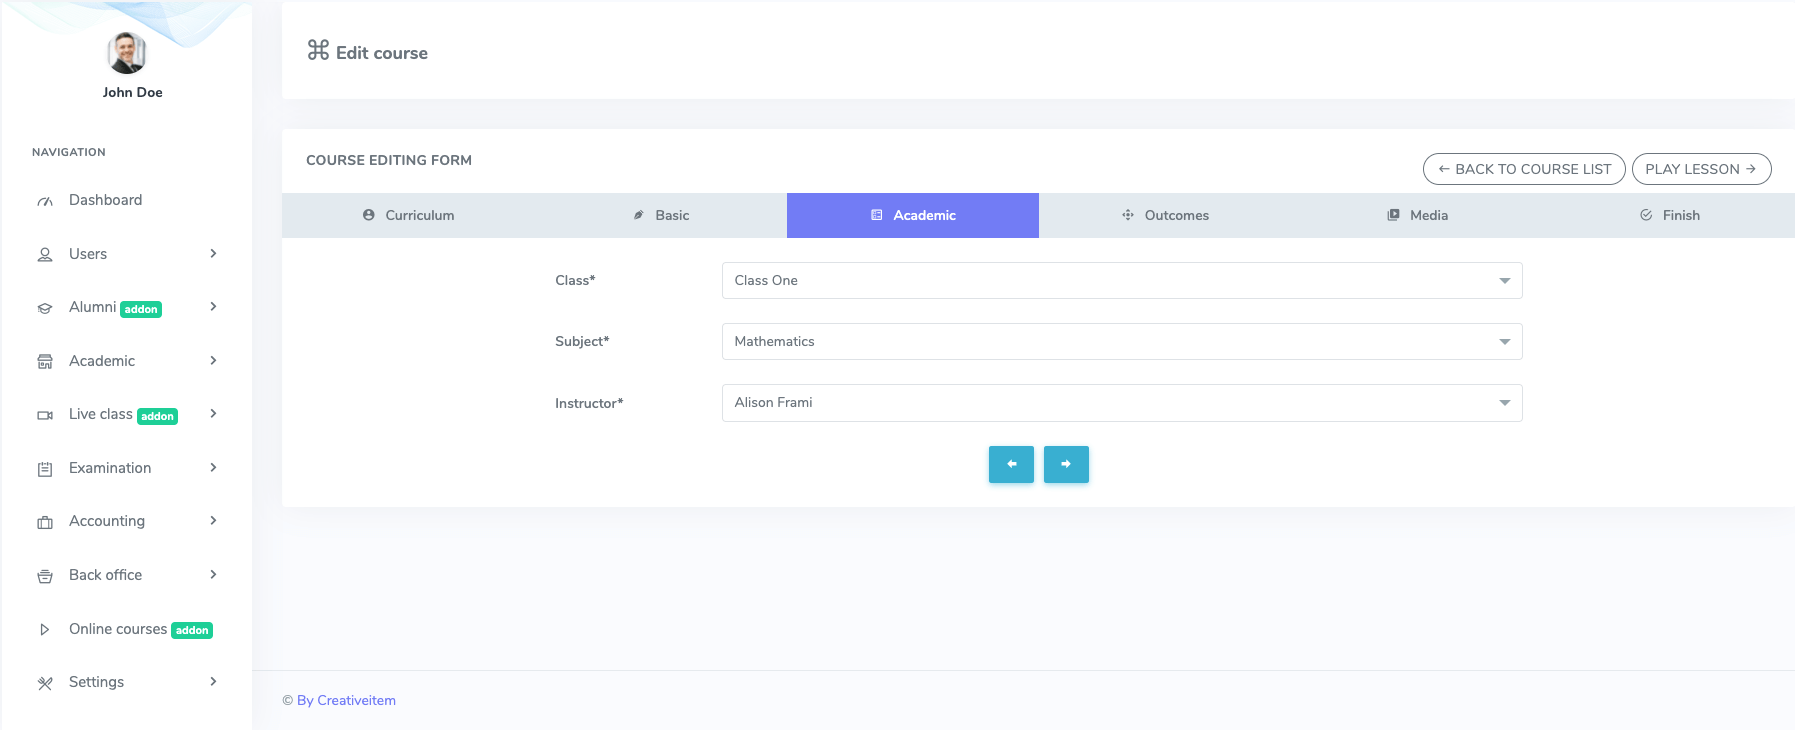
Figure 20. Ekattor ERP Editing Academic Course Form
4. Outcome:
In this form, you have to describe the course. After that, you can move to the next form.
5. Media:
After completing the outcome, you have to complete this form. Here, you have to provide:
- Course overview provider (You can play the course on Youtube, Vimeo, HTML5)
- Course overview URL
- Course thumbnail (You can select the image from your device)
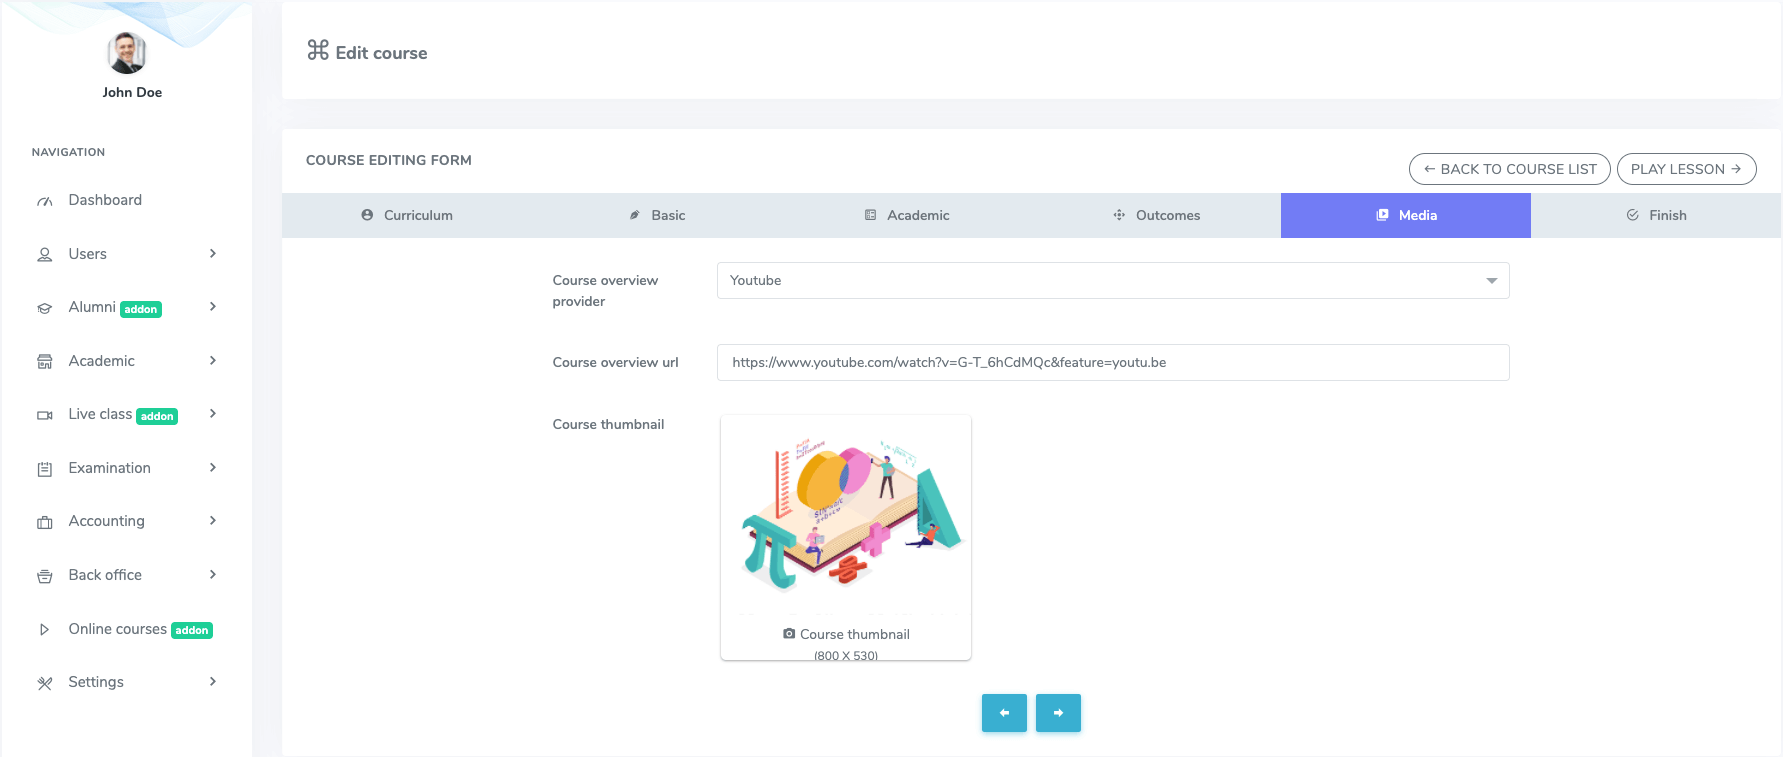
Figure 21. Ekattor ERP Editing Media Course Form
After providing all data, you have to select the "Submit" button from the "Finish" option.
To update and modify the lesson and quiz section, you have to:
- Select the superadmin panel
- Select the "Online course" addon
- Open the "Action" option from the course list
You can update and modify the "Lesson and quiz" section from the "Edit this course" panel. To change the course status from this panel, you have to select the "Action" option and change the status (Mark as Active/Mark as Inactive). If you want to remove an online course, you have to select the "Delete" option from "Action." Then choose the "Continue" button for confirmation.
Teacher's Panel:
Your teachers can create, modify, or delete the course, lesson, quiz with this addon as a teacher. After installing the addon, as a superadmin, your instructors have to navigate:
- Log in to the teacher panel.
- Select the "Online course" option from the left menu.
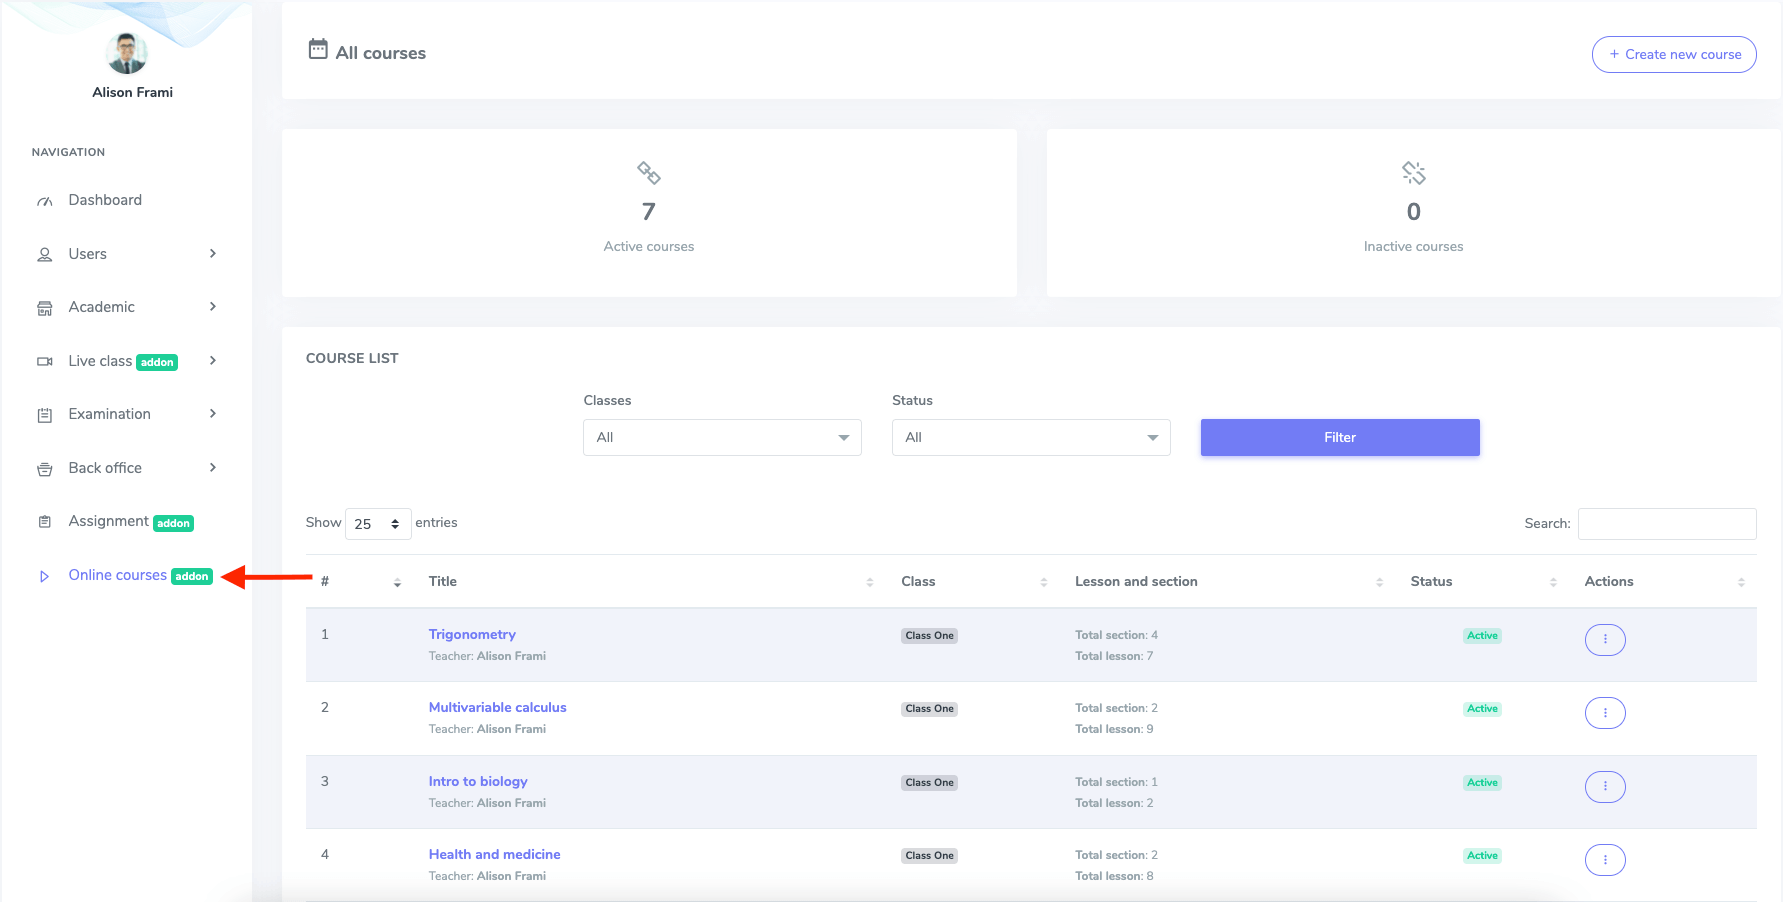
Figure 22. Ekattor ERP Online Course (Teacher)
To create a new online course, select the "Select new course" button.
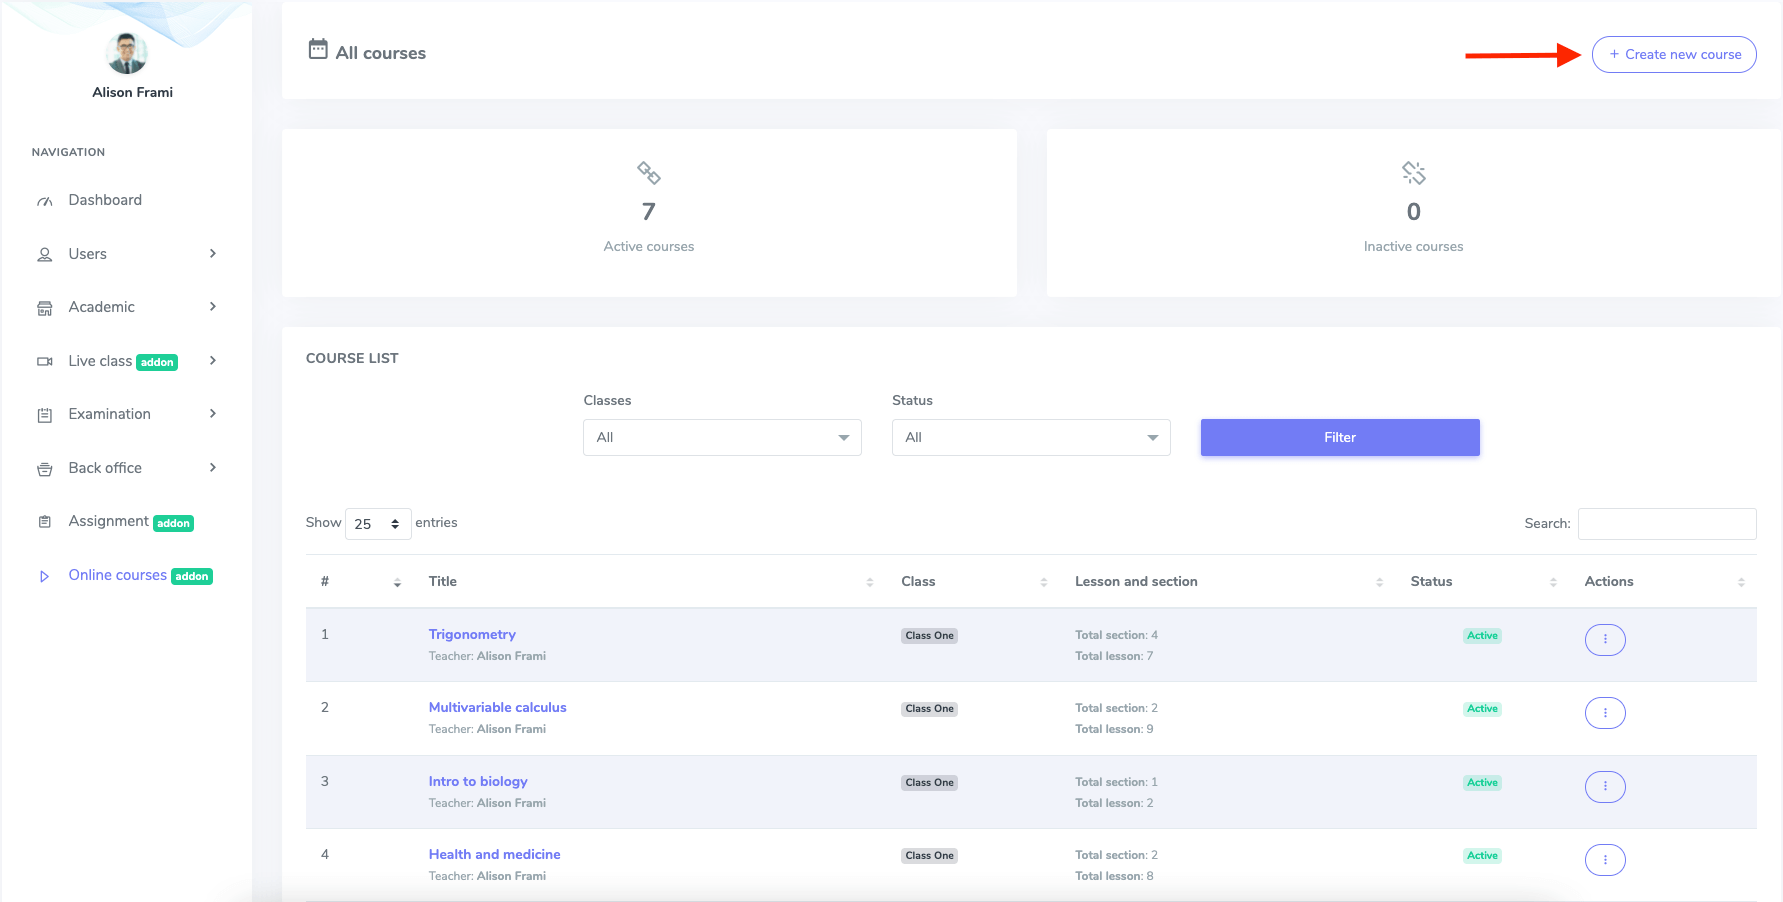
Figure 23. Ekattor ERP Creating New Course (Teacher)
After that, they have to complete the "COURSE ADDING FORM". They are:
1. Basic:
In this form, they have to provide basic information about their course. For this, they have to provide:
- Course
- Title
- Description
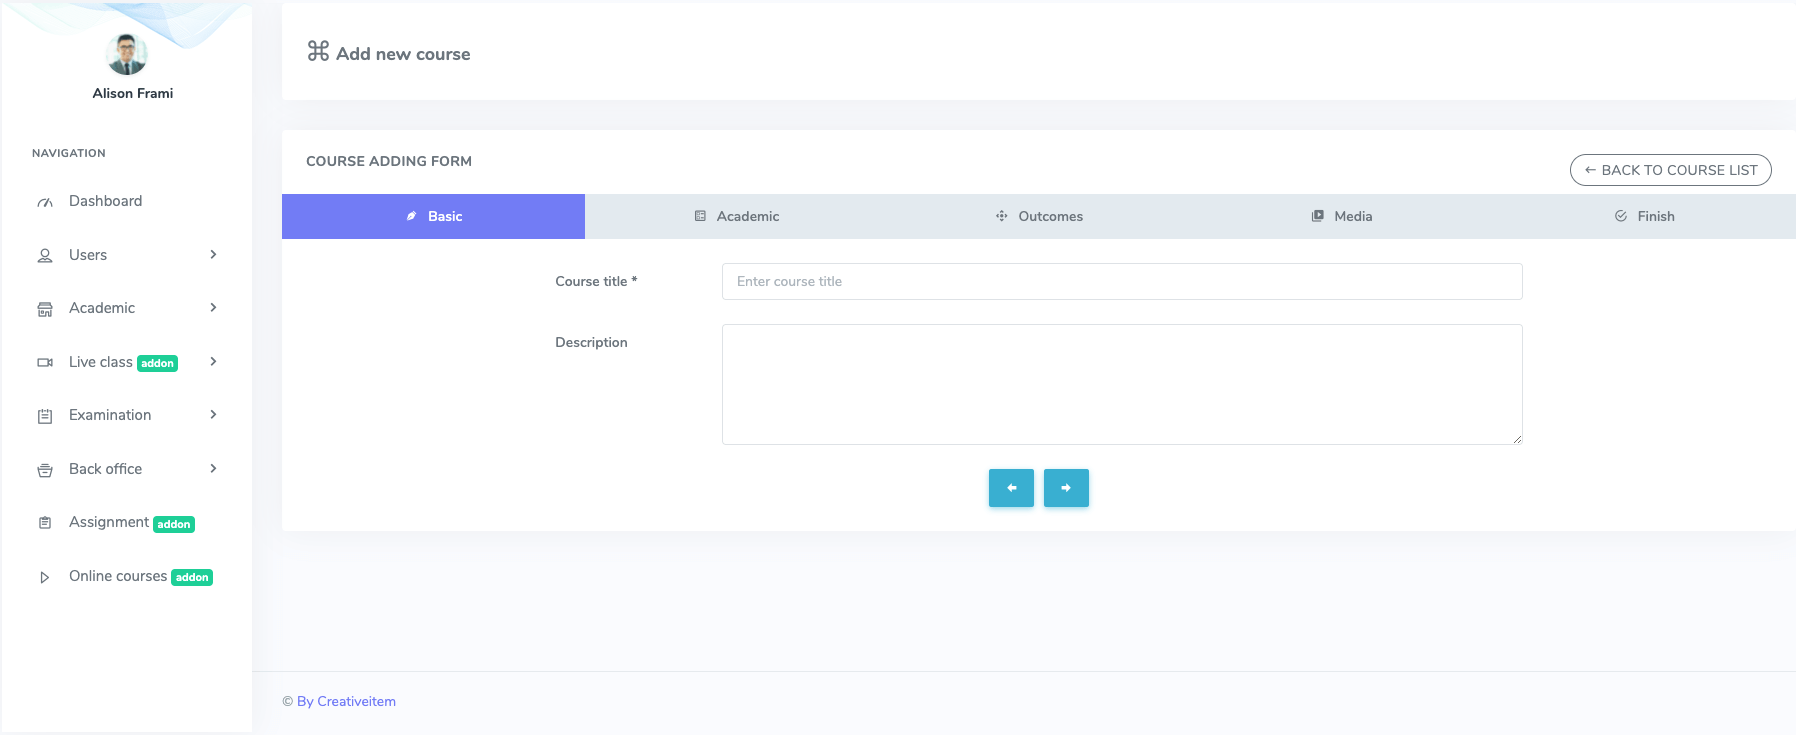
Figure 24. Ekattor ERP Basic Course Form (Teacher)
2. Academic:
After completing the basic information, your teachers have to complete the academic form. Here, they have to select:
- Class
- Subject
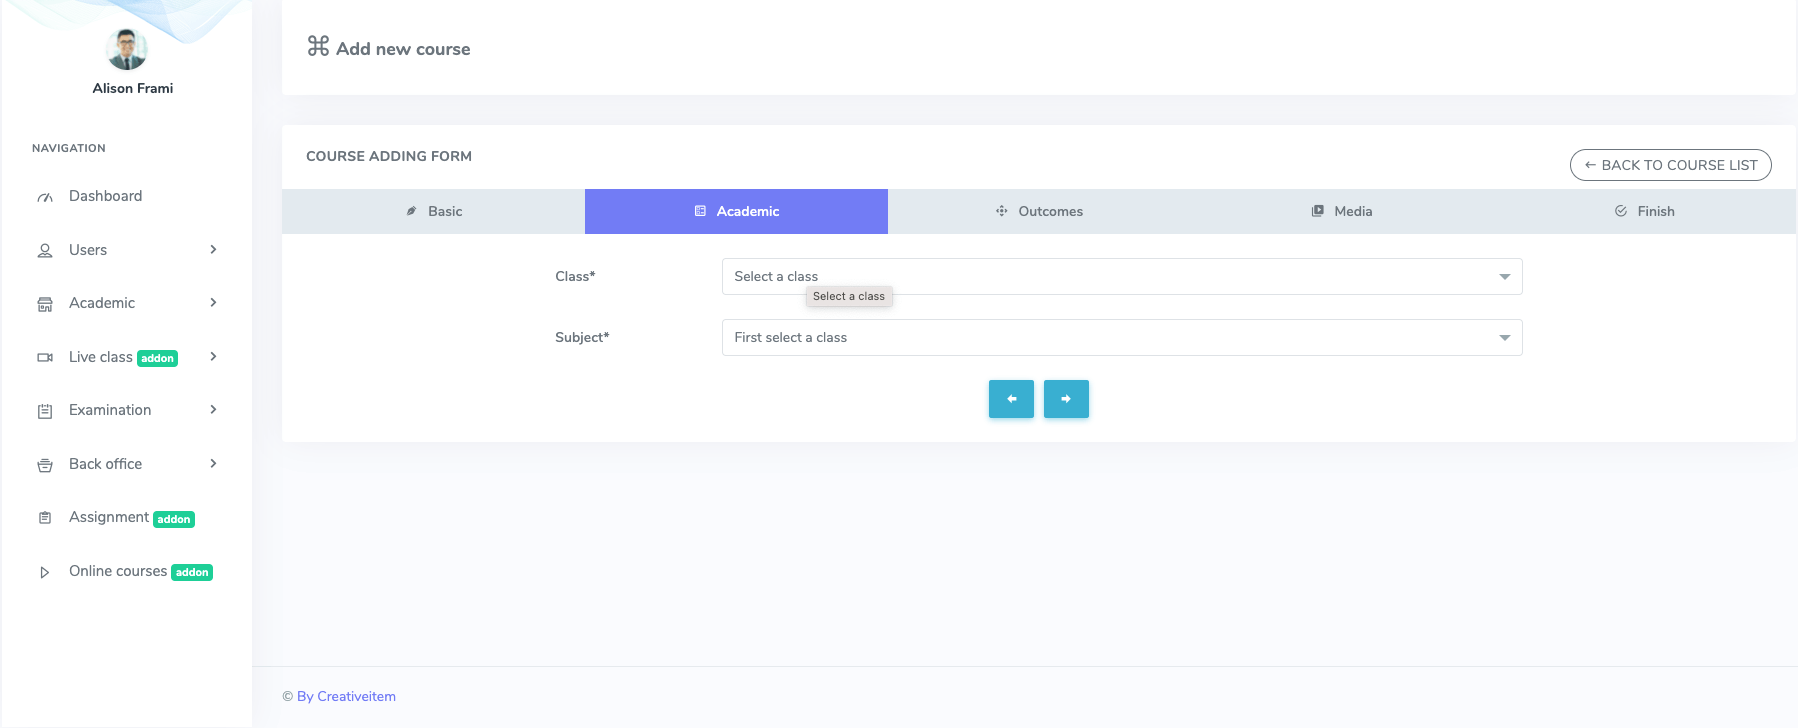
Figure 25. Ekattor ERP Academic Course Form (Teacher)
3. Outcome:
In this form, teachers have to describe the course. After that, they can move to the next record.
4. Media:
After completing the outcome, teachers have to complete this form. Here, they have to provide:
- Course overview provider (You can play the course on Youtube, Vimeo, HTML5)
- Course overview URL
- Course thumbnail (You can select the image from your device)
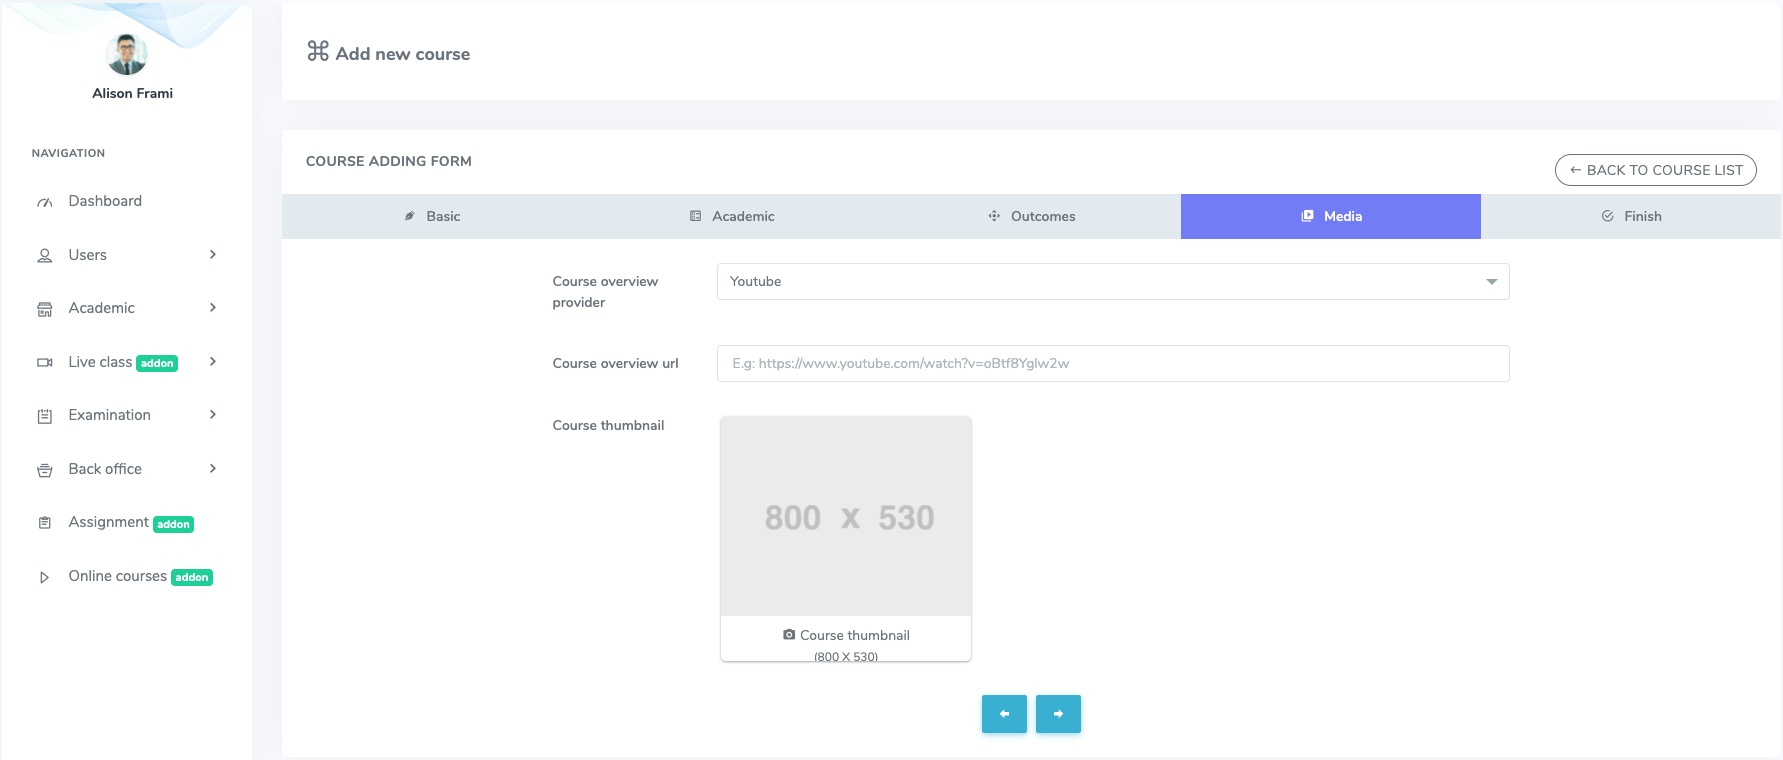
Figure 26. Ekattor ERP Media Course Form (Teacher)
After providing all data, teachers have to select the "Submit" button from the "Finish" option.
They can "Filter" the course by selecting the class, instructor, and course activation status in the course list. They can also overview:
- The course list
- The course title
- Lesson and section
- Lesson status
- "Action" bar
In this section, your teachers can preview the course on fronter. For this, they have to select "View course on fronter."

Figure 27. Ekattor ERP Course Frontend (Teacher)
To update and modify the course, they have to select the "Edit this course" from the "Action" button.
To update the course, they have to complete the "COURSE EDITING FORM." They are:
Curriculum:
Your teachers can add a section in this panel. For this, you have to select the "Add section."
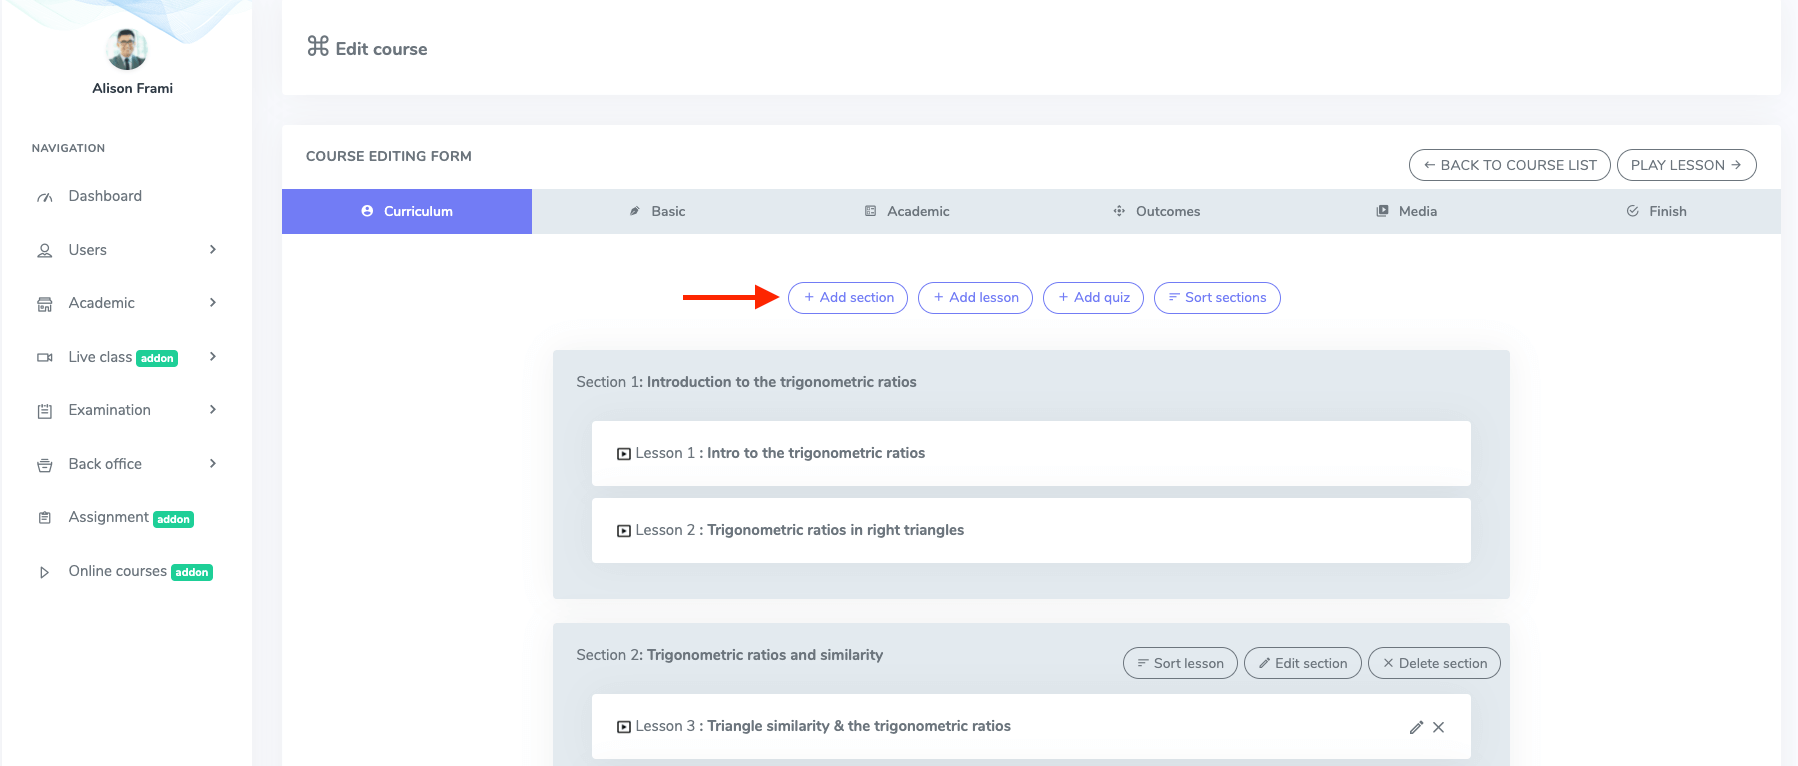
Figure 28. Ekattor ERP Adding Section (Teacher)
In this form, your teachers have to provide a section name. Then, select the "Submit" button.
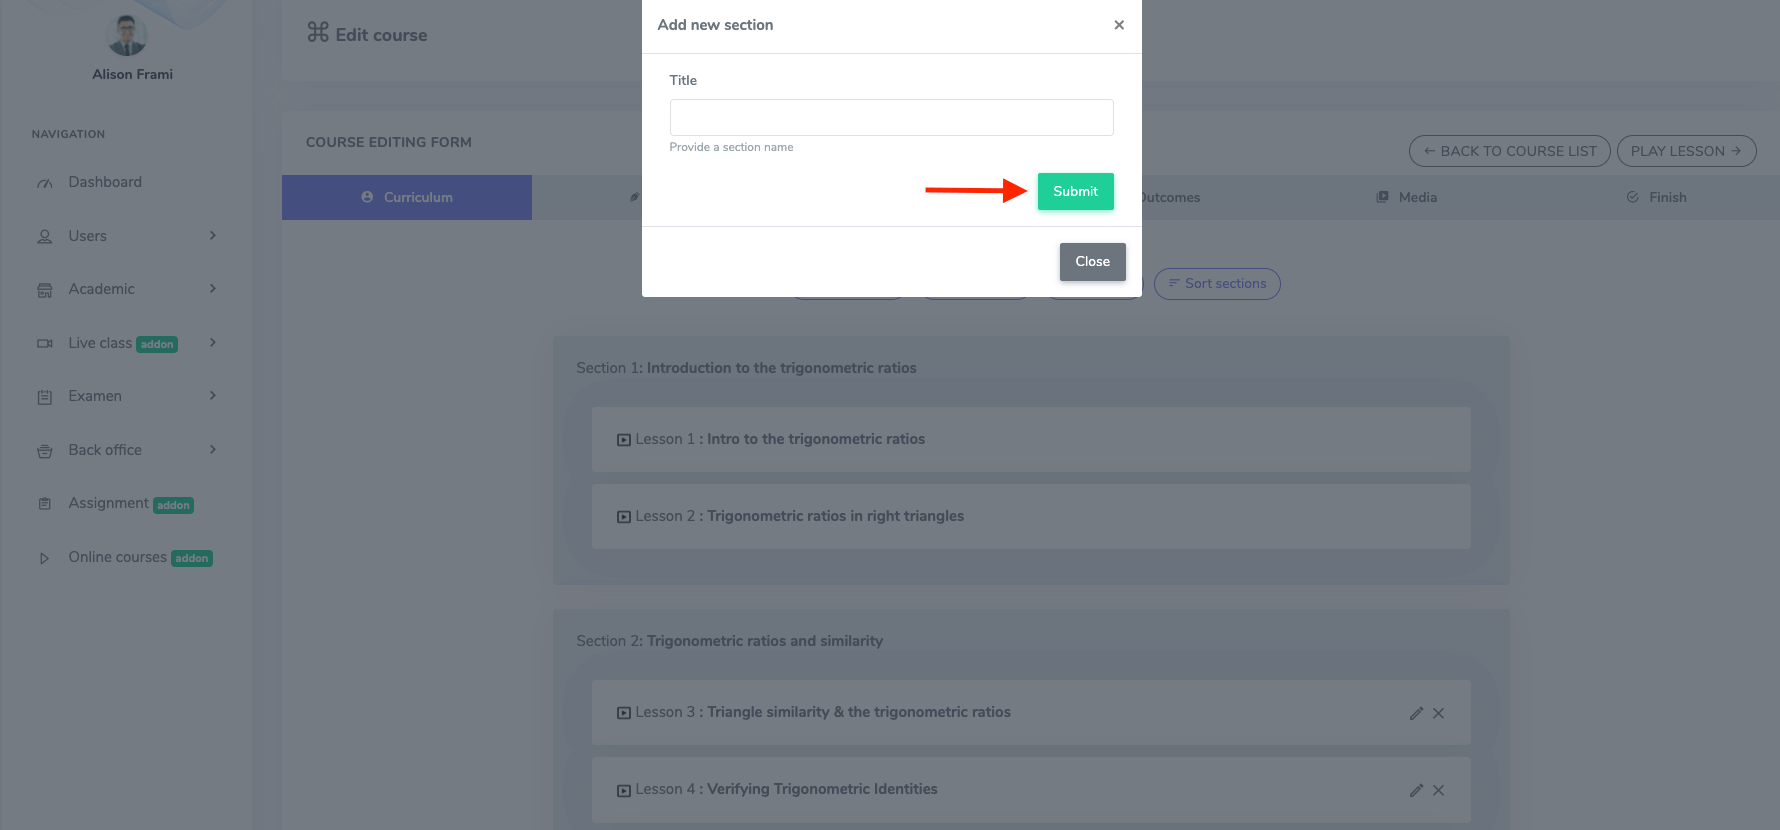
Figure 29. Ekattor ERP Submitting Section (Teacher)
To create a new lesson, they have to select the "Add lesson" button.
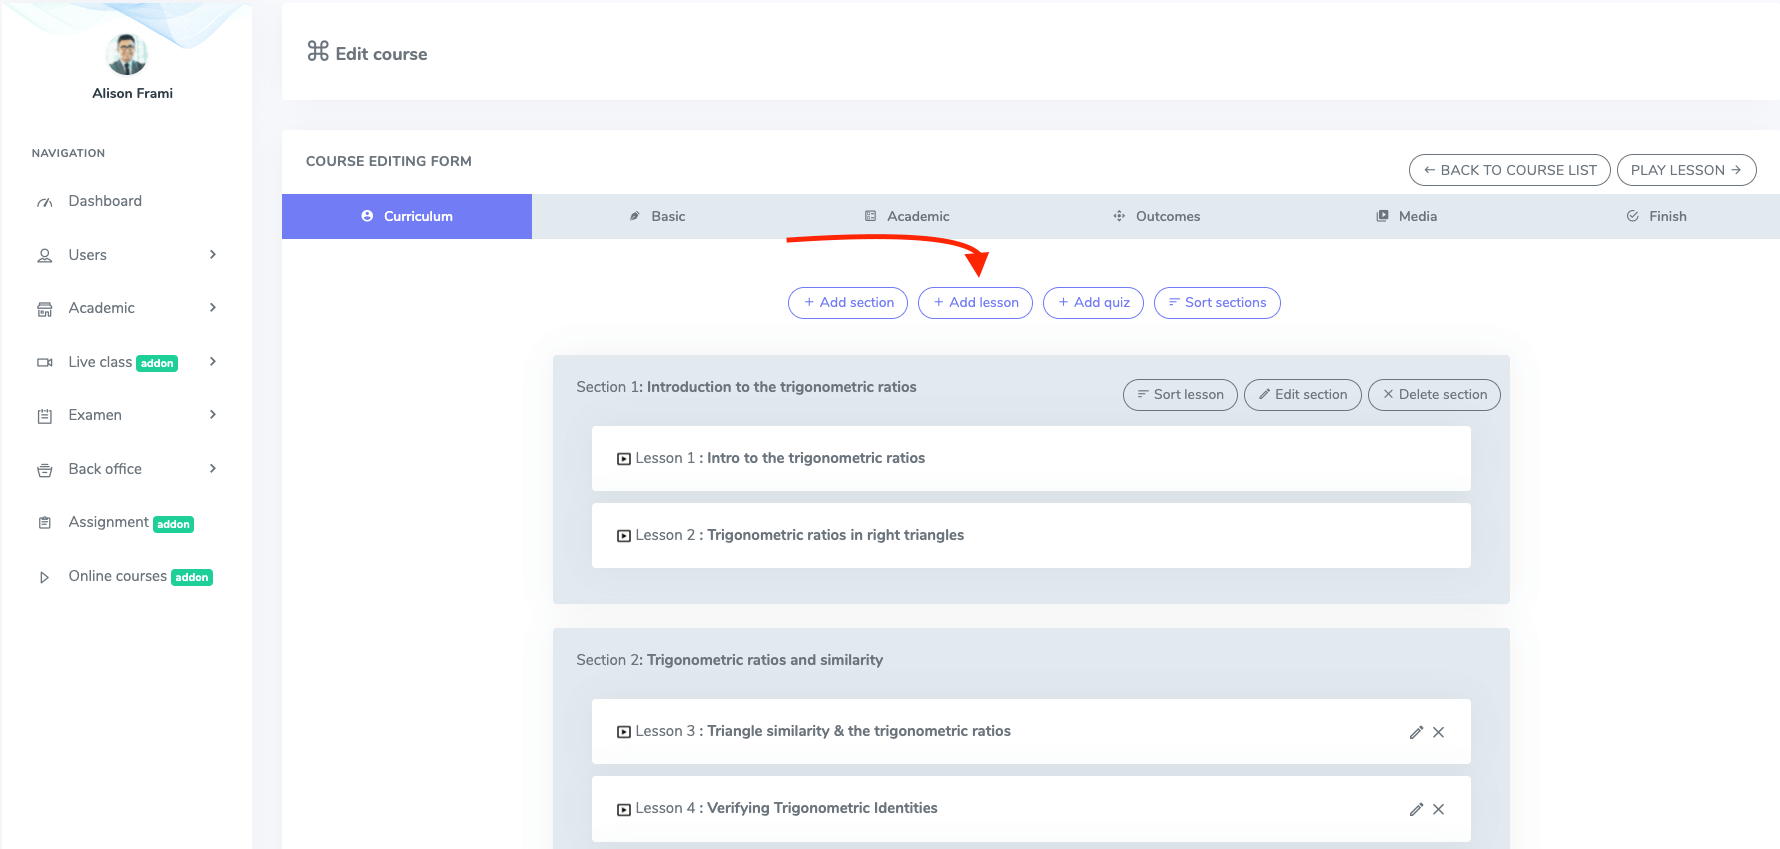
Figure 30. Ekattor ERP Adding Lesson (Teacher)
In this form, your teachers have to provide:
- Lesson title
- Section
- Lesson type(You can select the different kinds of platforms)
- Lesson summary
After that, select the "Add lesson" button.
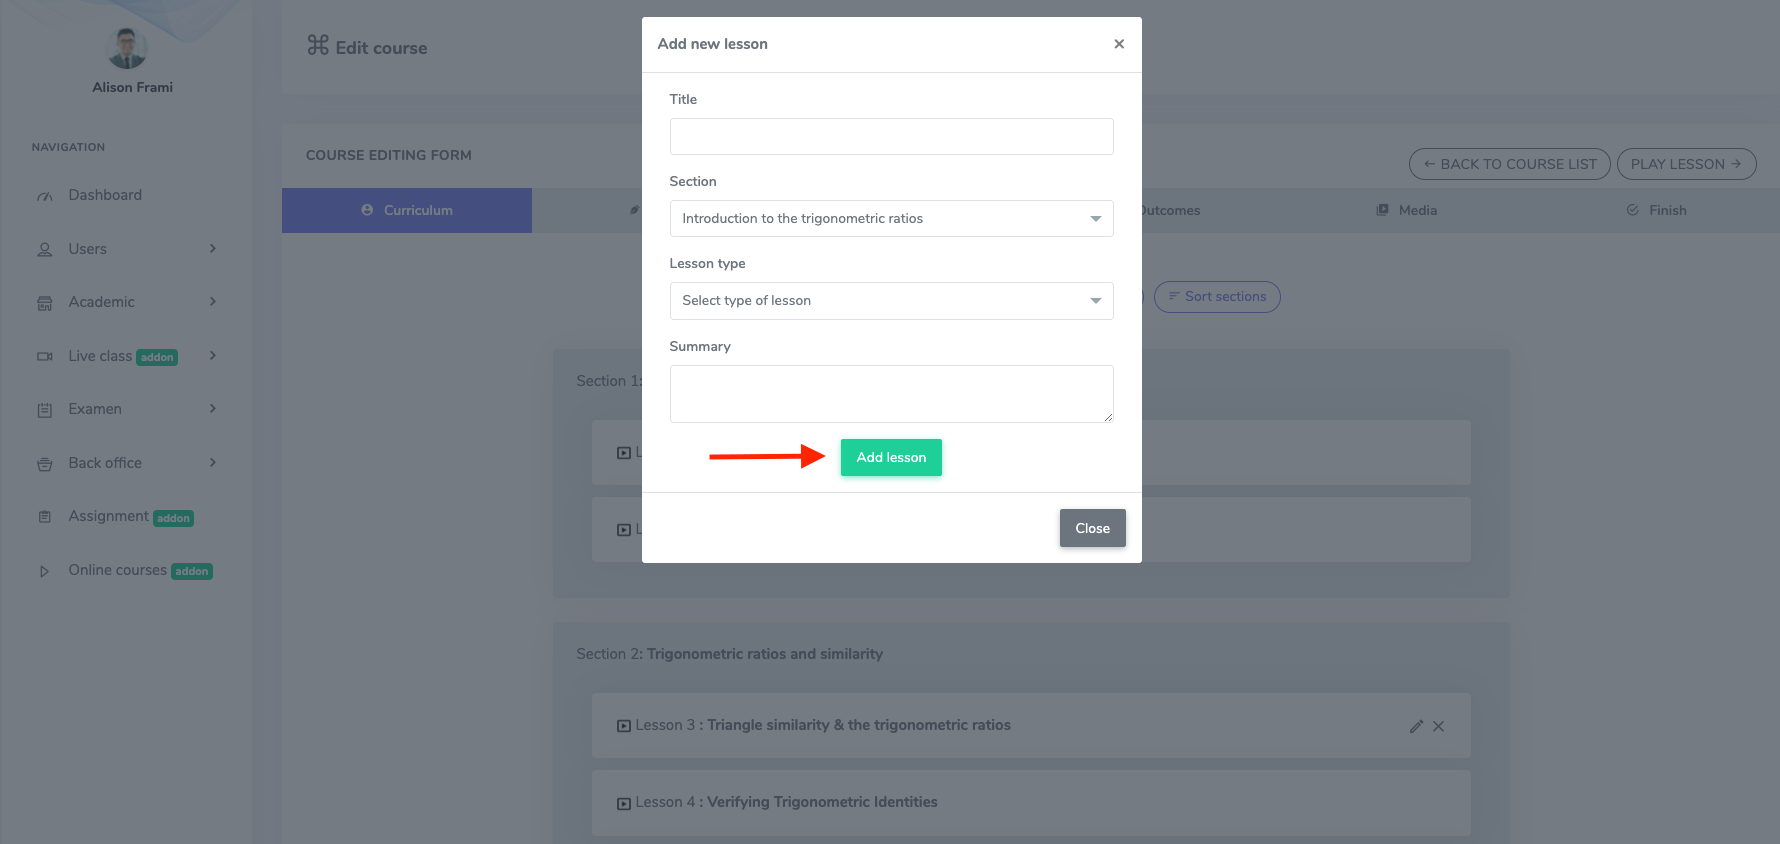
Figure 31. Ekattor ERP Saving New Lesson (Teacher)
Your teachers can also create and update the quiz. For this, they have to select the "Add quiz" button.
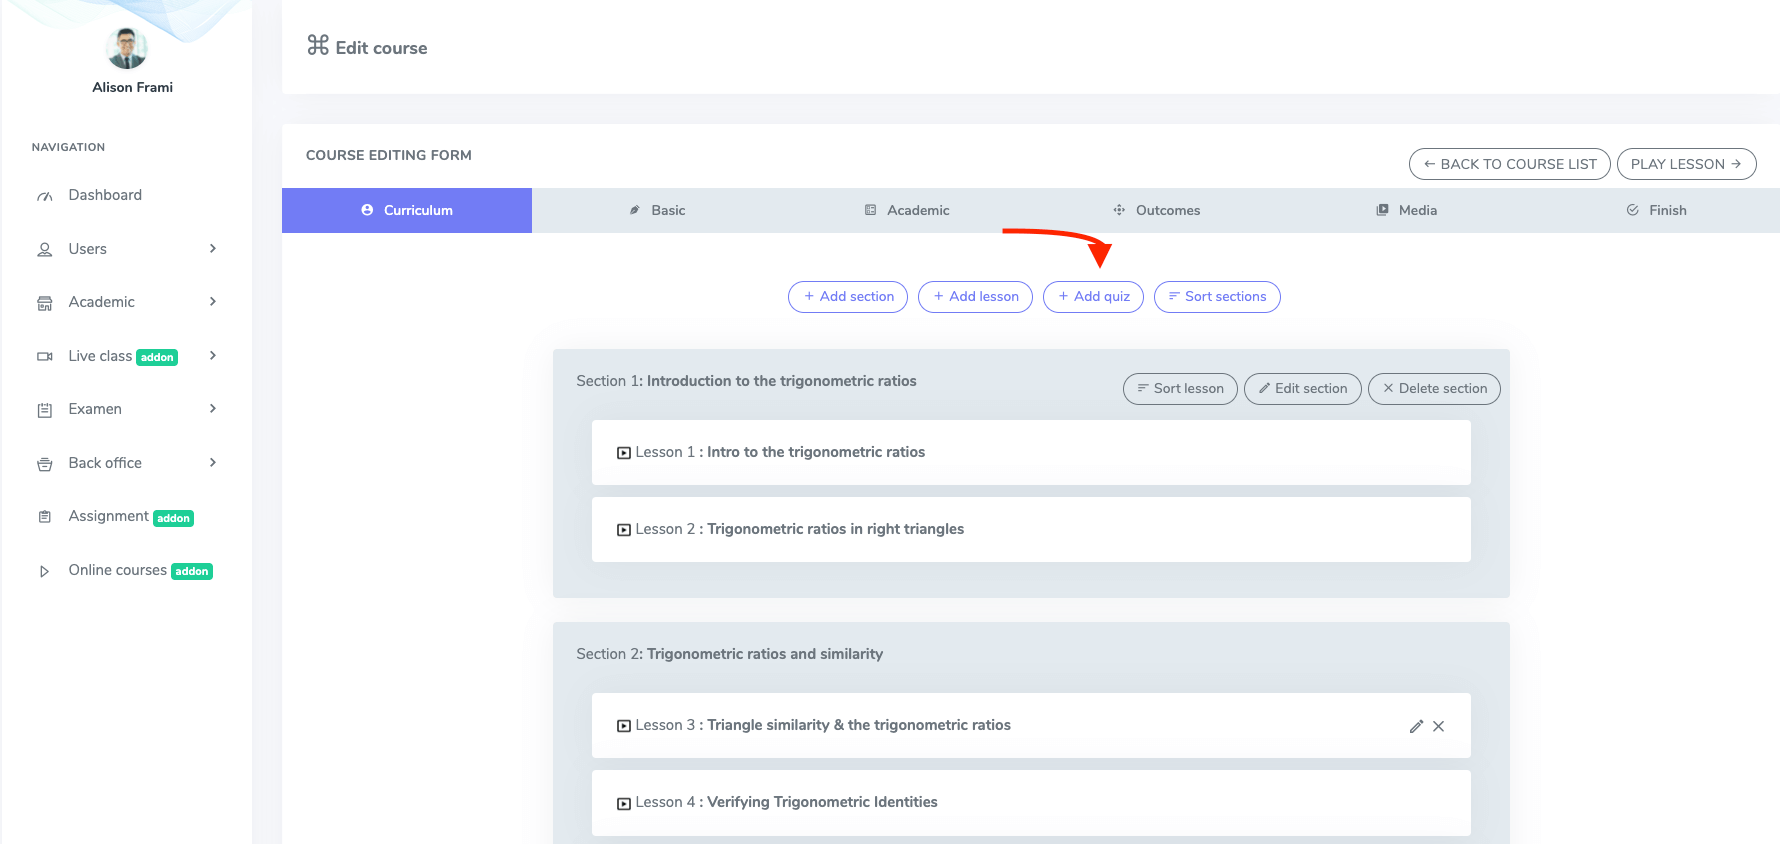
Figure 32. Ekattor ERP Adding Quiz (Teacher)
Now they have to provide:
- Quiz title
- Quiz section
- Quiz instruction
To save the update, select the "Submit" button.
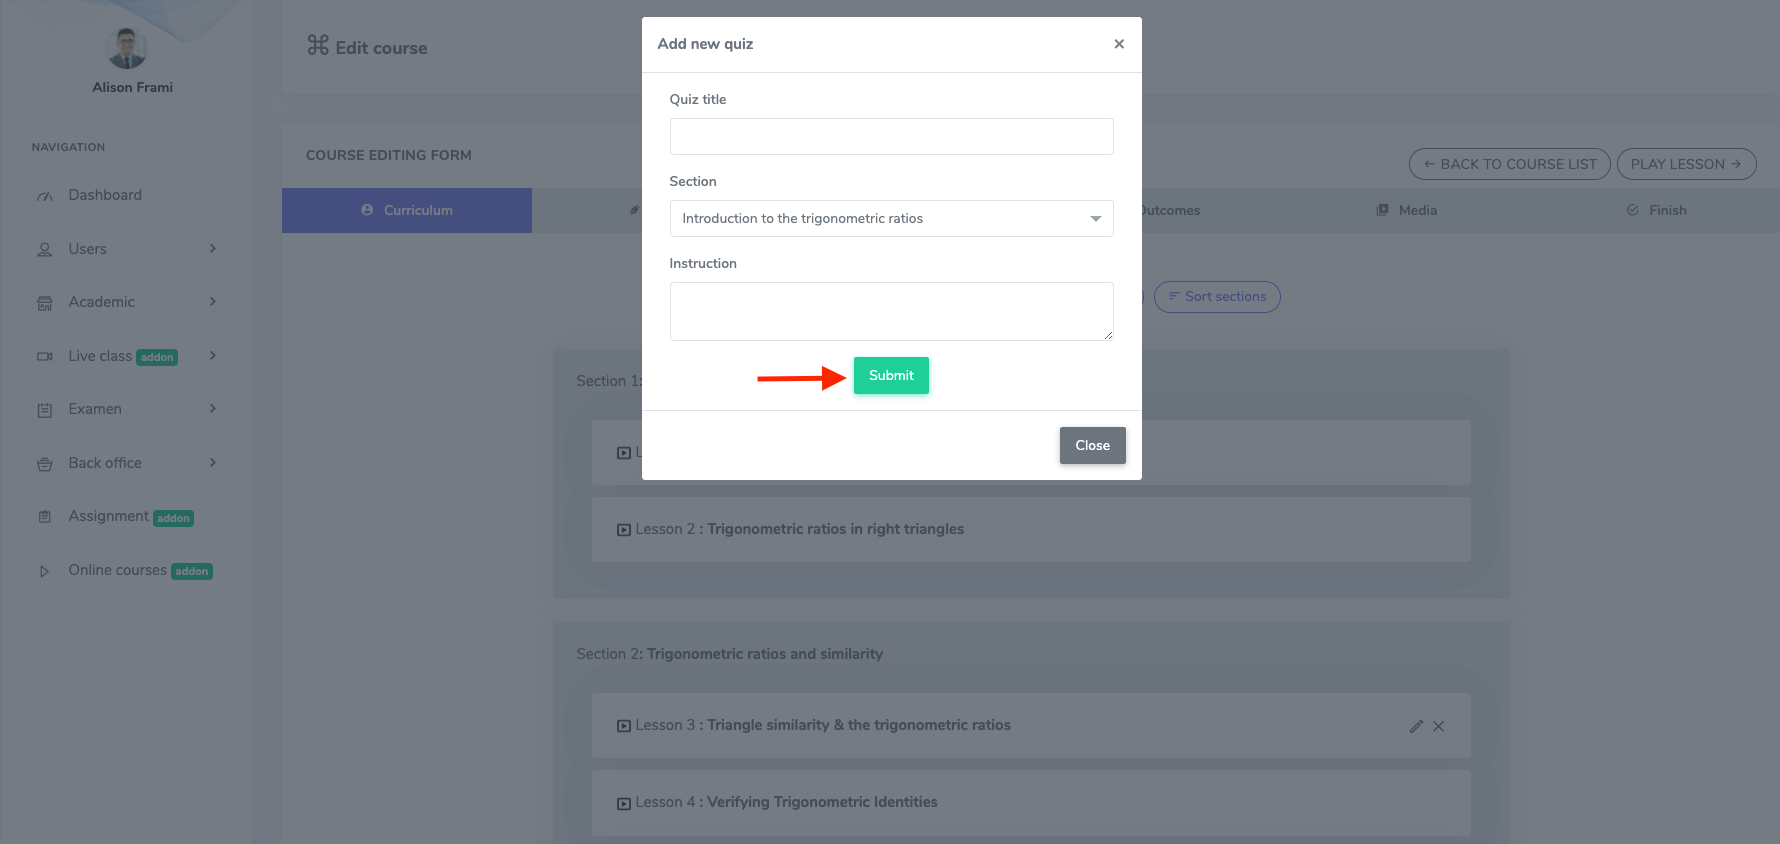
Figure 33. Ekattor ERP Submitting Quiz (Teacher)
They can also change the sort of your course lesson from this panel. Select the "Sort section" from the curriculum panel.
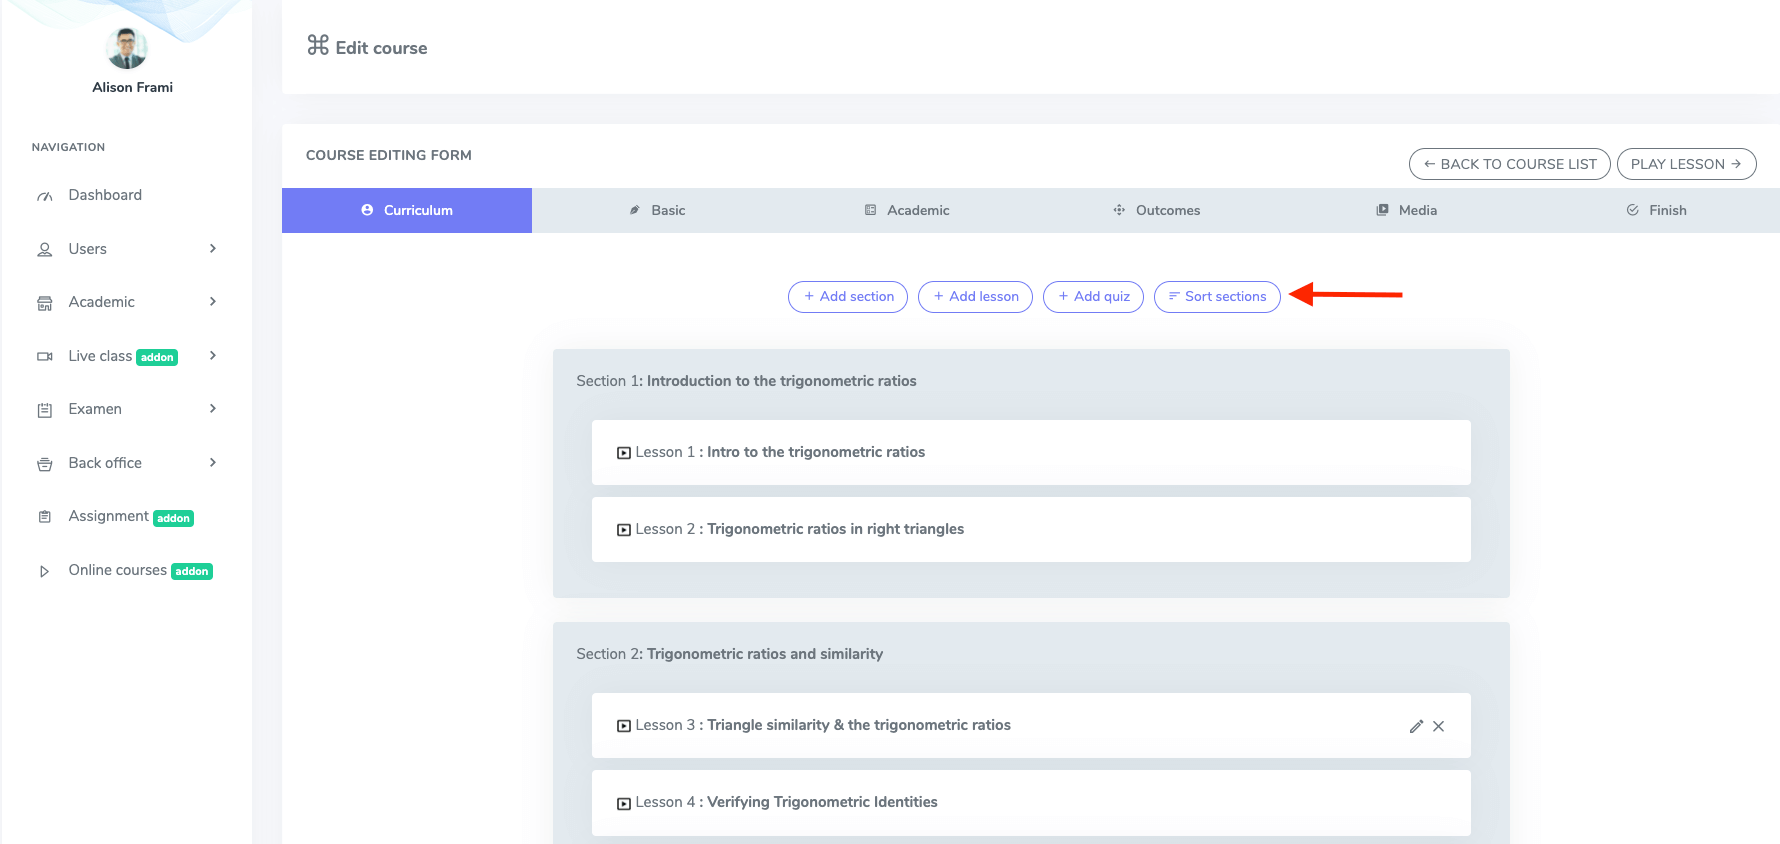
Figure 34. Ekattor ERP Sort Section (Teacher)
After that, your teachers can sort the section as you want. To save the change, click the "Update sorting" button.
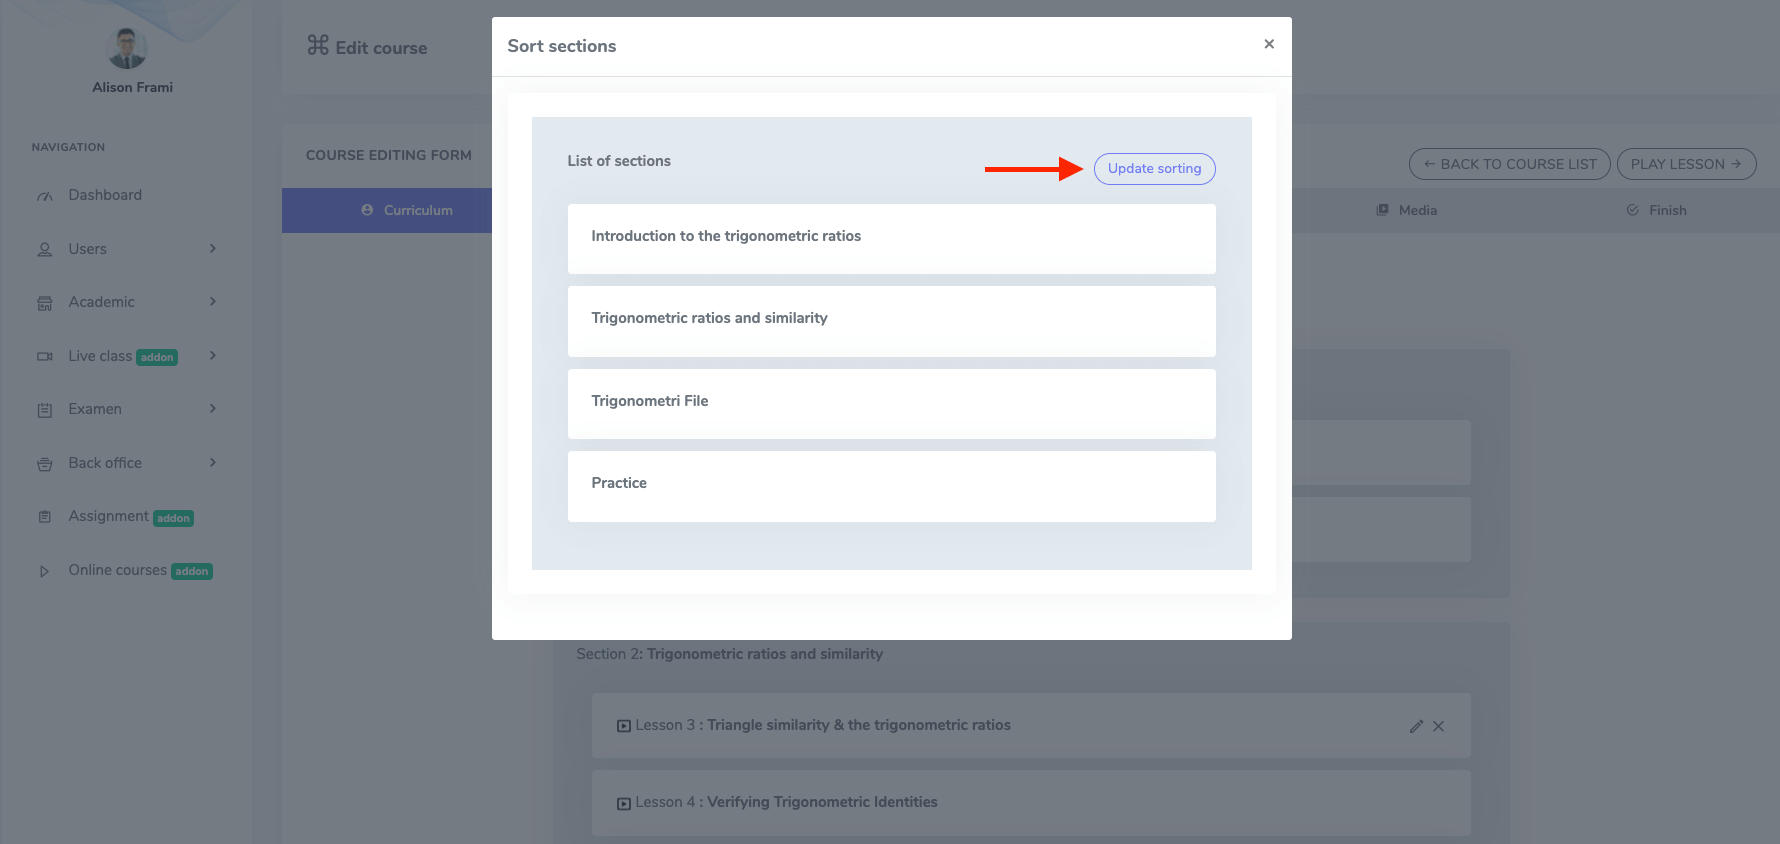
Figure 35. Ekattor ERP Update Sorting (Teacher)
They can also update the section from the individual section. Here they can:
- Sort
- Edit
- Delete/remove the section
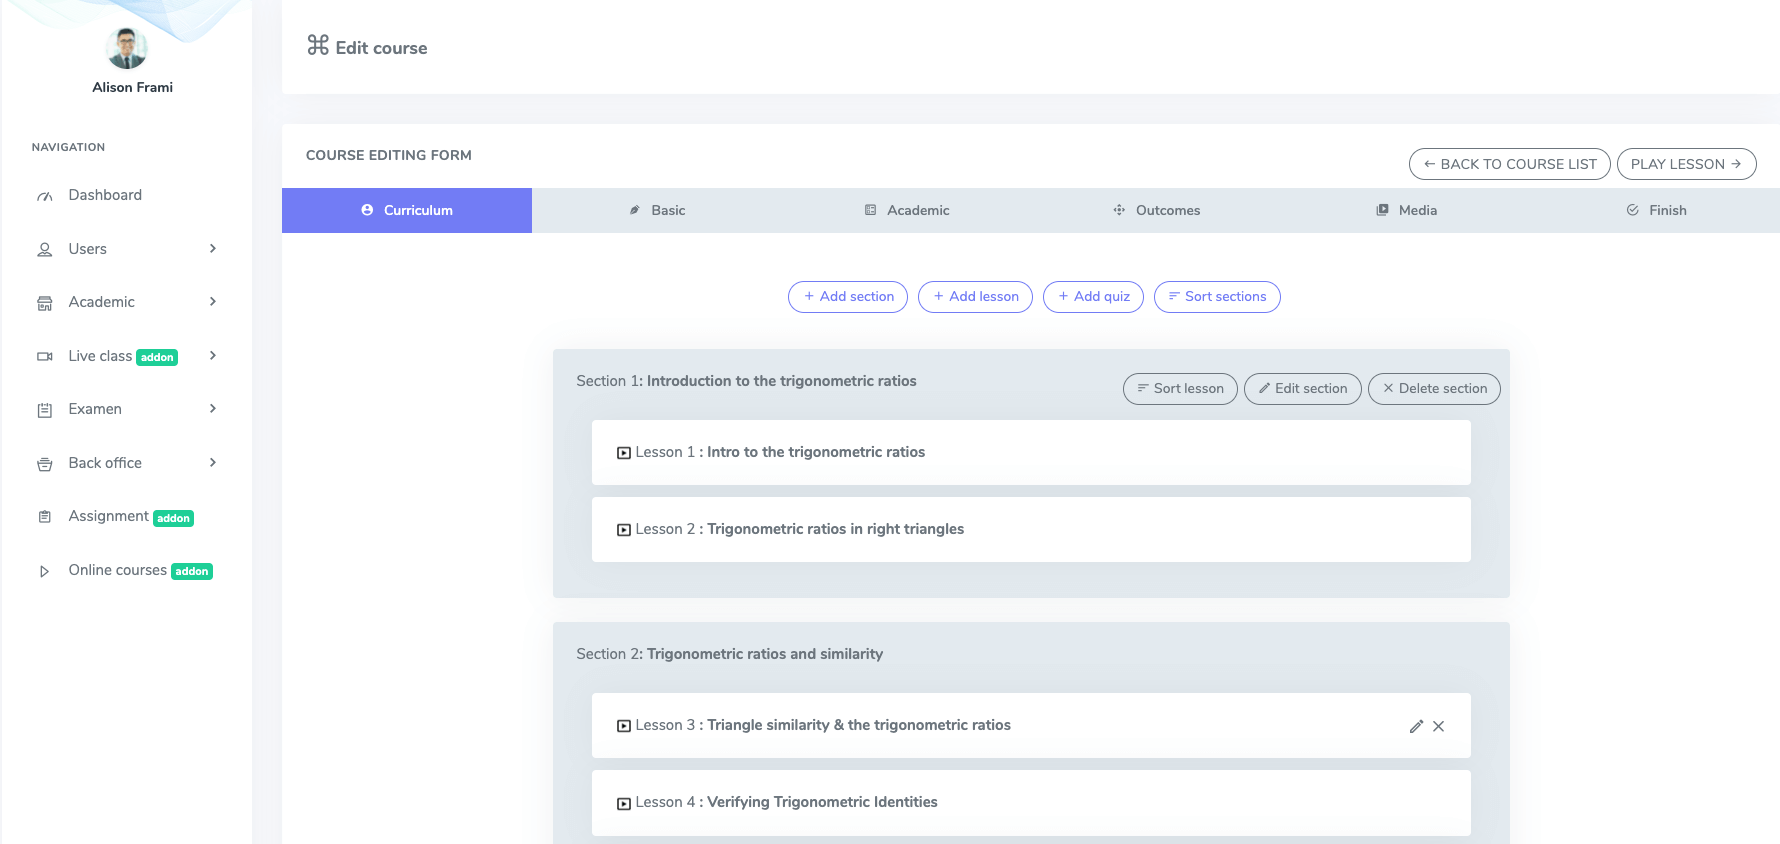
Figure 36. Ekattor ERP Section Managing option
To update a lesson, your teacher has to navigate:
- Select a lesson.
- Click on the "Edit" button.
Now they have to provide:
- Lesson title
- Lesson section
- Lesson type(You can select different types of lessons)
- Lesson provider (You can choose different types of provider)
- Video URL
- Duration
- Lesson summary
After providing the information, select the "Update lesson"
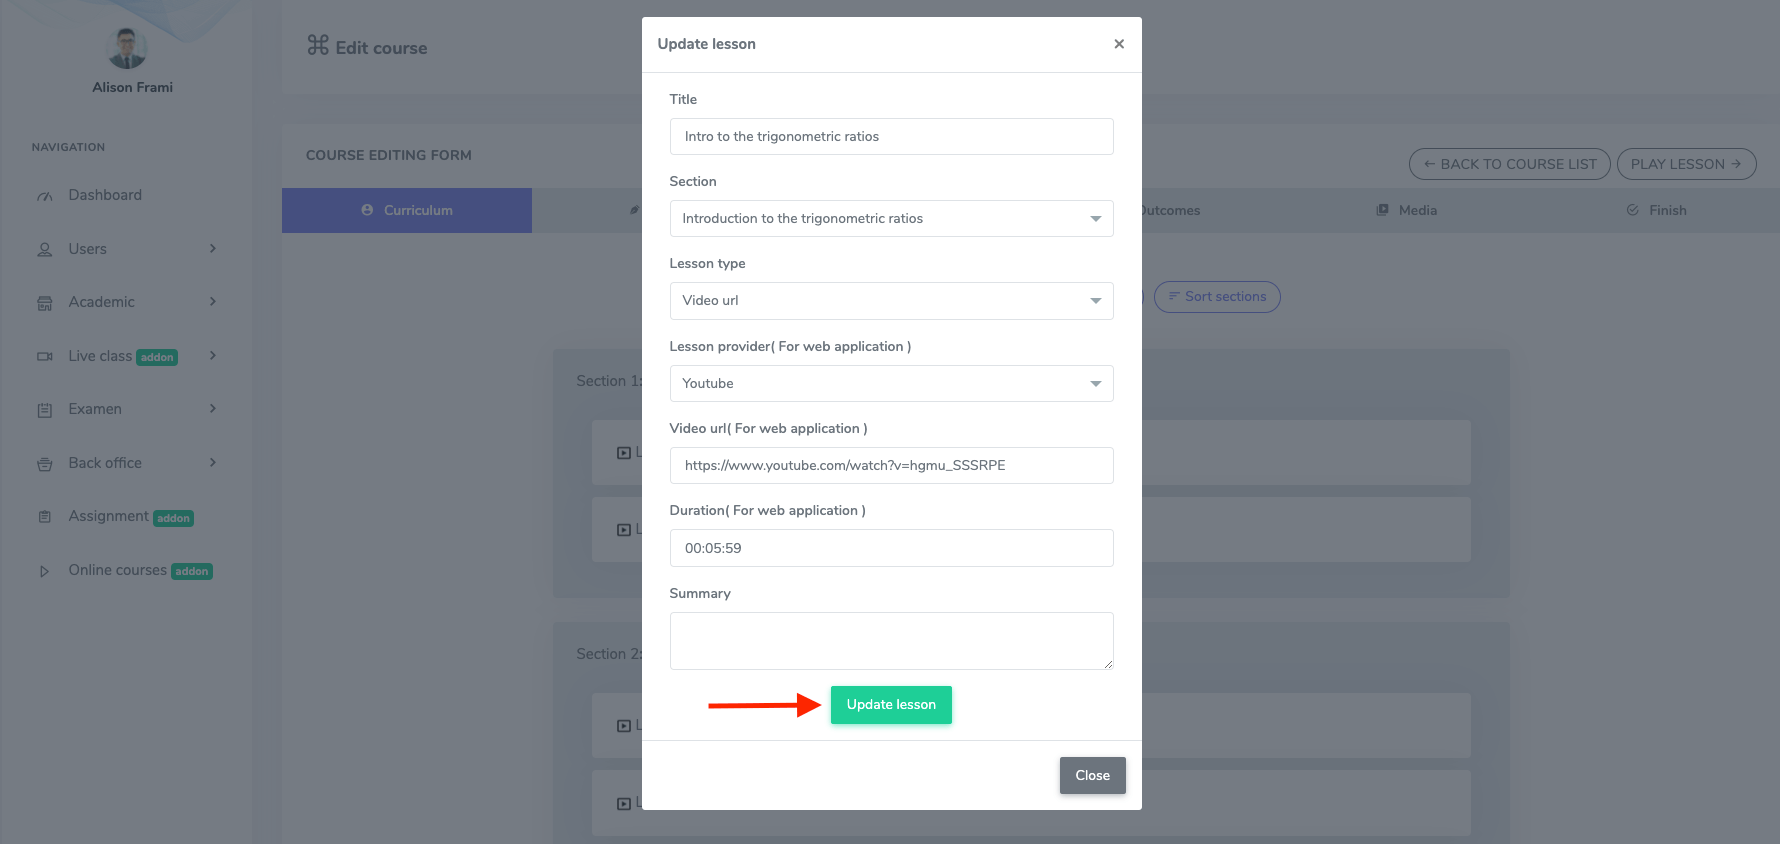
Figure 37. Ekattor ERP Update Sorting
To remove a lesson, they have to select the "x" button. Then click the "Continue" button for confirmation.
1. Basic:
In this form, your teacher has to provide the basic information about your course. Now you have to provide:
- Course
- Description
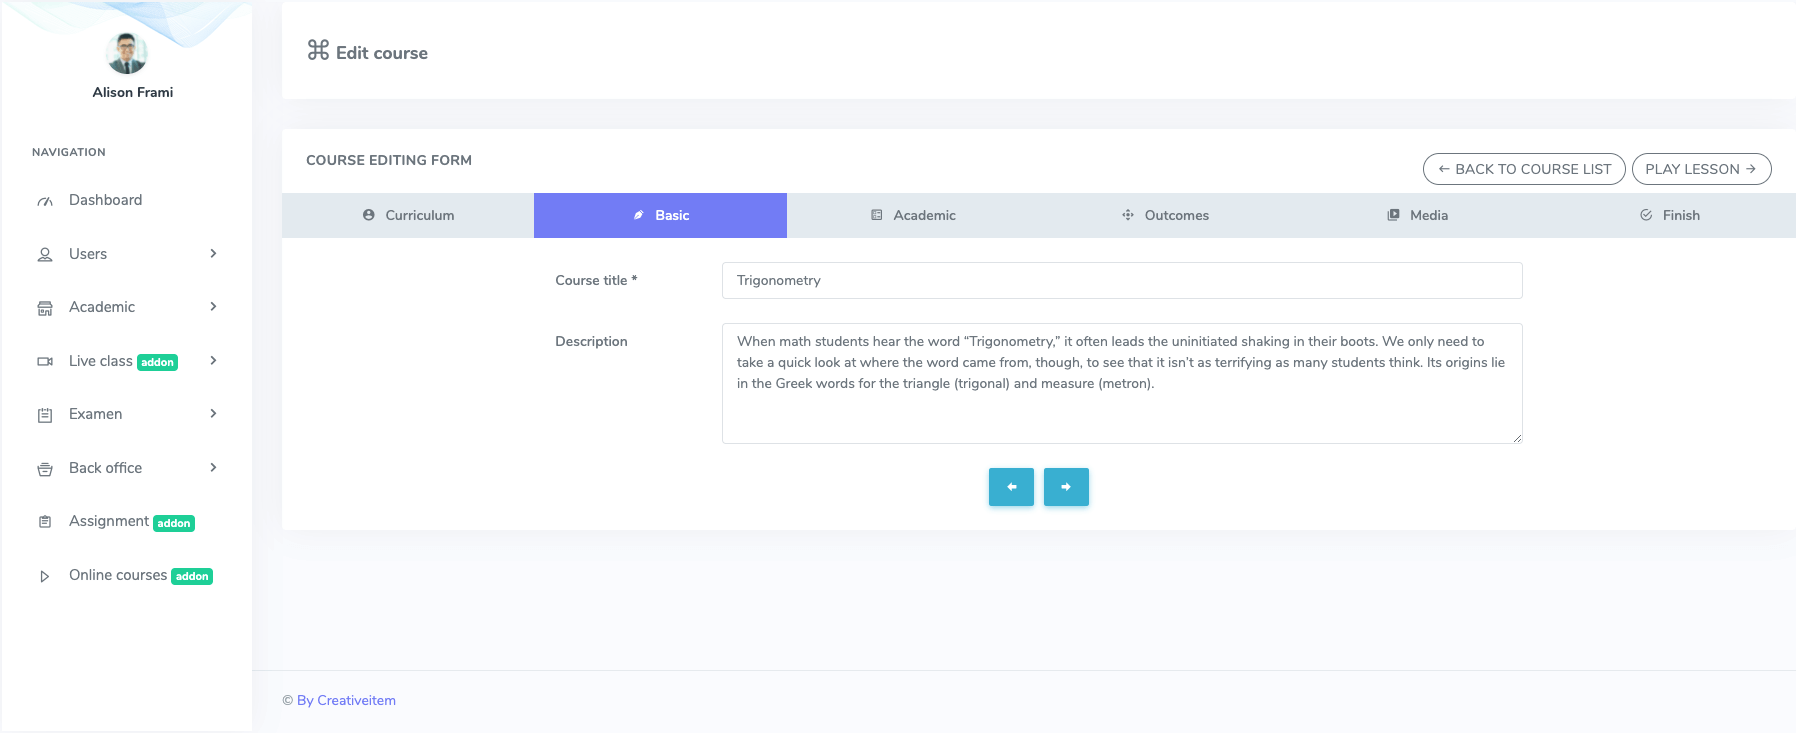
Figure 38. Ekattor ERP Updating Basic Course Form (Teacher)
2. Academic:
After completing the basic information, your teachers have to complete the academic form. Here, they have to select:
- Class
- Subject
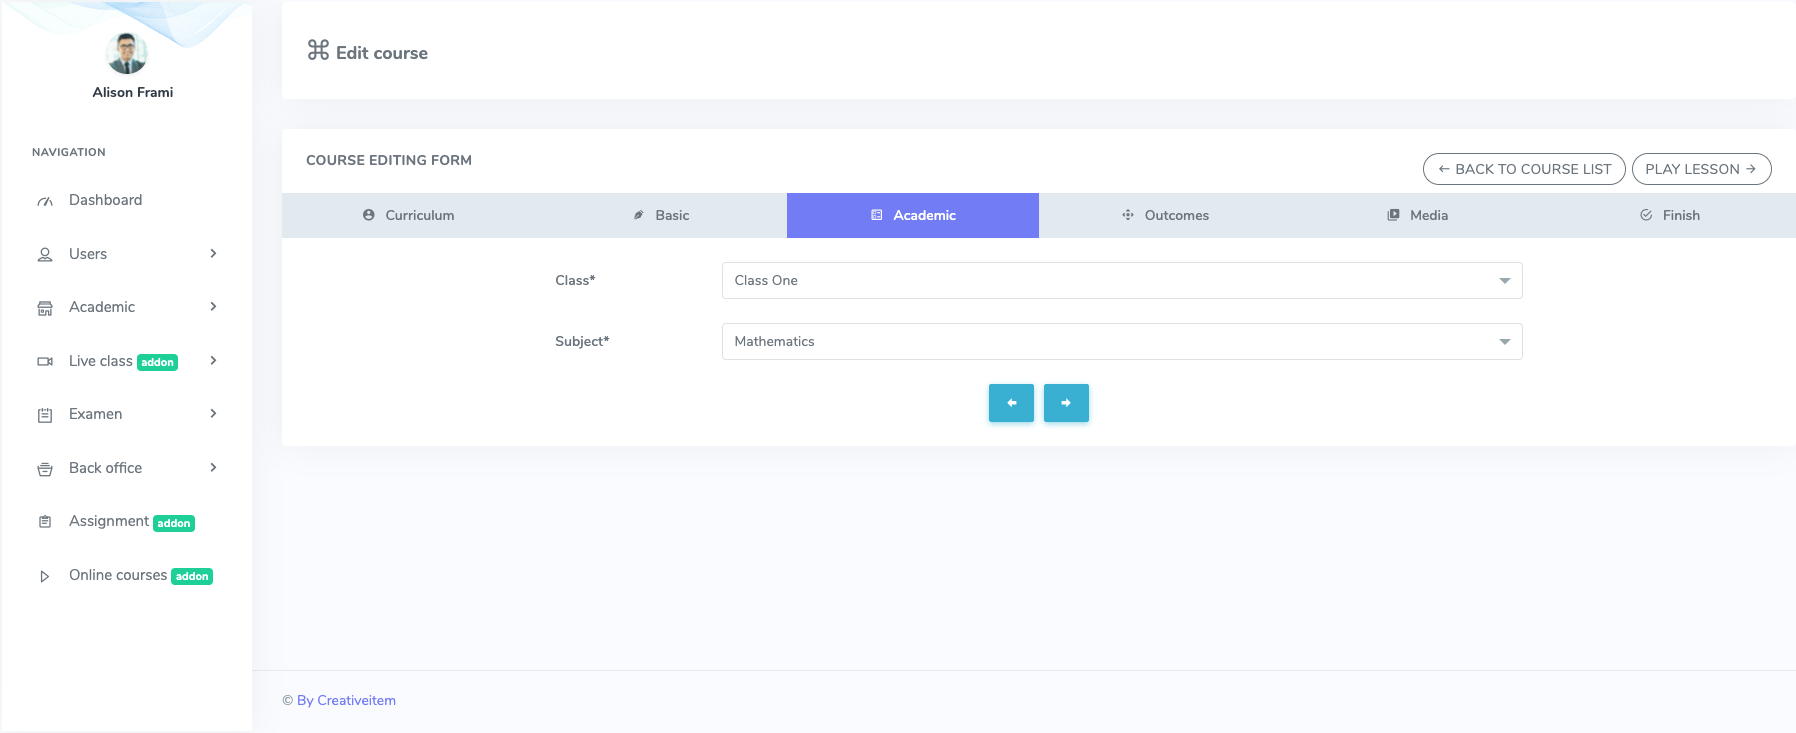
Figure 39. Ekattor ERP Editing Academic Course Form (Teacher)
3. Outcome:
In this form, your teachers have to describe the course. After that, they can move to the next record.
4. Media:
After completing the outcome, your teachers have to complete this form. Here, they have to provide:
- Course overview provider (You can play the course on Youtube, Vimeo, HTML5)
- Course overview URL
- Course thumbnail (You can select the image from your device)
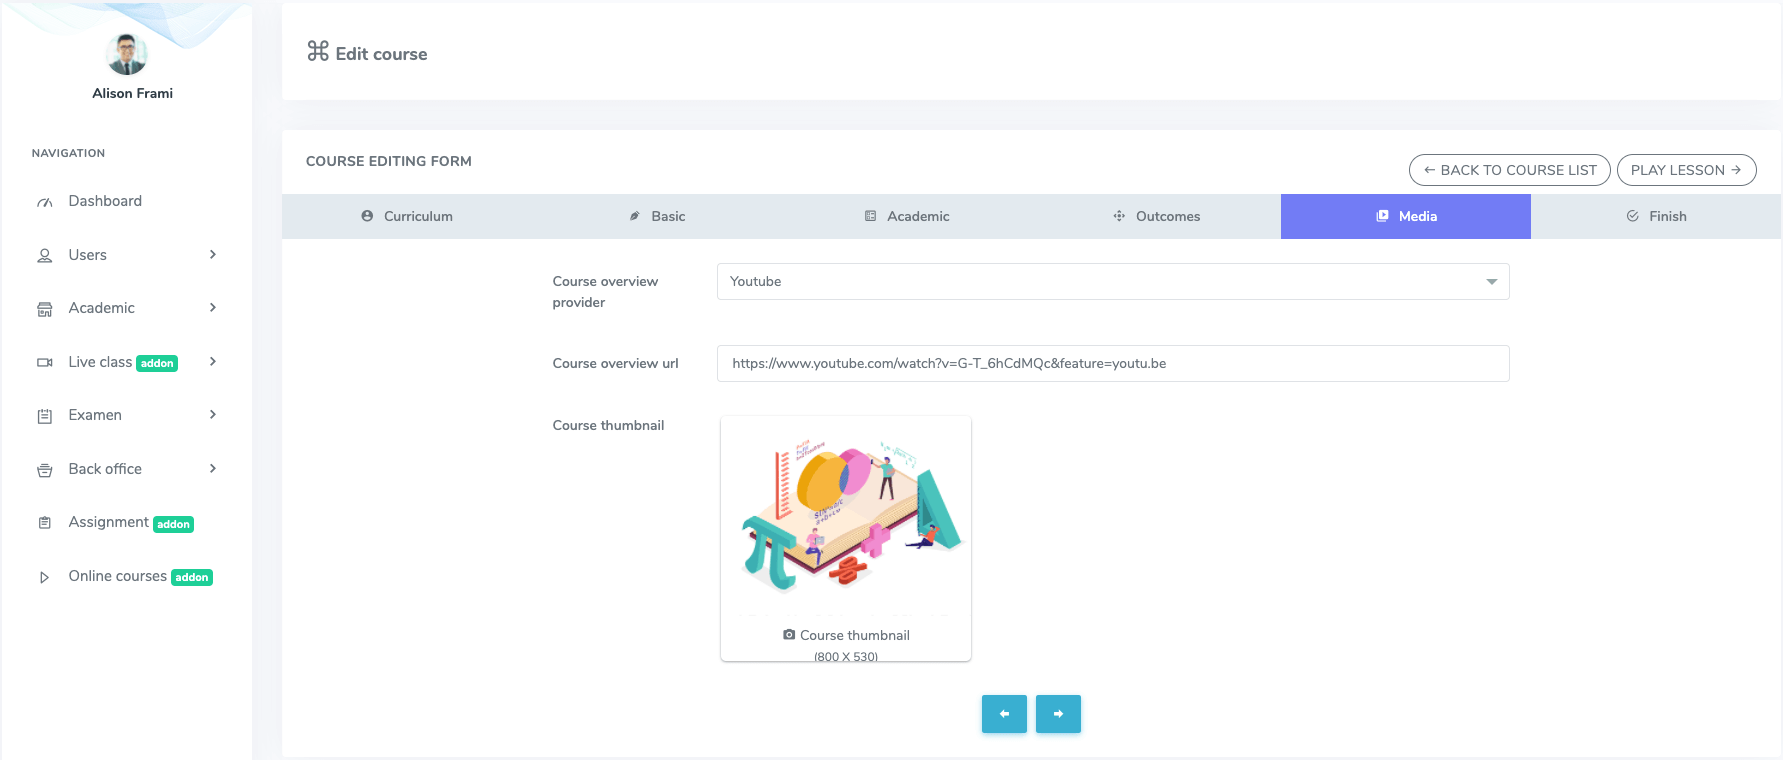
Figure 40. Ekattor ERP Editing Media Course Form (Teacher)
After providing all data, your teachers have to select the "Submit" button from the "Finish" option.
To update and modify the lesson and quiz section, they have to:
- Select the teacher panel
- Select the "Online course" addon
- Open the "Action" option from the course list
Your teachers can update and modify the "Lesson and quiz" section from the "Edit this course" panel. To change the course status from this panel, they have to select the "Action" option and change the status (Mark as Active/Mark as Inactive).
To remove the online course, they have to select the "Delete" option from "Action." Then choose the "Continue" button for confirmation.
Student's Panel:
Your students can watch your lesson, course information in summary. They can also continue learning from the last lesson in this school management system. For this, they have to navigate:
- Log in to the student panel.
- Select the "Online course" button from the left menu.
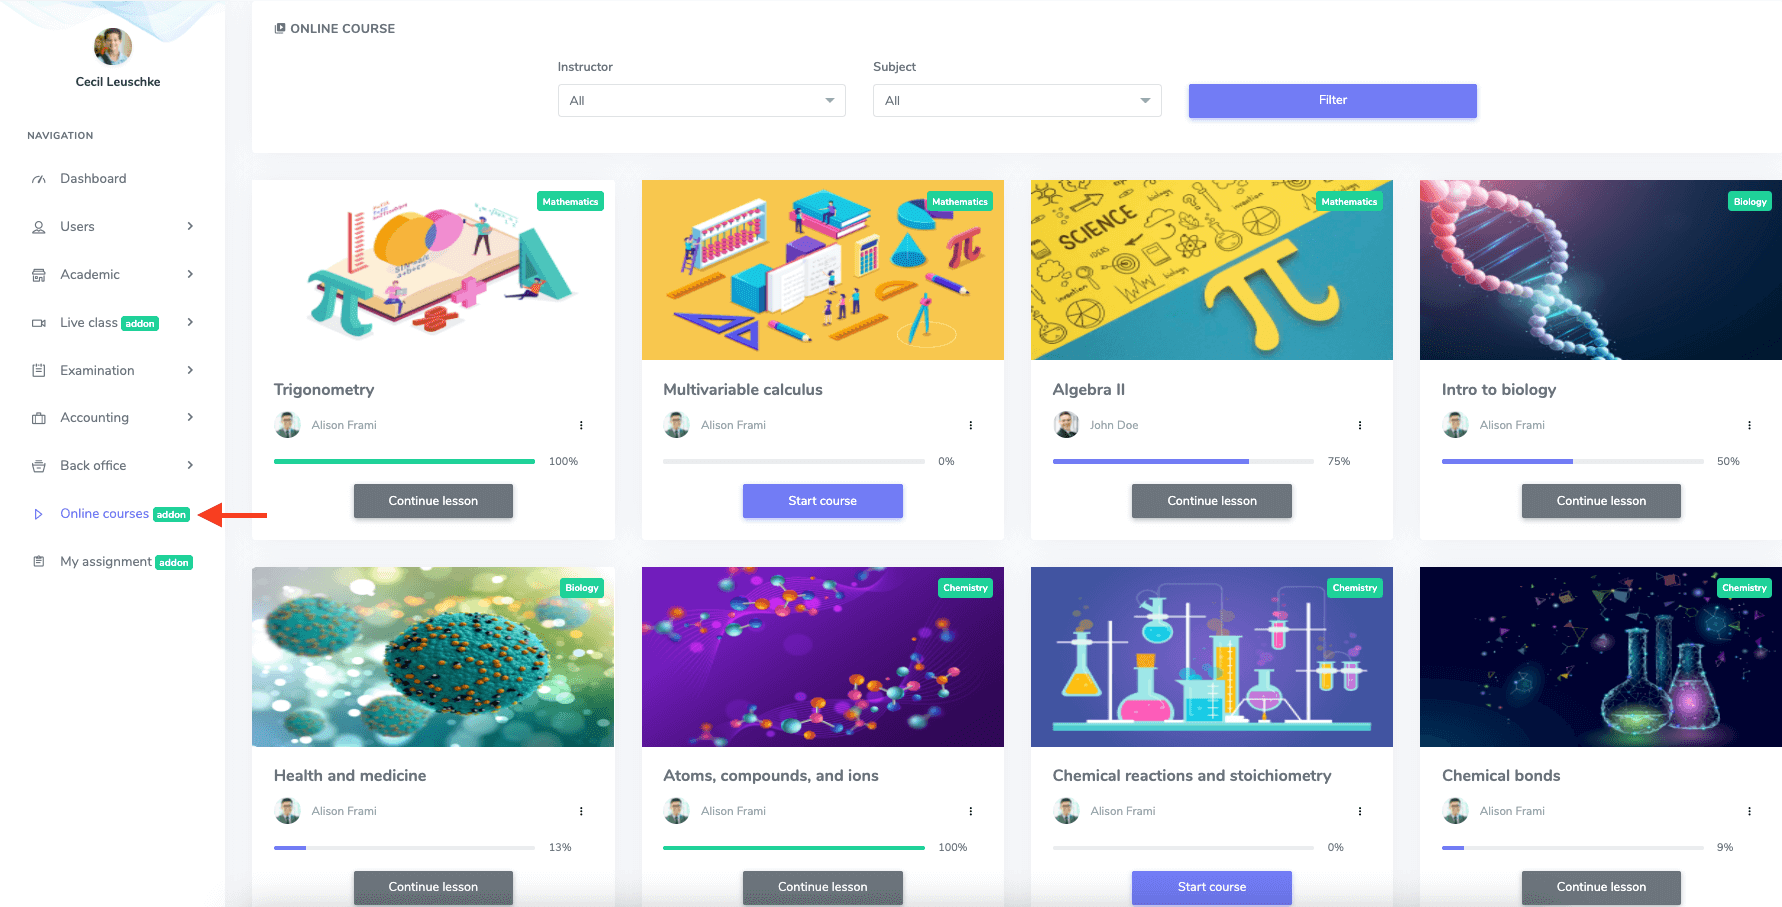
Figure 41. Ekattor ERP Online Course (Student)
In this panel, your students can "Filter" the course by providing the required information.

Figure 42. Ekattor ERP Filtering The Course (Student)
Your students can watch your courses in this panel by selecting the "Continue lesson" or " Start course" button.

Figure 43. Ekattor ERP Start/Continue The Course
After selecting the button, your students can start or continue the lesson. They can also continue your learning from the last lesson they have watched.
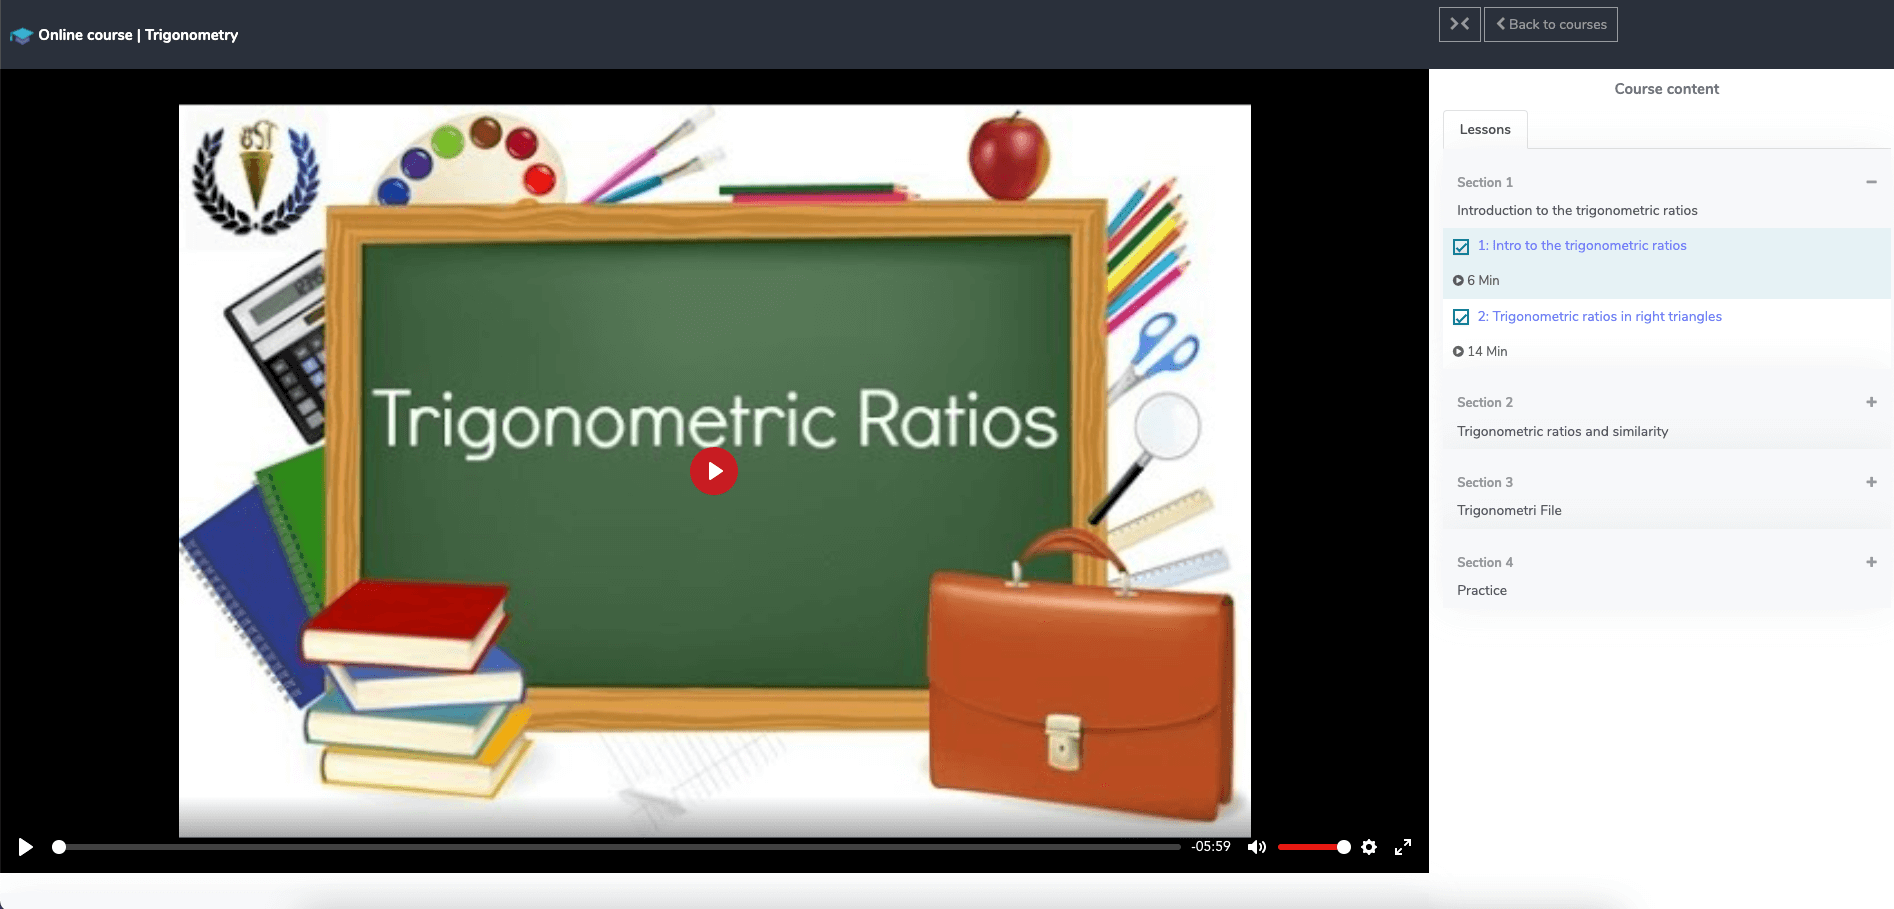
Figure 44. Ekattor ERP Watching The Course
Your students can also select the course preview and information in the course "Option" section.

Figure 45. Ekattor ERP Course Options
Was this article helpful to you?
Contact us and we will get back to you as soon as possible

