How to Manage Project
In Insight CRM Laravel, you can create projects and manage them efficiently. As an admin, you can oversee multiple projects, assign tasks, and track progress. You can also attach important files and set milestones to ensure smooth workflow management.
Your team members can also create projects, but they require approval from the site admin before they become active.
Insight CRM provides an efficient way to manage categories and organize them into projects. Follow the structured step-by-step guide for managing Categories and Projects in Insight CRM.
How to Manage Search, Export, Filter, Grid View, and List View
- Log in to the Admin and access the Dashboard from the Admin Panel.
- Navigate to Project from the left menu.
- Click on Project from the left menu a window will appear.
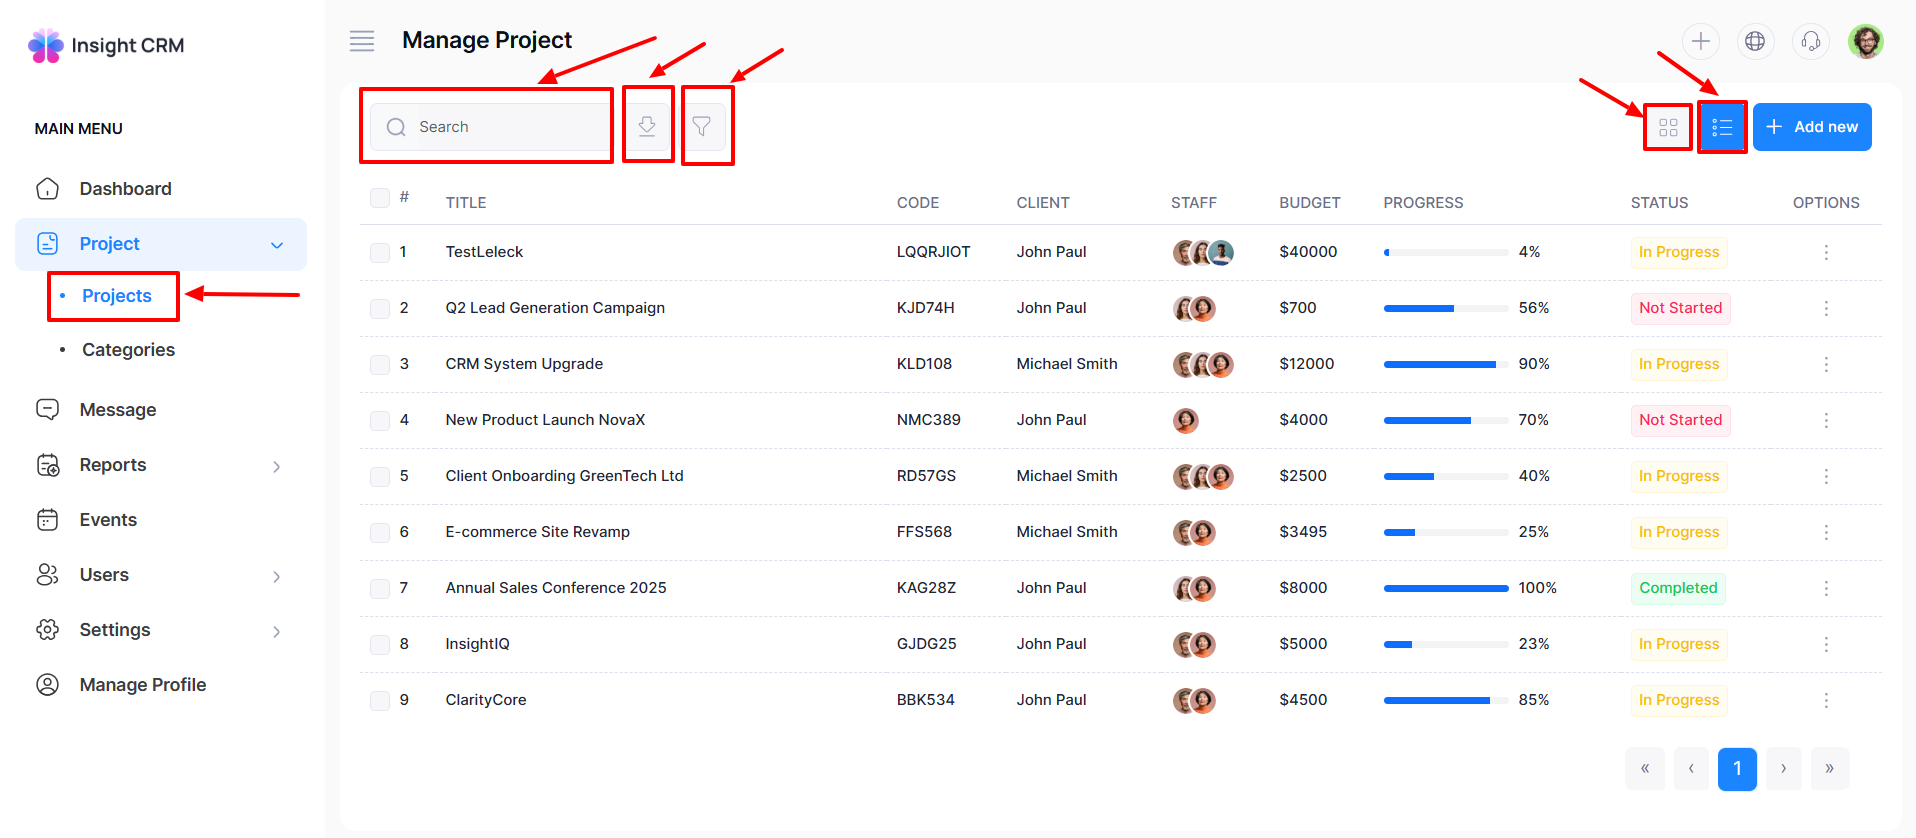
- Click the Search button and type the desired title name to view.
- Click the Export button a new window will pop up with PDF, CSV, and Print.
-
- If you click the PDF button automatically downloads the selected document.
- If you click the CSV button automatically downloads the selected document.
- If you click the Print button automatically prints the selected document.
-
- Click the Filter button a new window will pop up as you desired.
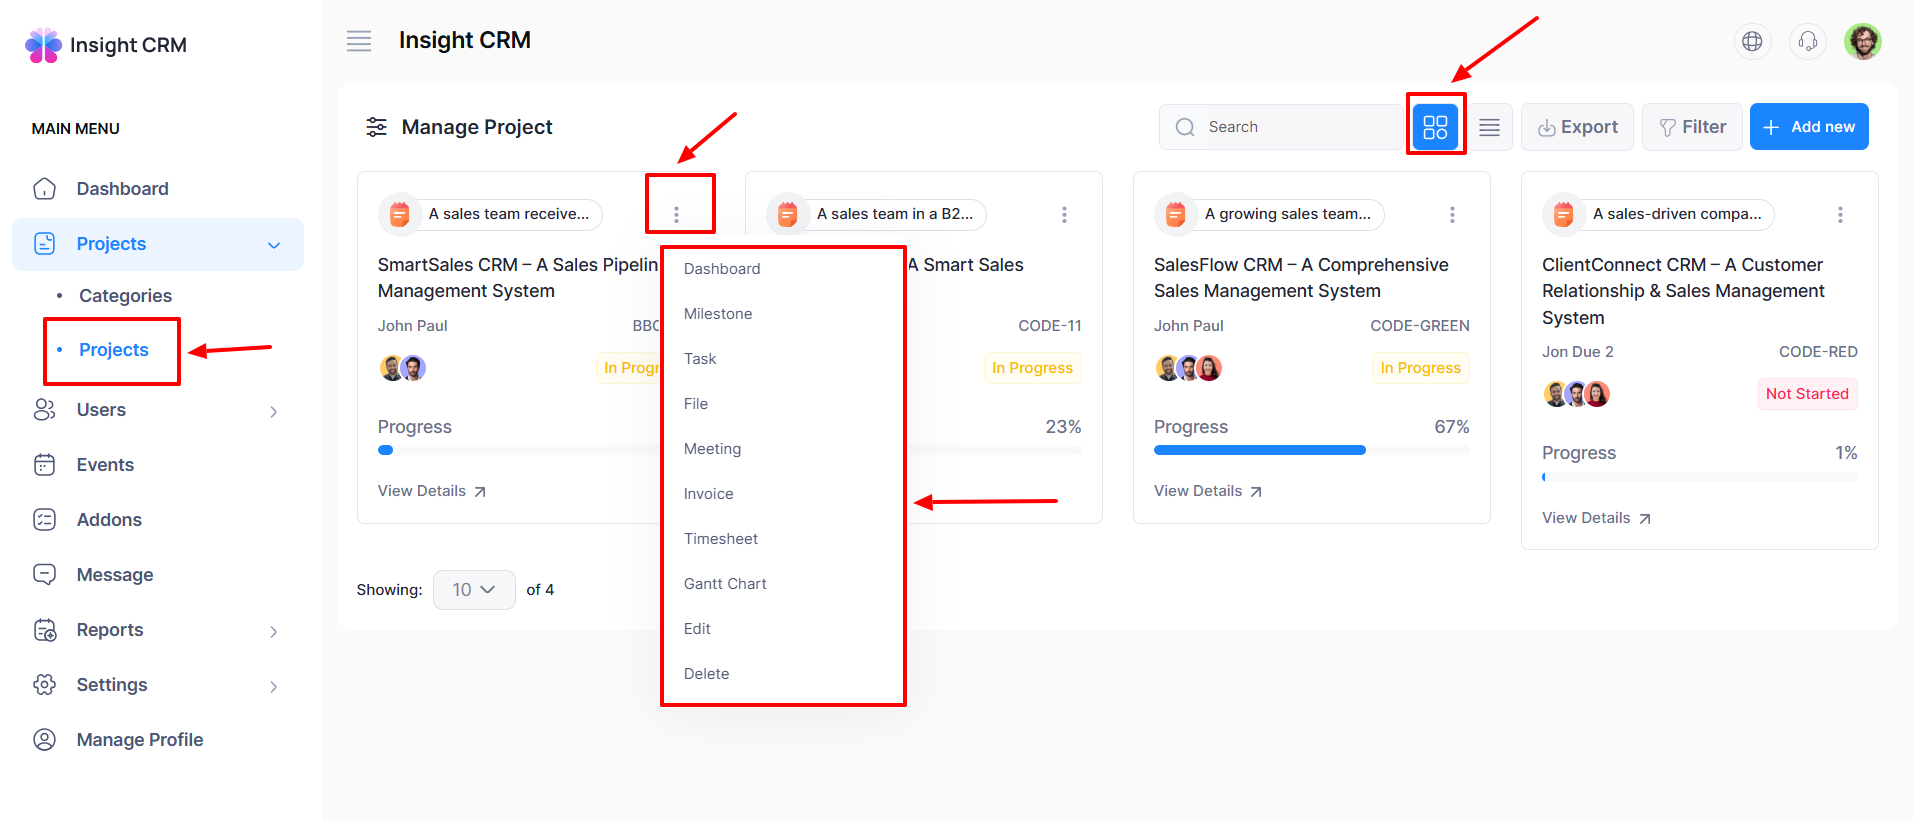
- Click the Grid View button a new window will appear with all listed projects. You will get an opportunity to edit the project form from this window.
- Click the List View button a new window will appear with a list of projects.
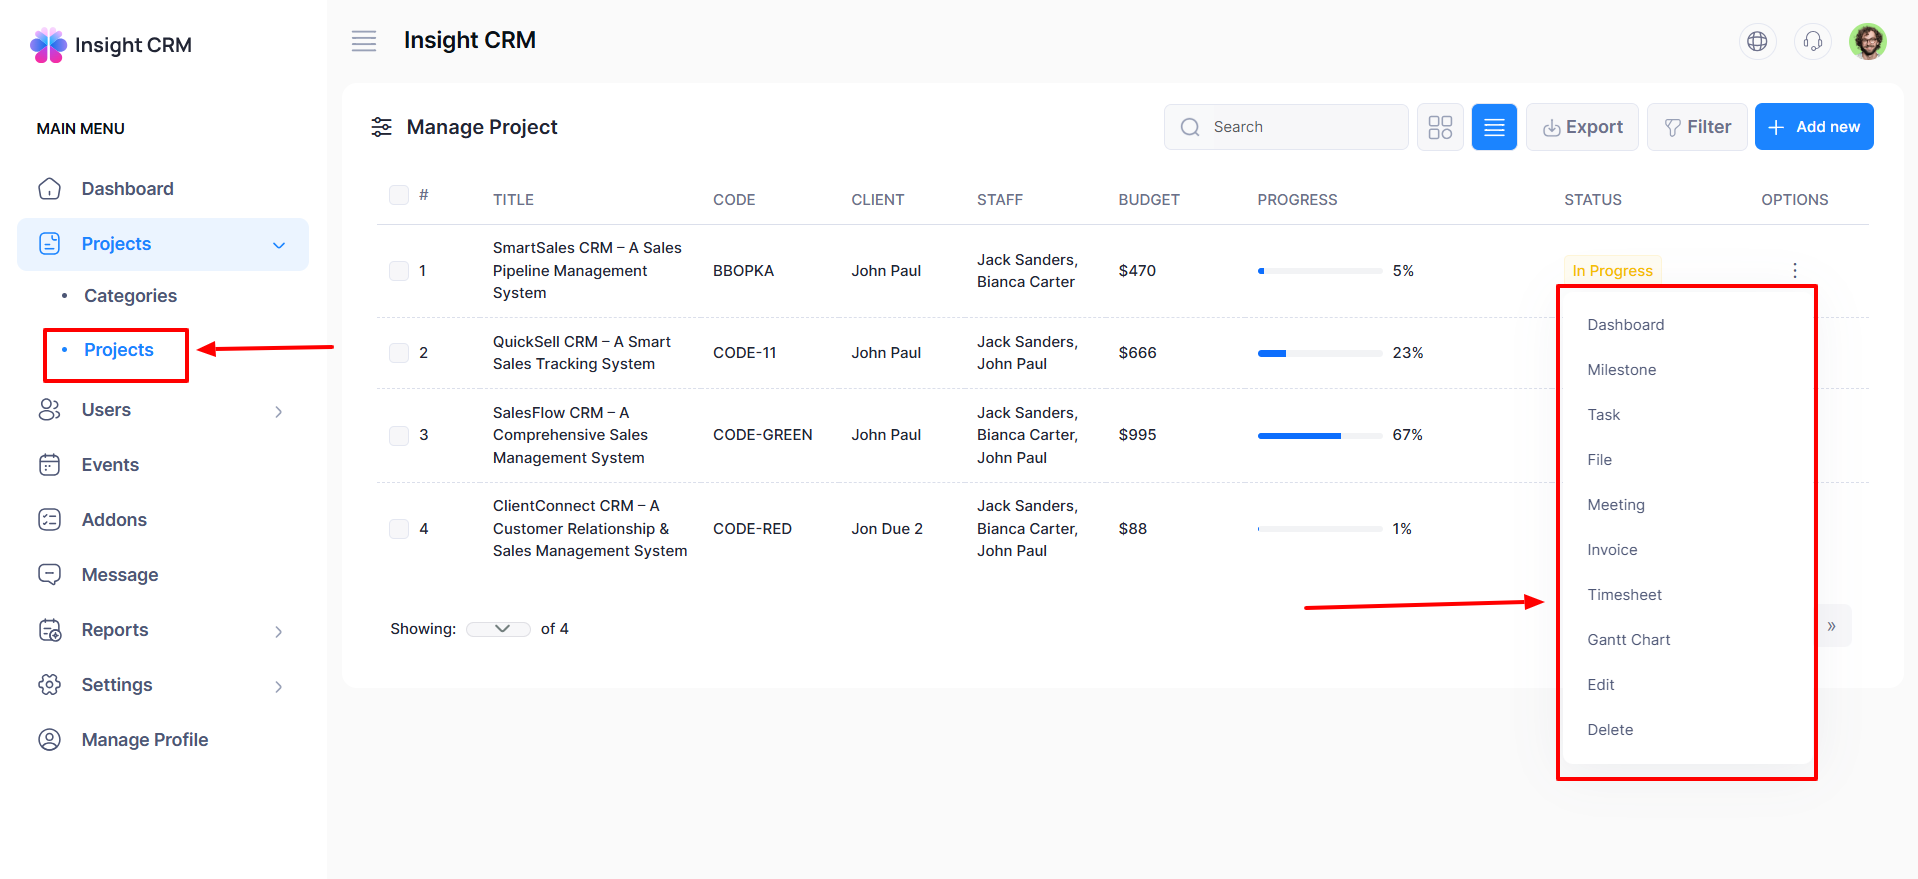
- Click the Options button (three dots) of the respective project, and open a menu with the options: Dashboard, Milestone, Task, File, Meeting, Invoice, Timesheet, Gantt Chart, Edit, and Delete.
How to Add a Project
- Log in to the Admin and access the Dashboard from the Admin Panel.
- Navigate to Project from the left menu.
- Click on Project from the left menu a window will appear.
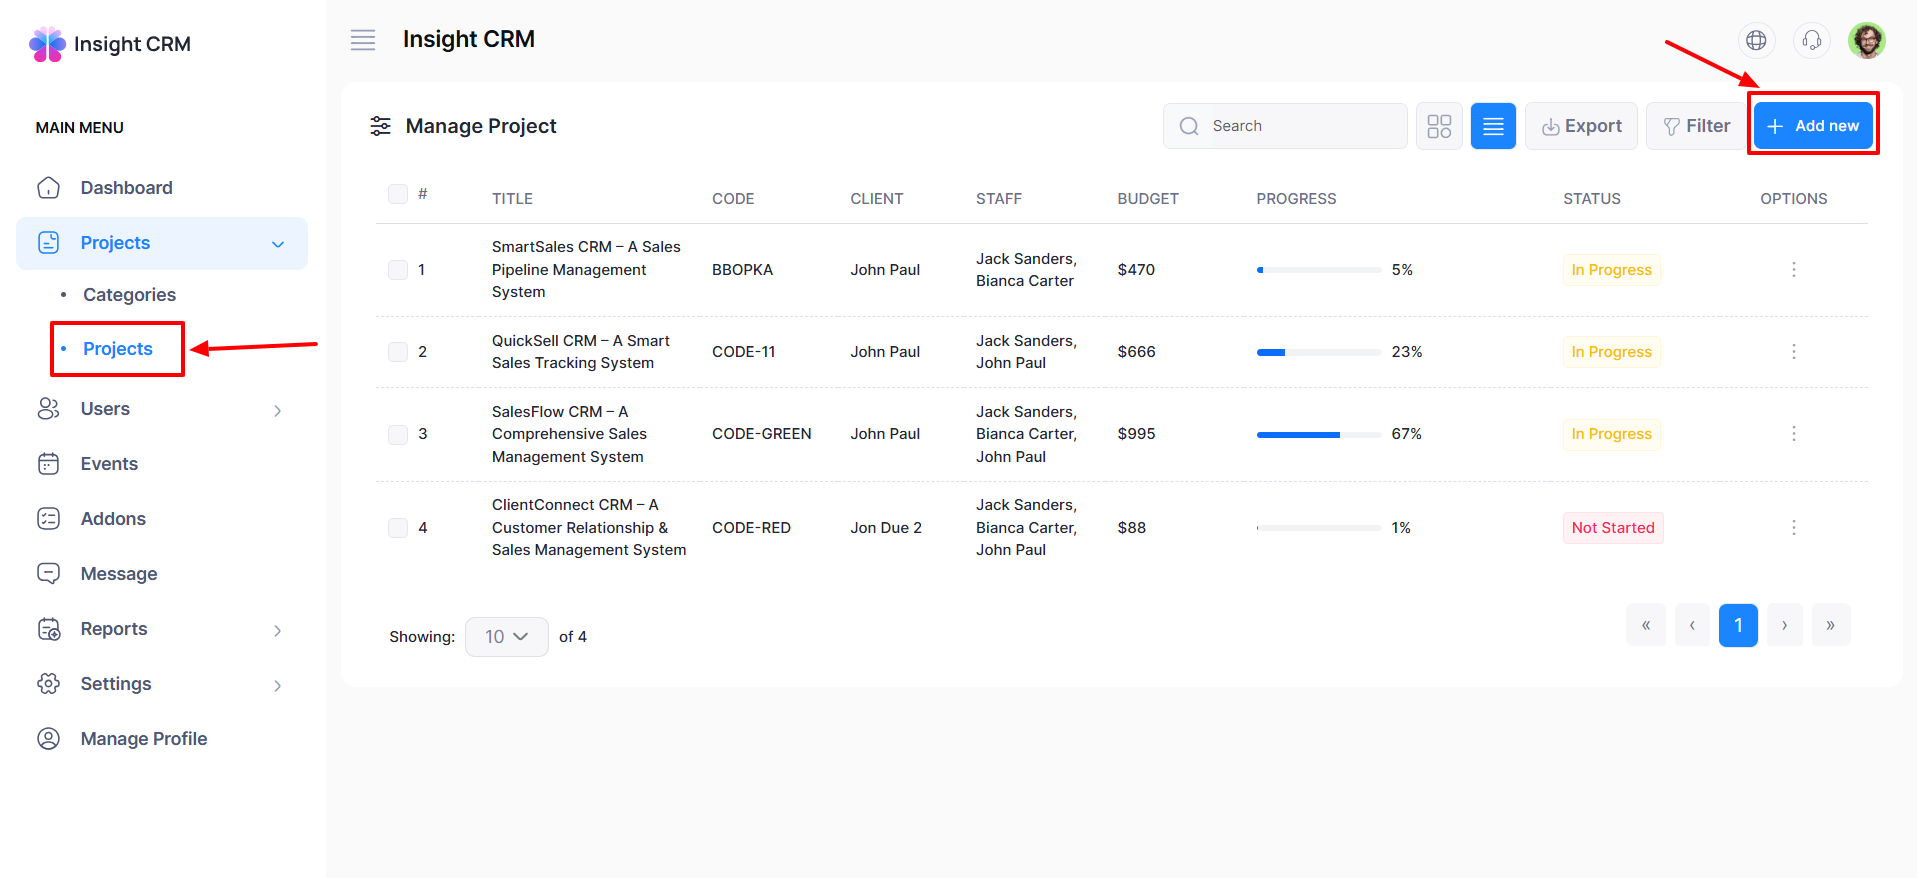
- Click the Add New button to open an entry format. Or click the Add Now button from the Grid view.
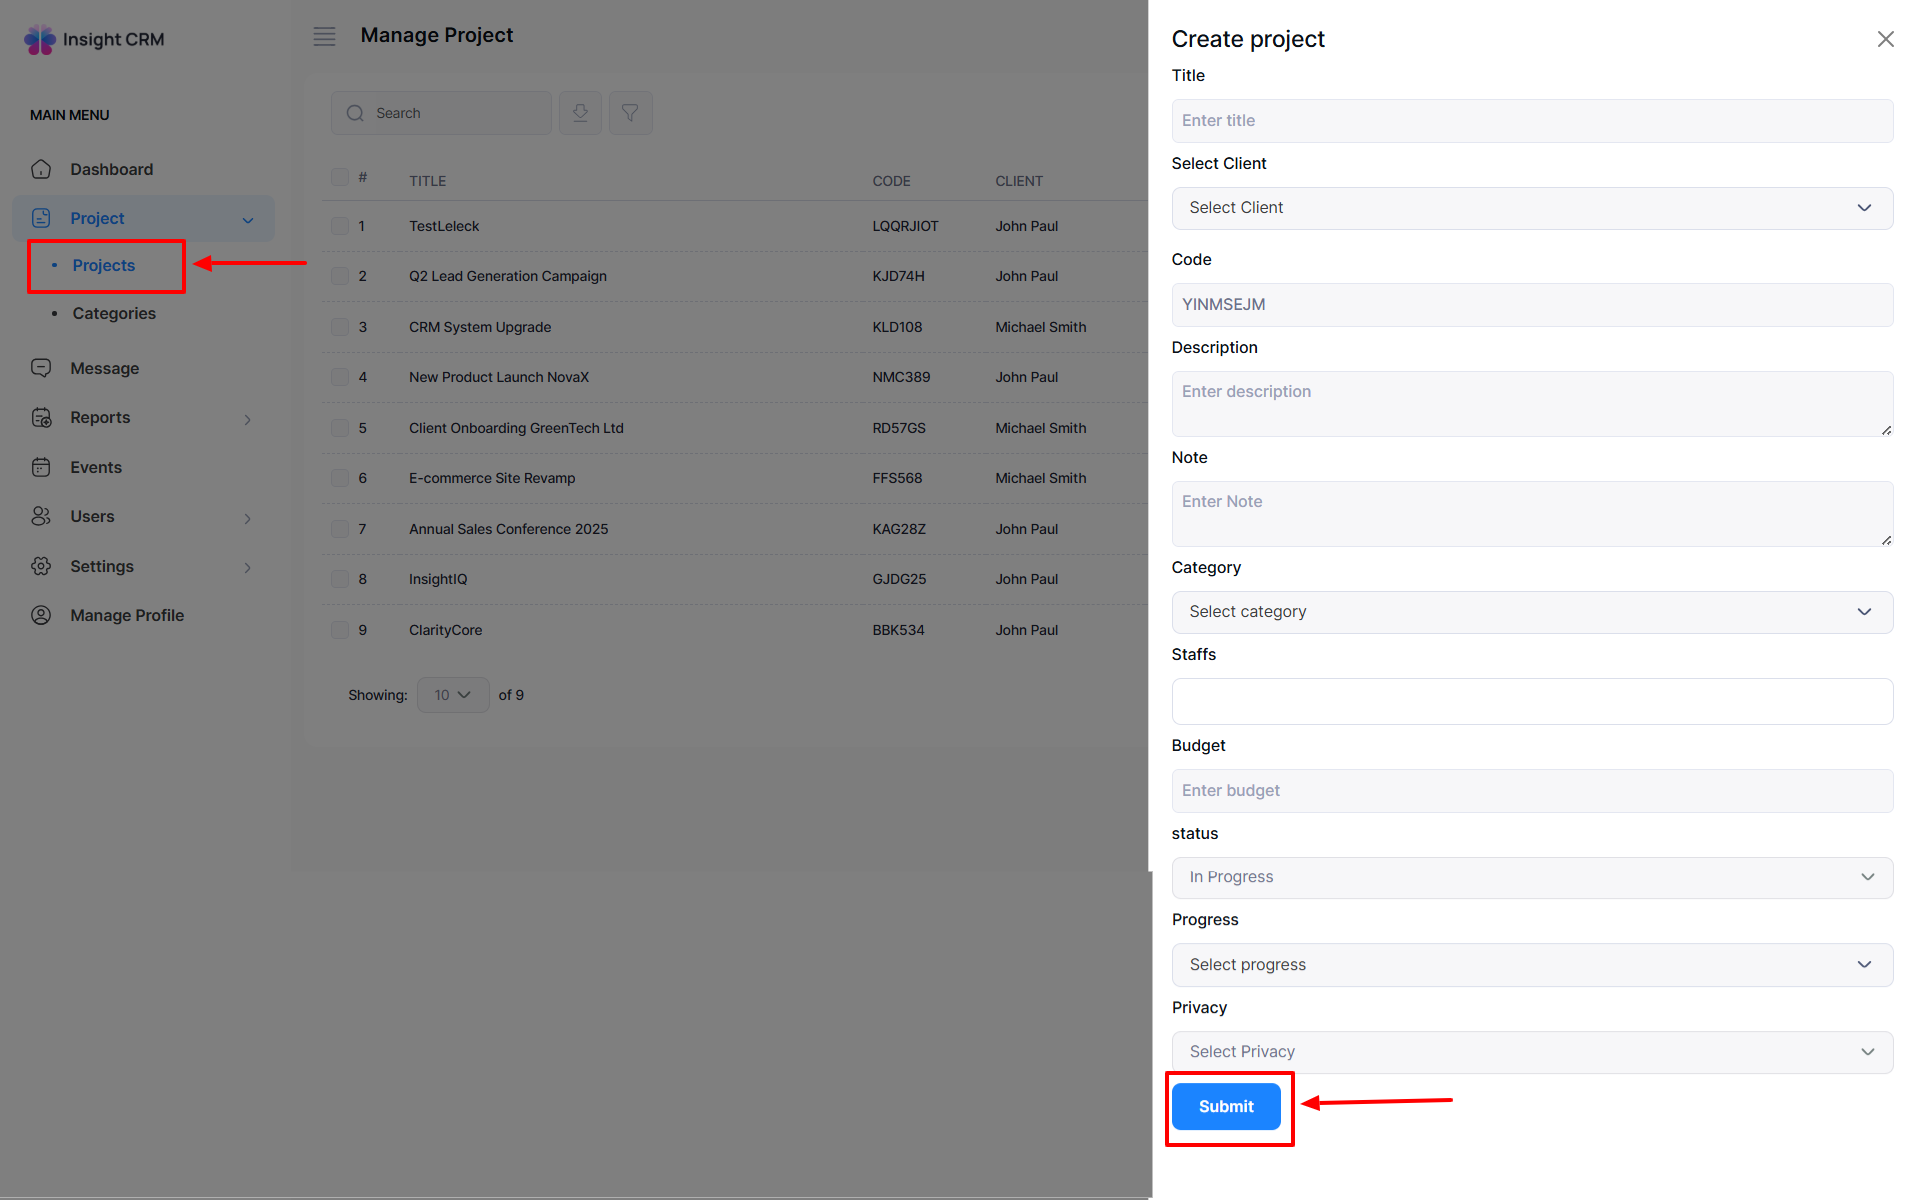
- Fill in the following details:
-
- Enter the Project Name in the Title field.
- Select Client from the dropdown menu.
- Enter the Code in the Code field.
- Type the desired Description in the Description field.
- Type your desired Note in the Note field.
- Select the Category from the Category dropdown menu.
- Input the Staff name in the Staff field.
- Enter the required Budget in the Budget field.
- Select Status from the Status dropdown menu.
- Select Progress from the Progress dropdown menu.
- Select Privacy from the Privacy dropdown menu.
-
- Once all fields are completed, click the Submit button to apply the updates.
How to Edit a Project
- Log in to the Admin and access the Dashboard from the Admin Panel.
- Navigate to Project from the left menu.
- Click on Project from the left menu a window will appear.
- Click the Options button (three dots) for the respective project, and open a menu with the options: Dashboard, Milestone, Task, File, Meeting, Invoice, Timesheet, Gantt Chart, Edit, and Delete.
- Or click the (three dots) from the Grid view respective project.
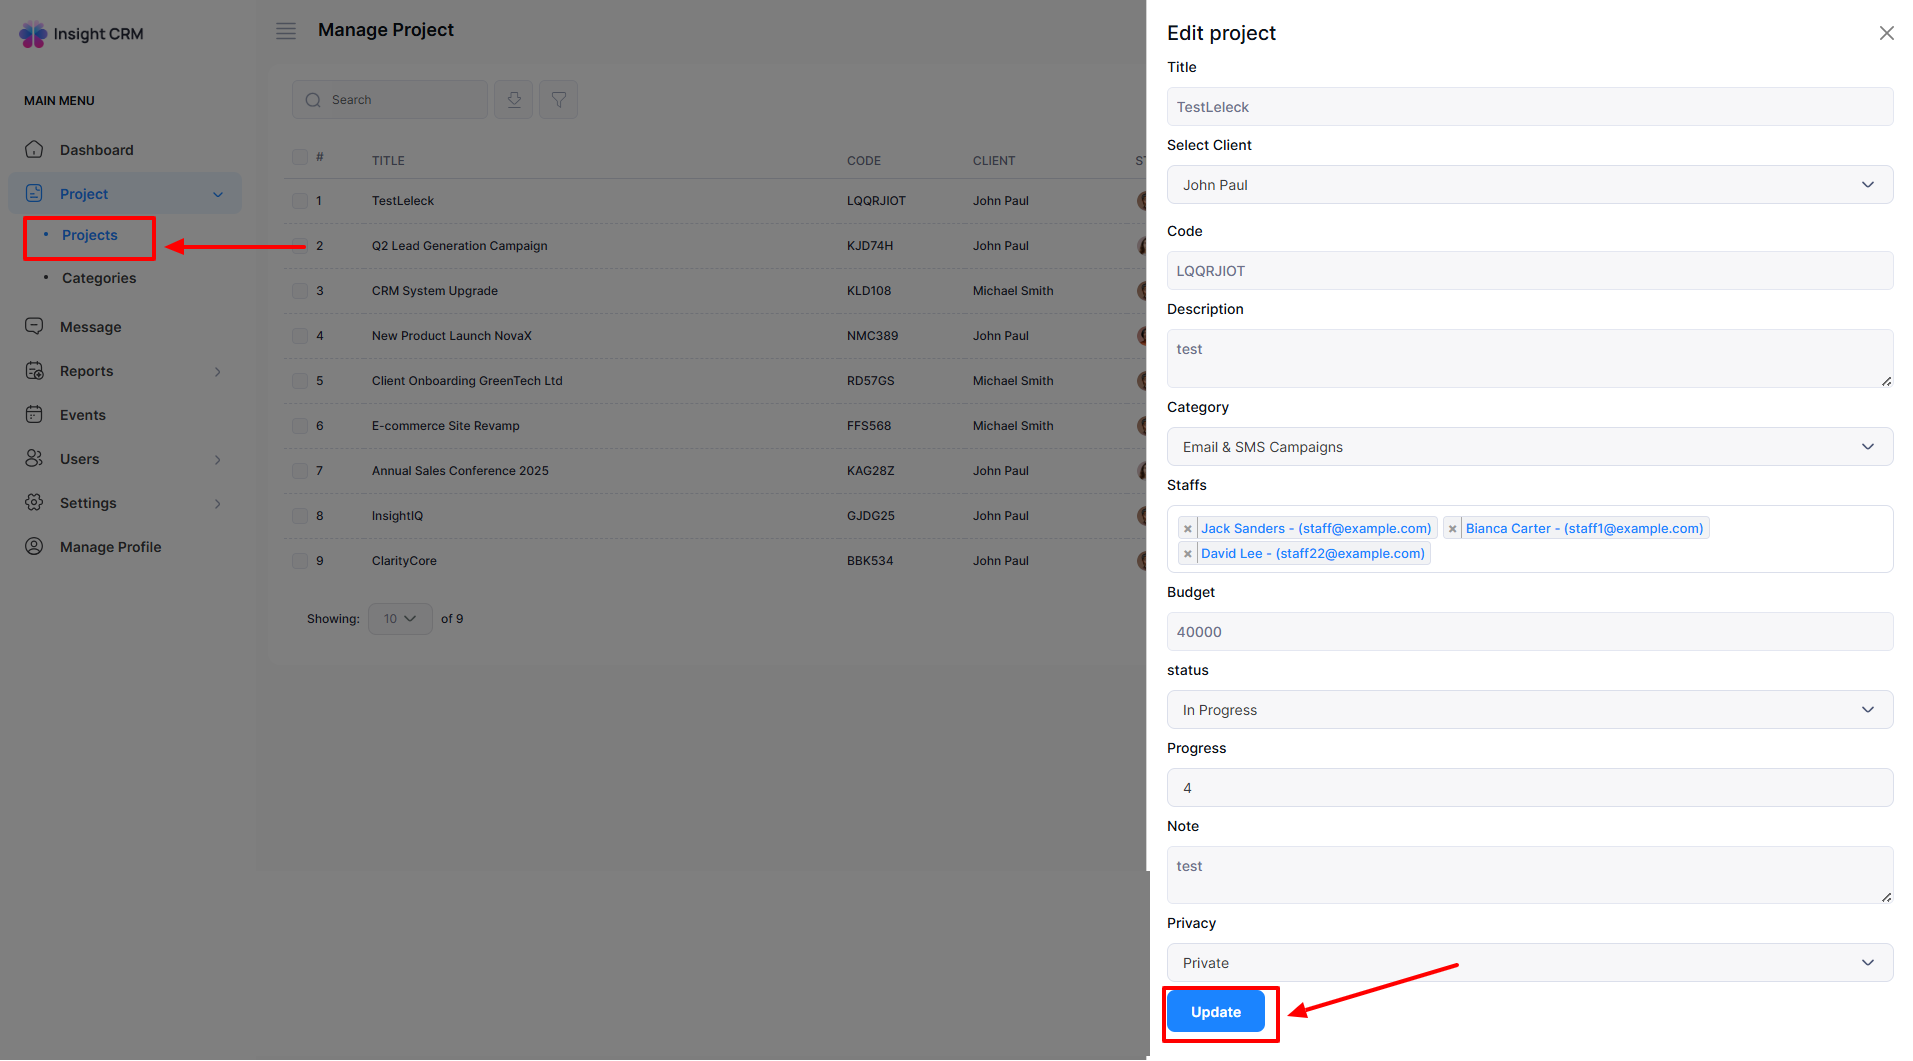
- Finally, click the Edit button of the respective project, and a new entry form will appear
- Fill in the following details:
-
- Enter the Title Name in the Title field.
- Select Clint from the Select Clint dropdown menu.
- Enter the desired Code in the Code field.
- Enter the desired Description in the Description field.
- Select Category from the Category dropdown menu.
- Click the Staff field to select staff from the dropdown menu.
- Type the budget amount in the Budget field.
- Select status from the Status dropdown menu.
- Put the Progress in the Progress field.
- Enter the desired Note in the Note field.
- Select Privacy from the Privacy dropdown menu.
-
- Once all fields are completed, click the Update button to apply the updates.
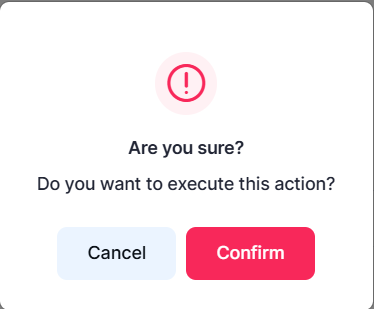
- If you click the Delete button to delete the desire, a new confirmation window will open.
- If you click Confirm, it will delete it permanently; otherwise, click Cancel. Note: Never back it again.
- Note: The same procedure will be applicable in all projects.
How to view the Dashboard
- Log in to the Admin and access the Dashboard from the Admin Panel.
- Navigate to Project from the left menu.
- Click on Project from the left menu a window will appear.
- Click the Options button (three dots) for the respective project, and open a menu with the options: Dashboard, Milestone, Task, File, Meeting, Invoice, Timesheet, Gantt Chart, Edit, and Delete Tab. Or click the three dots in the Grid view of the respective project.
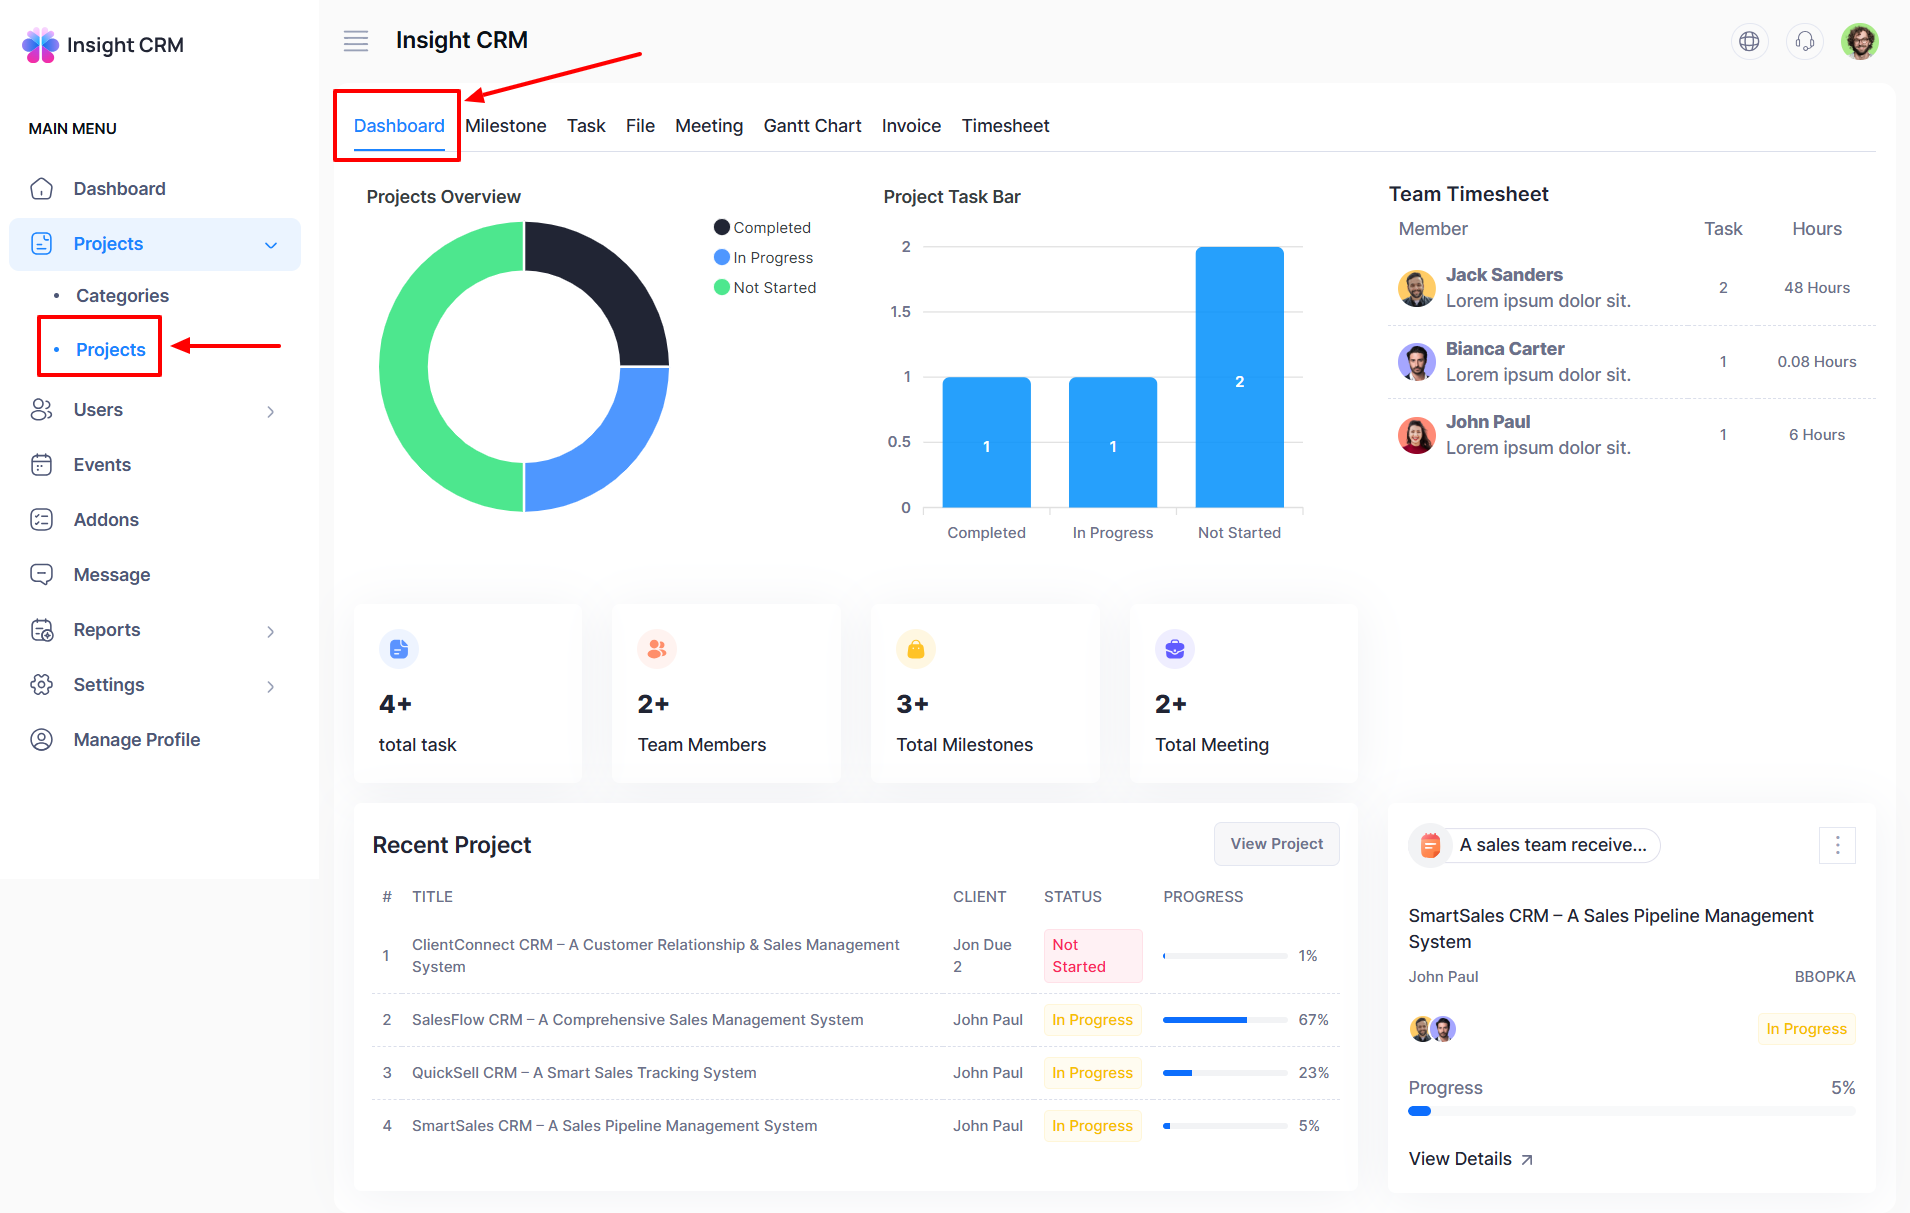
- Finally, click the Dashboard button, and a new window will appear
- Click the Dashboard Tab, and a new window will appear to view the project details.
How to Add New Milestones
- Log in to the Admin and access the Dashboard from the Admin Panel.
- Navigate to Project from the left menu.
- Click on Project from the left menu a window will appear.
- Click the Options button (three dots) of the respective project, and open a menu with the options: Dashboard, Milestone, Task, File, Meeting, Invoice, Timesheet, Gantt Chart, Edit, and Delete Tab. Or click the (three dots) from the Grid view to the respective project.
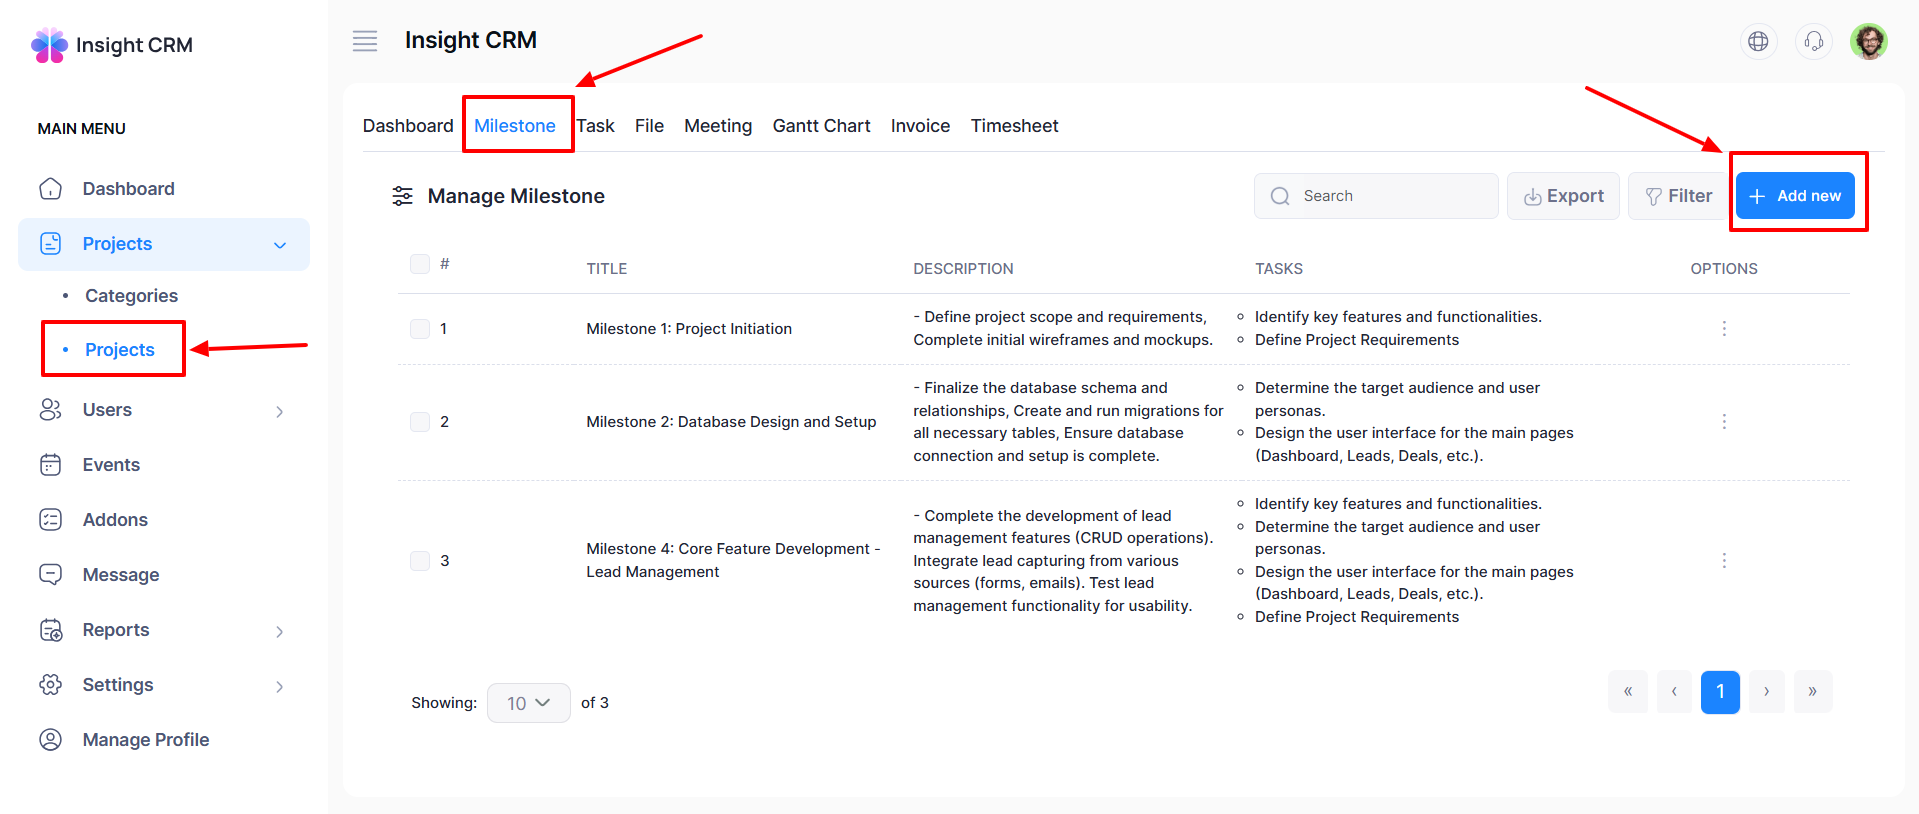
- Finally, click the Milestones tab, and a new window will appear
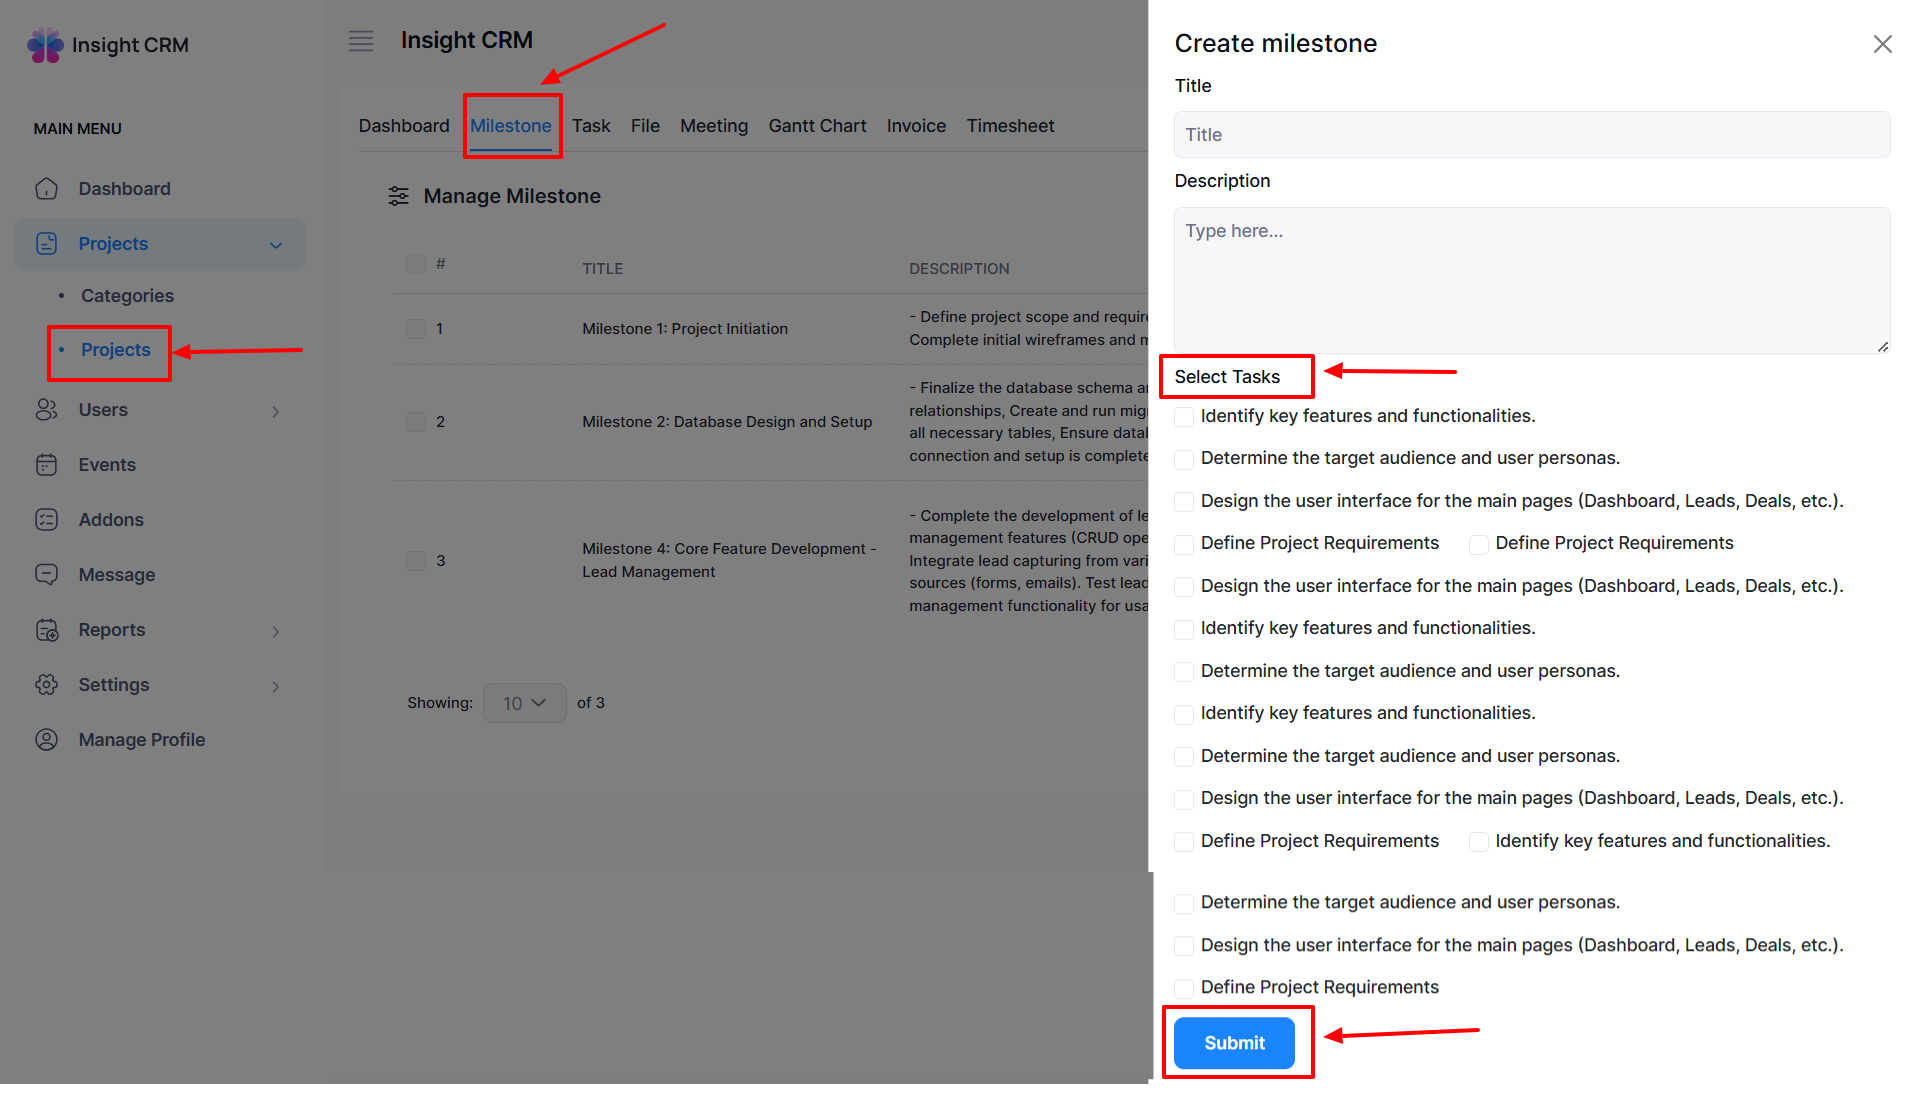
- Click the Add New button a new entry form will appear
- Fill in the following details:
-
- Enter the Title Name in the Title field.
- Type the desired description in the Description field.
- Click the Tick box to select the task in the Select Tasks field.
-
- Once all fields are completed, click the Submit button to apply the updates.
How to Edit Milestones
- Log in to the Admin and access the Dashboard from the Admin Panel.
- Navigate to Project from the left menu.
- Click on Project from the left menu a window will appear.
- Click the Options button (three dots) of the respective project, and open a menu with the options: Dashboard, Milestone, Task, File, Meeting, Invoice, Timesheet, Gantt Chart, Edit, and Delete Tab. Or click the three dots in the Grid view of the respective project.
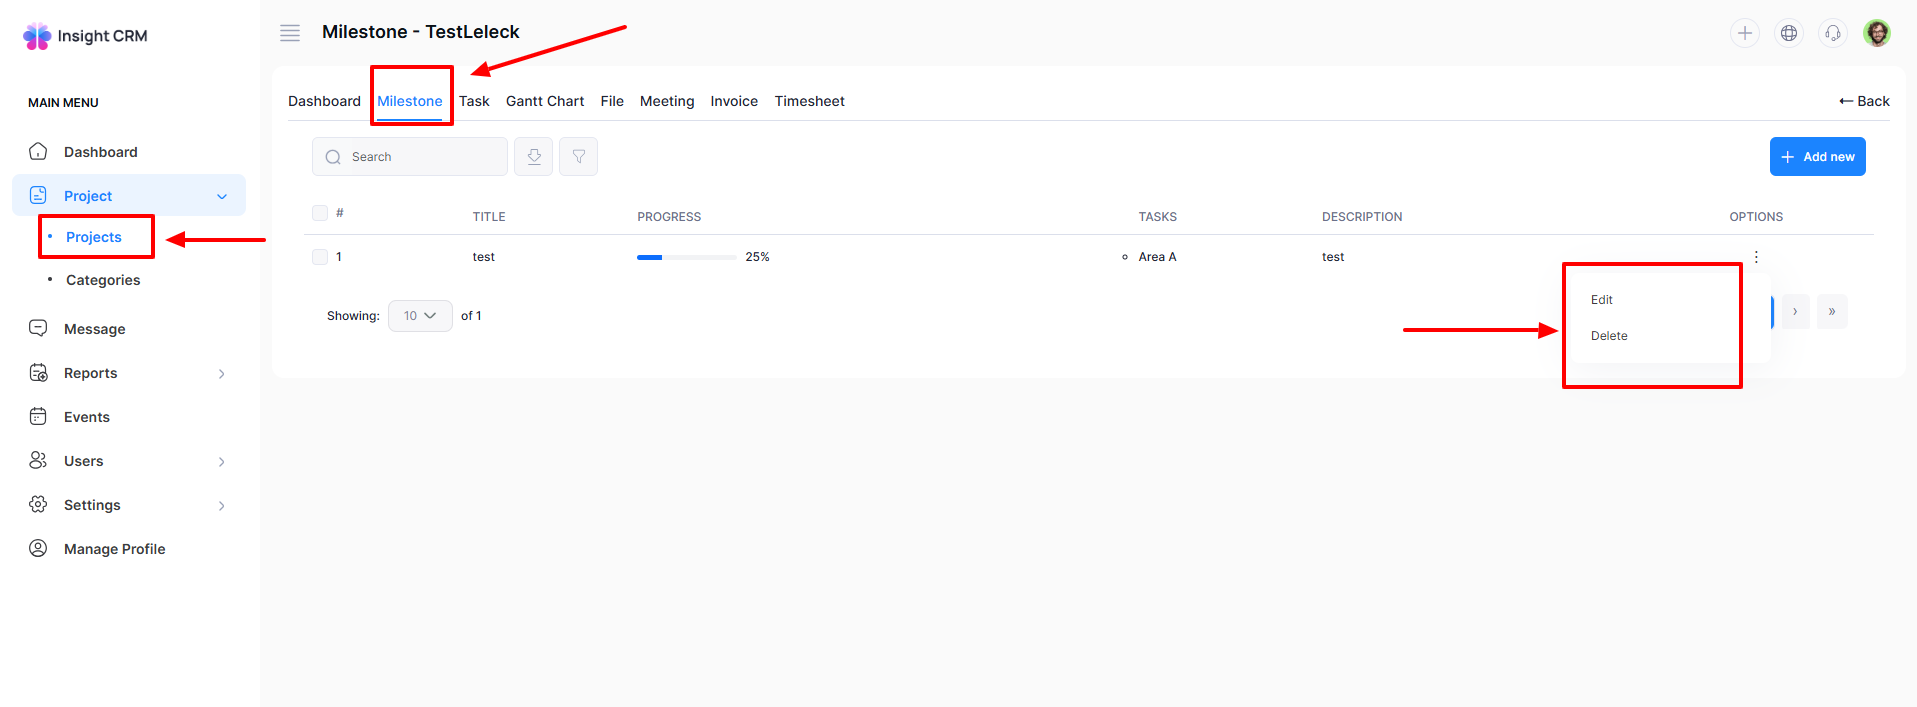
- Finally, click the Milestones Tab, and a new window will appear
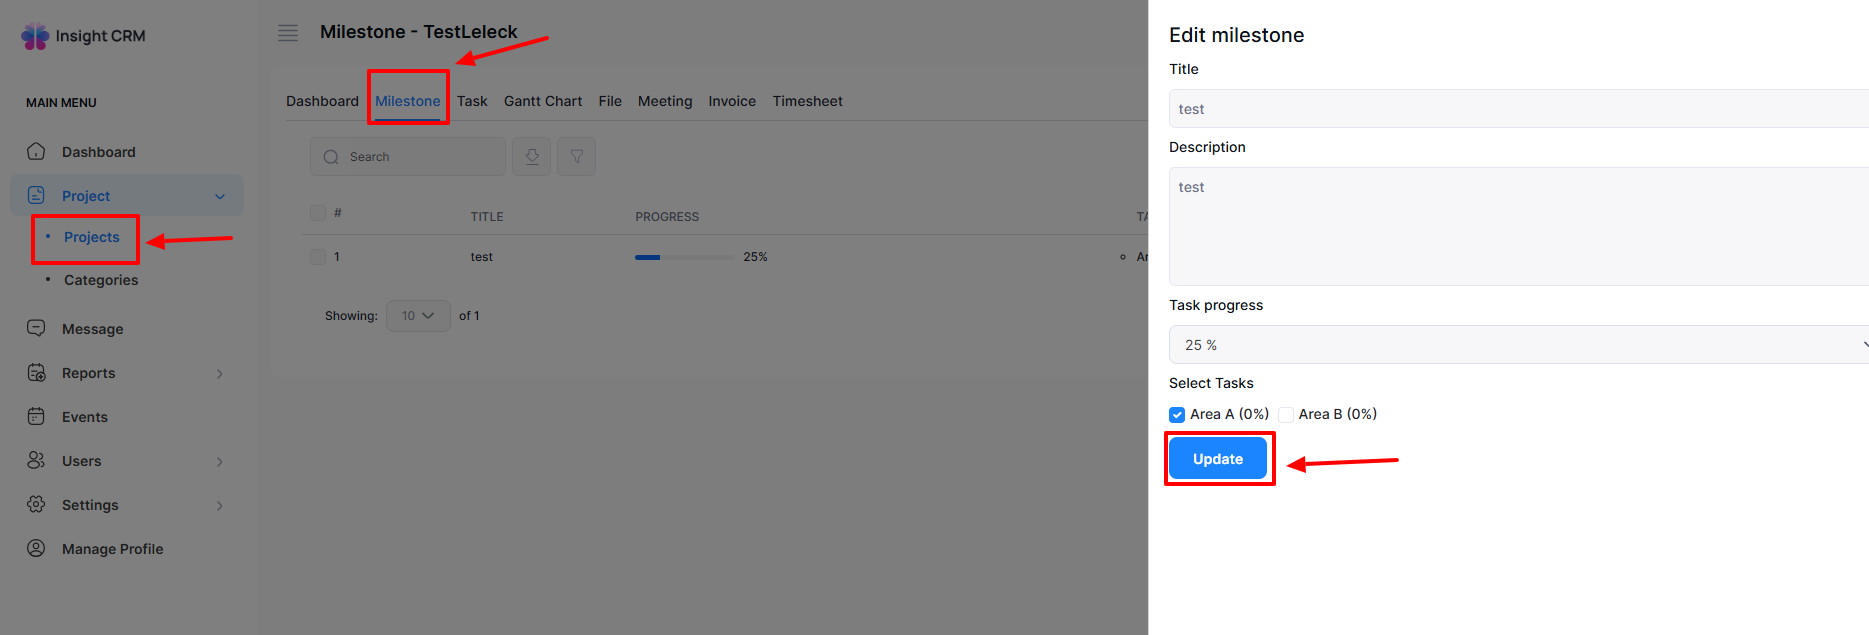
- Click the Edit button of the respective project, and a new entry form will appear
- Fill in the following details:
-
- Enter the Title Name in the Title field if needed.
- Type the desired Description in the Description field.
- Select the Task Progress from the dropdown menu.
- Click the Check box to select Area A% or Area B%.
-
- Once all fields are completed, click the Update button to apply the updates.
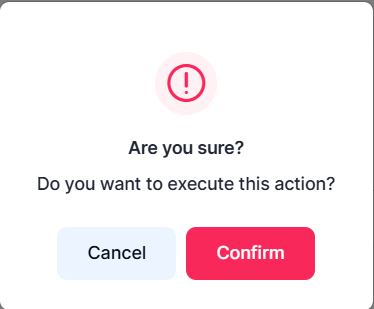
- If you click the Delete button, a new confirmation window will open.
- If you click Confirm item will be deleted permanently; otherwise, click Cancel. Note: Never back it again.
- Note: The same procedure will apply to all Project Milestones.
How to Add a Task
- Log in to the Admin and access the Dashboard from the Admin Panel.
- Navigate to Project from the left menu.
- Click on Project from the left menu a window will appear.
- Click the Options button (three dots) of the respective project, and open a menu with the options: Dashboard, Milestone, Task, File, Meeting, Invoice, Timesheet, Gantt Chart, Edit, and Delete Tab. Or click the (three dots) from the Grid view of the respective project.
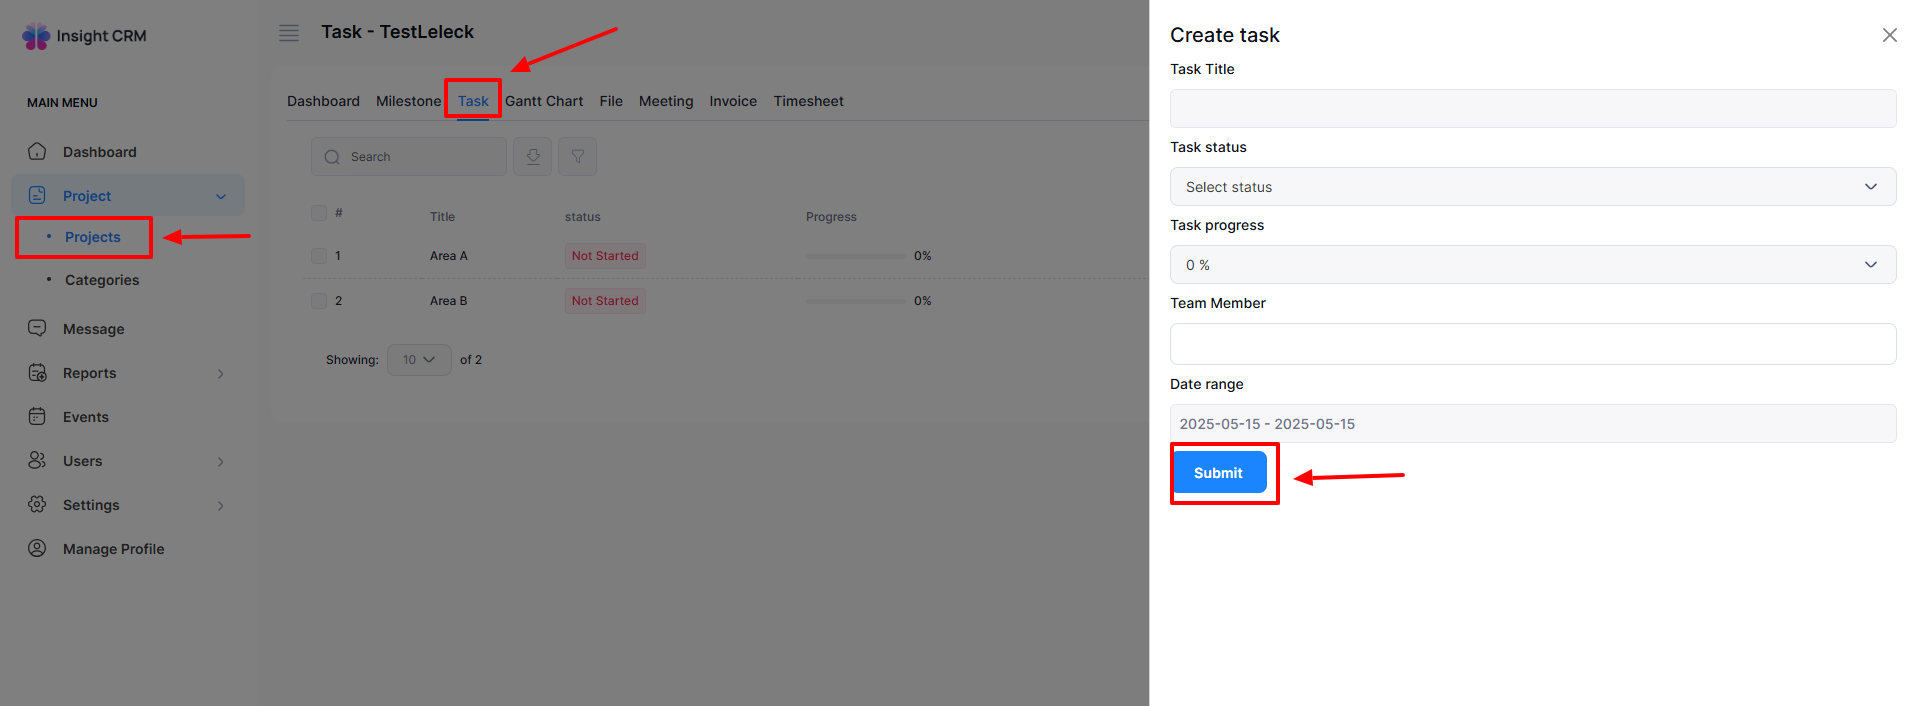
- Finally, click the Task tab, a new window will appear.
- Click the Add New button a new entry form will appear to create the Task.
- Fill in the following details:
- Enter the Title Name in the Title field.
- Select status from the Task Status dropdown menu.
- Select Task Progress % from the Task Progress dropdown menu.
- Select a Team Member from the Team Member dropdown menu.
- Select Date Range from the Date Range dropdown calendar and click the Apply button.
- Once all fields are completed, click the Submit button to apply the updates.

How to Edit a Task
- Log in to the Admin and access the Dashboard from the Admin Panel.
- Navigate to Project from the left menu.
- Click on Project from the left menu a window will appear.
- Click the Options button (three dots) of the respective project, and open a menu with the options: Dashboard, Milestone, Task, File, Meeting, Invoice, Timesheet, Gantt Chart, Edit, and Delete Tab. Or click the (three dots) from the Grid view of the respective project.
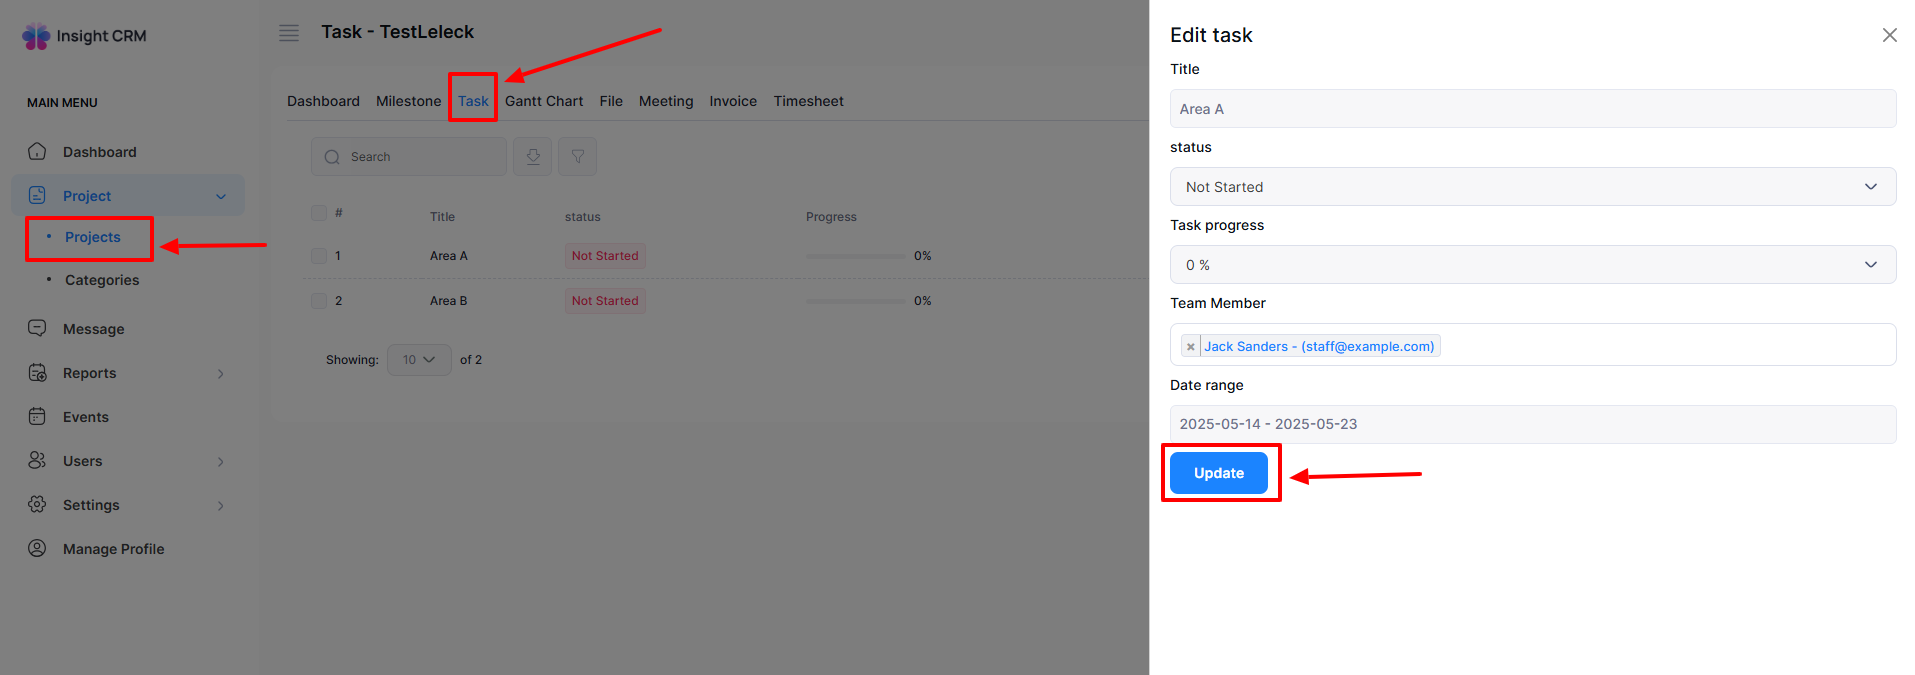
- Finally, click the Task Tab, and a new window will appear
- Click the Edit button of the respective project a new entry form will appear
- Fill in the following details:
- Enter the Title Name in the Title field.
- Select status from the Status dropdown menu.
- Type the Progress % in the Progress field.
- Select a Team Member from the Team Member dropdown menu.
- Select Date Range from the Date Range dropdown calendar and click the Apply button.
- Once all fields are completed, click the Update button to apply the updates.
- If you click the Duplicate button, a duplicate project will be created.
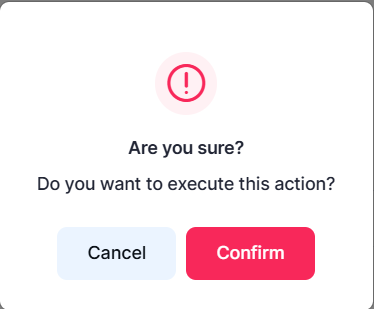
- If you click Delete, a new confirmation window will open.
- Click the Confirm item will be deleted permanently; otherwise, click Cancel. Note: Never back it again.
- Note: The same procedure will apply to all Project Tasks.

How to Gantt Chart Works
- Log in to the Admin and access the Dashboard from the Admin Panel.
- Navigate to Project from the left menu.
- Click on Project from the left menu a window will appear.
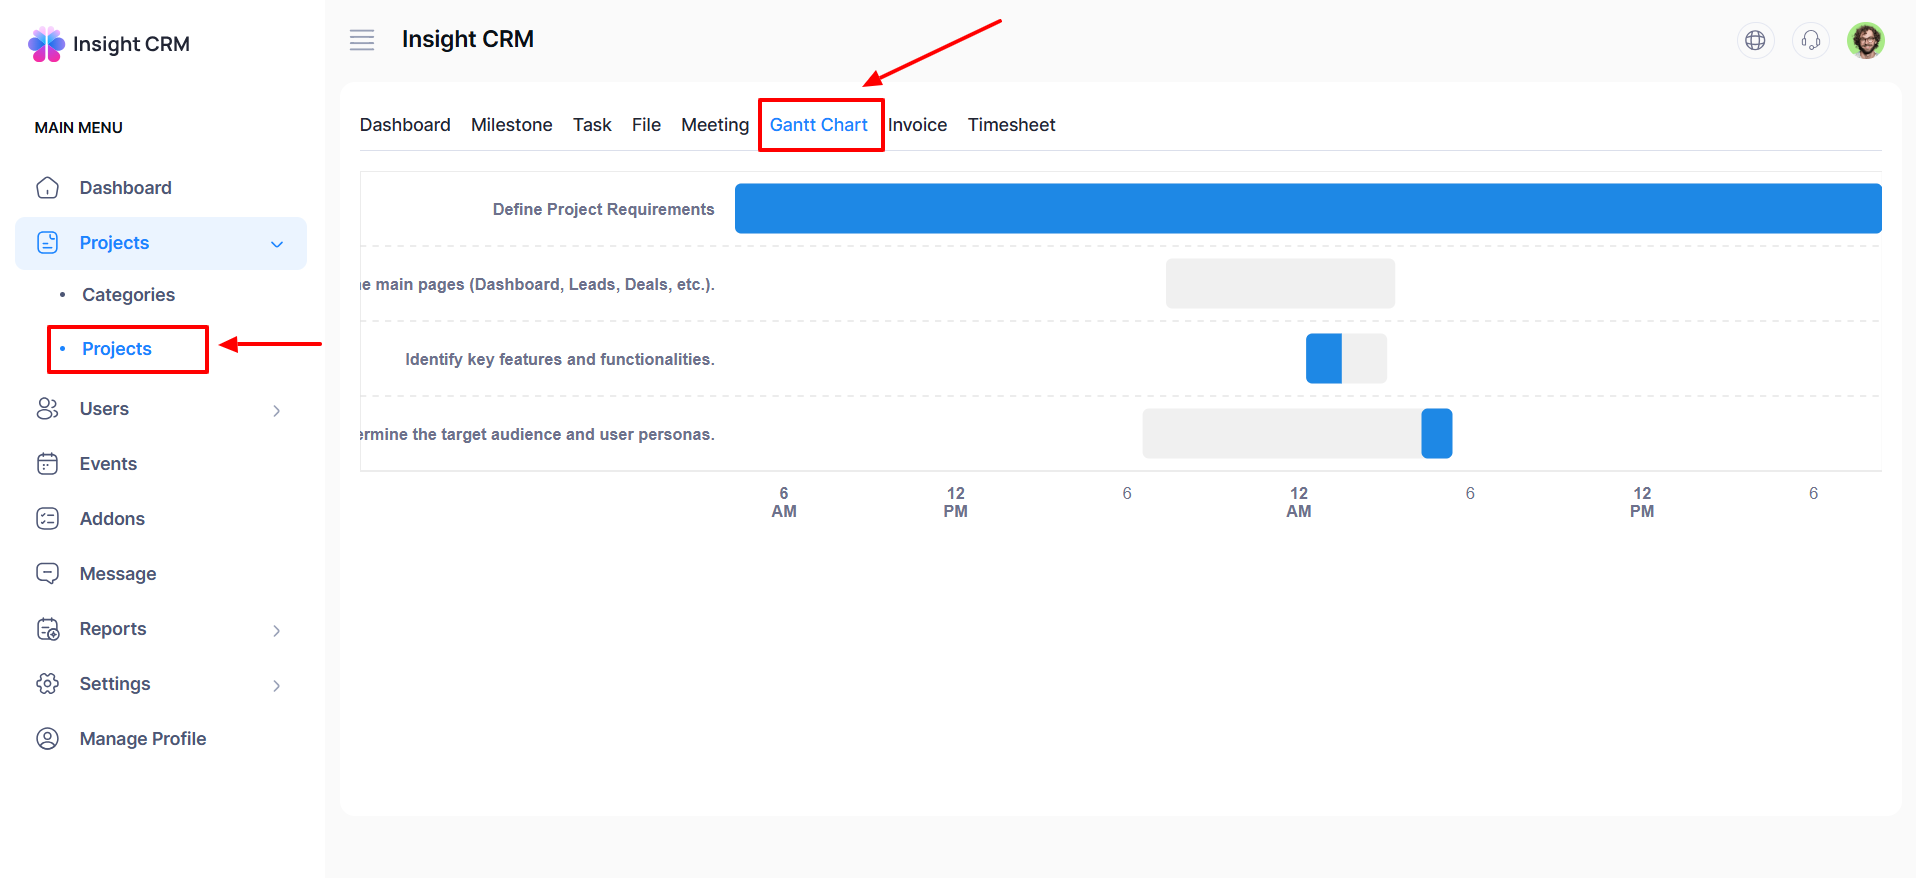
- Click the Options button (three dots) of the respective project, and open a menu with the options: Dashboard, Milestone, Task, File, Meeting, Invoice, Timesheet, Gantt Chart, Edit, and Delete Tab. Or click the (three dots) from the Grid view to the respective project.
- Finally, click the Gantt Chart button a new window will appear to view the Task Reflection.
How to Add a File
- Log in to the Admin and access the Dashboard from the Admin Panel.
- Navigate to Project from the left menu.
- Click on Project from the left menu a window will appear.
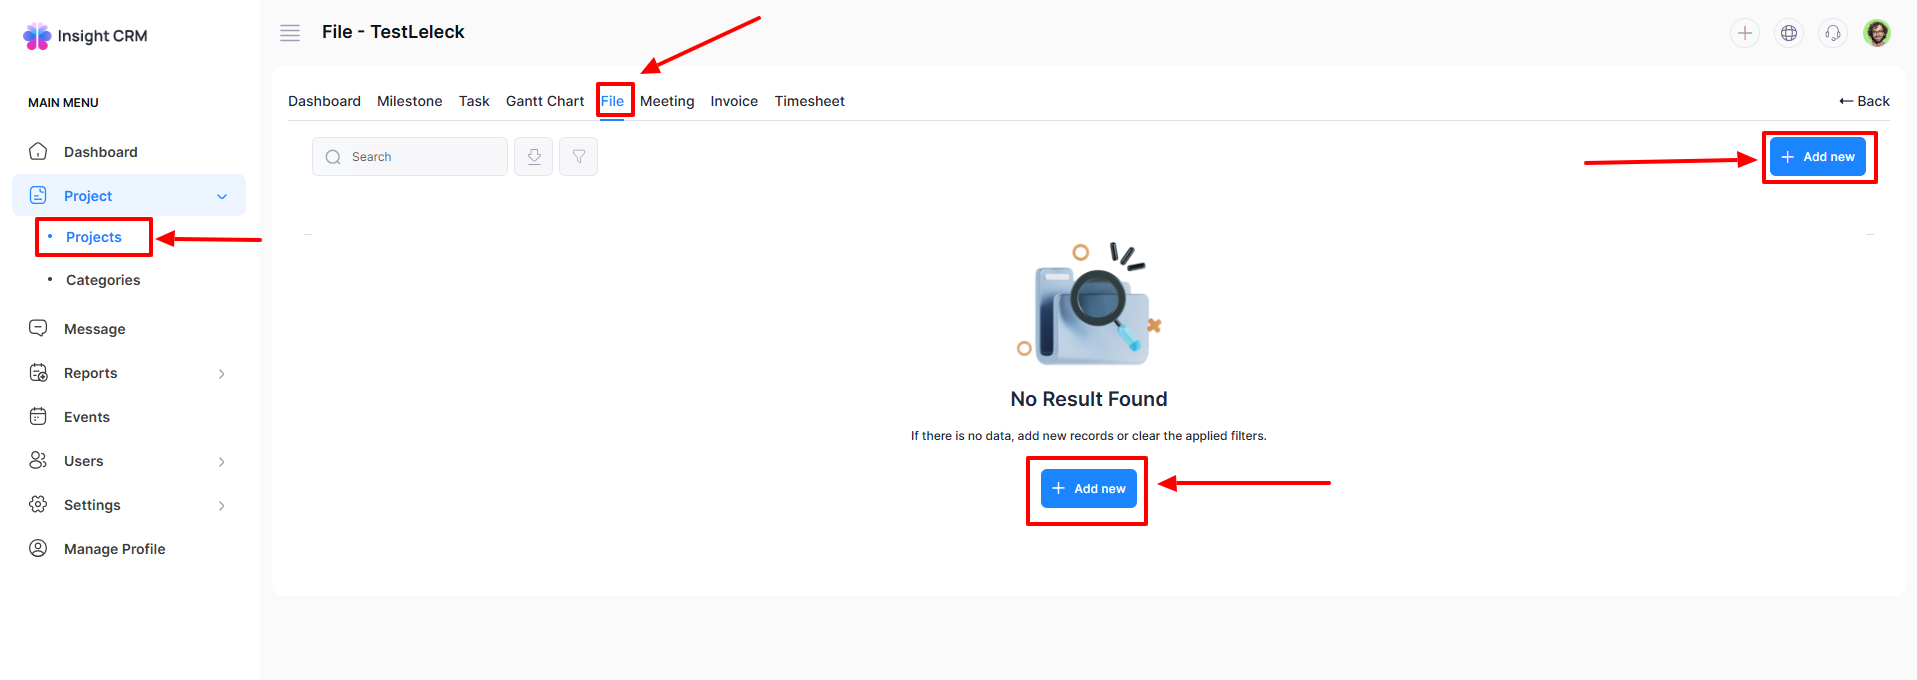
- Click the Options button (three dots) of the respective project, and open a menu with the options: Dashboard, Milestone, Task, File, Meeting, Invoice, Timesheet, Gantt Chart, Edit, and Delete Tab. Or click the three dots in the Grid View of the respective project.
- Finally, click the File Tab a new window will appear.
- Click the Add New button a new entry form will appear to create the Task.
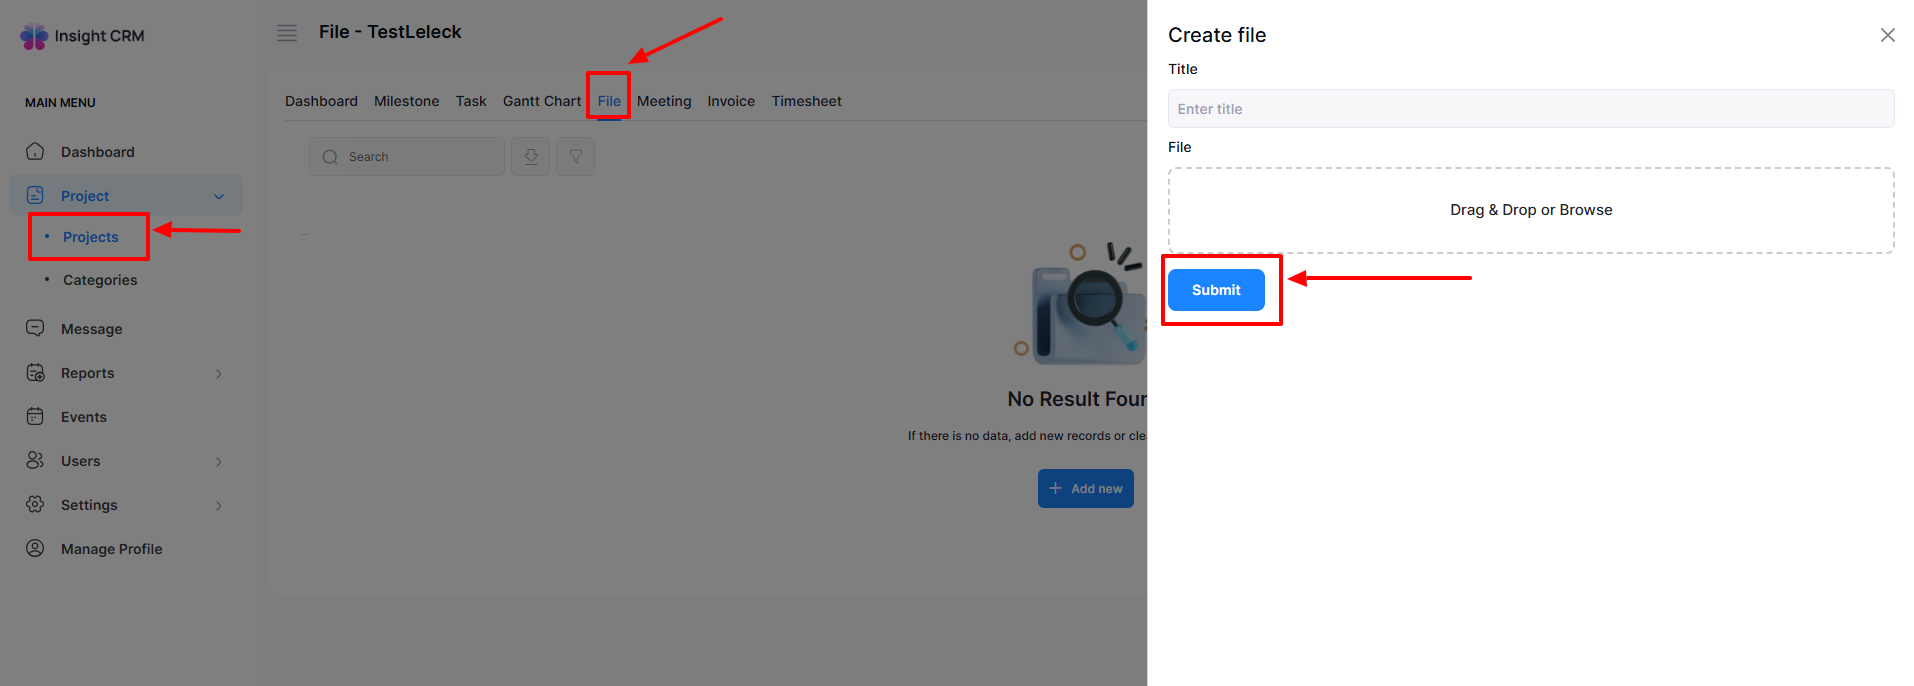
- Fill in the following details:
-
- Enter the Title Name in the Title field.
- Upload the desired file by clicking the Drag & Drop or Browse button.
-
- Click the Submit button to save all the provided information.
How to Edit a File
- Log in to the Admin and access the Dashboard from the Admin Panel.
- Navigate to Project from the left menu.
- Click on Project from the left menu a window will appear.
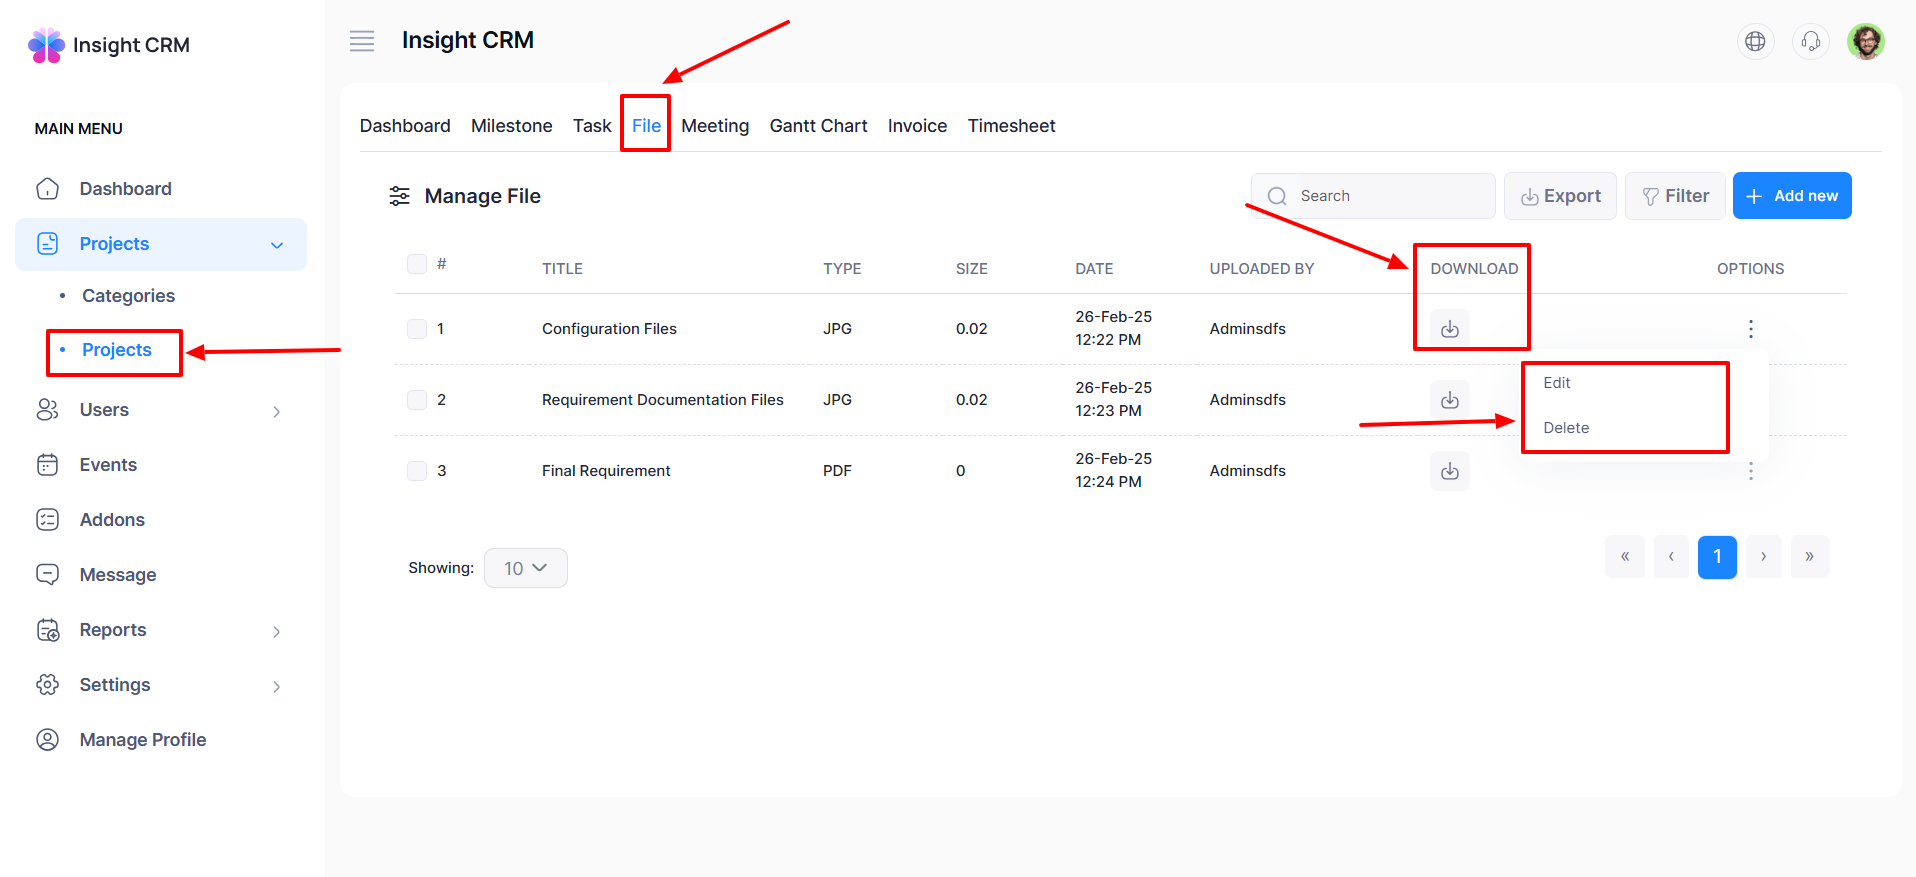
- Click the Options button (three dots) for the respective project, and open a menu with the options: Dashboard, Milestone, Task, File, Meeting, Invoice, Timesheet, Gantt Chart, Edit, and Delete Tab. Or click the three dots in the Grid view of the respective project.
- Finally, click the File Tab, and a new window will appear
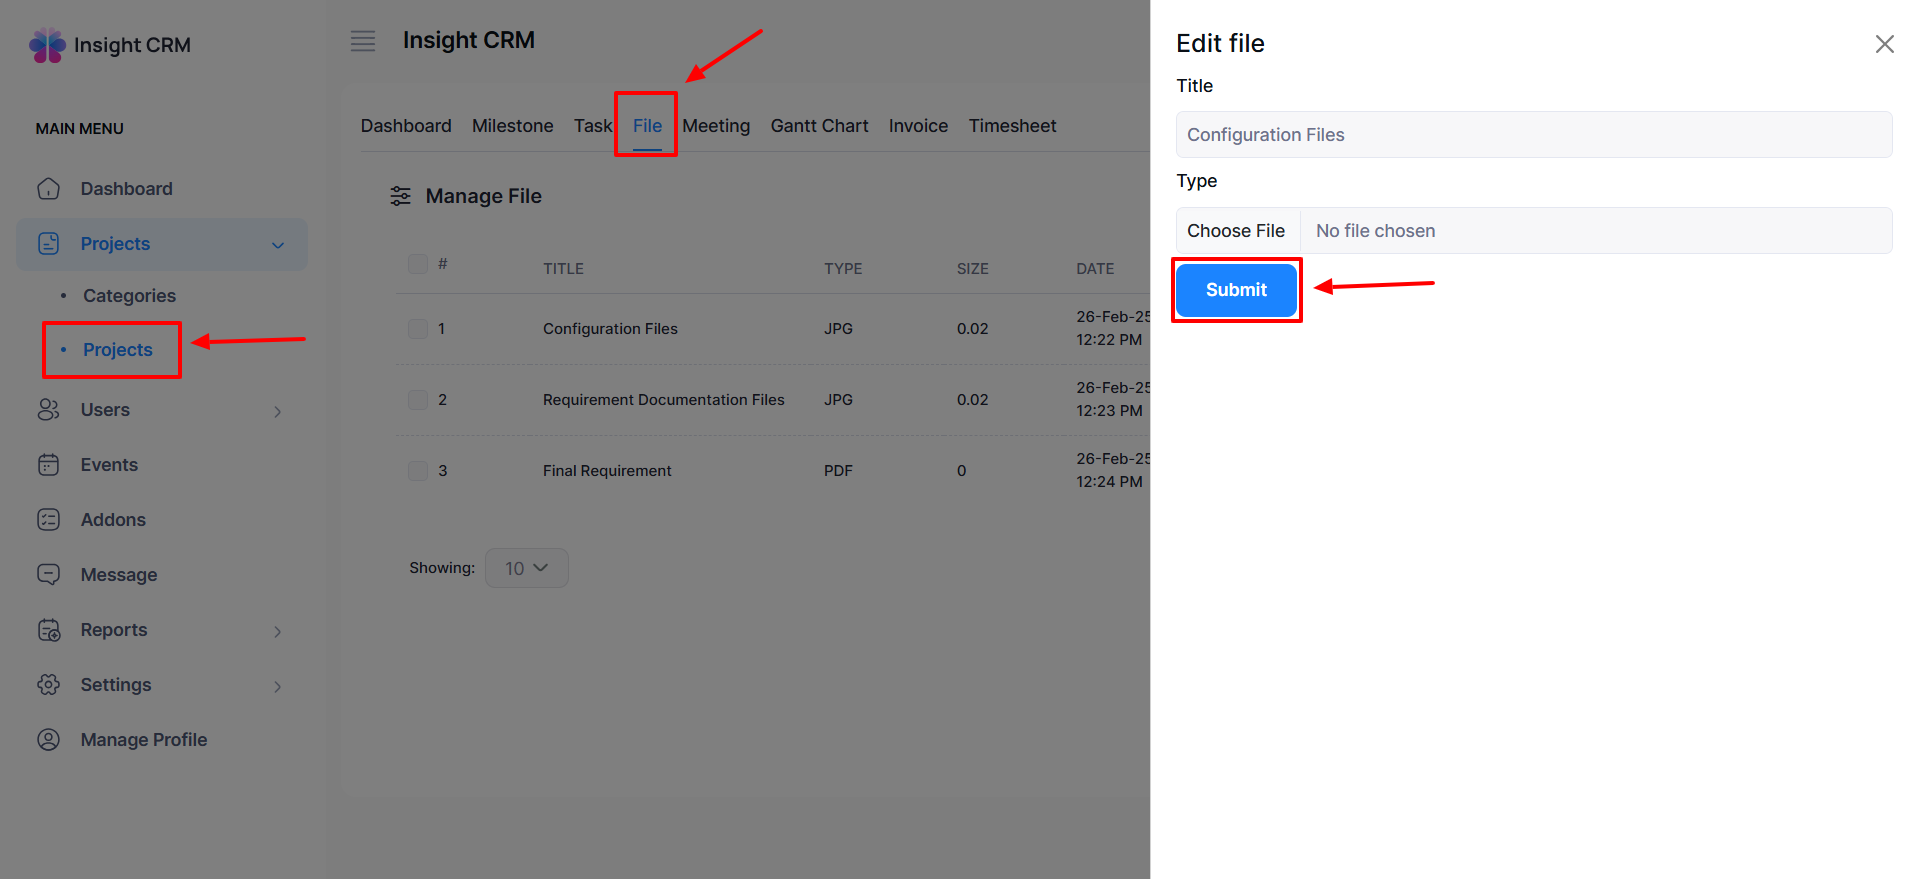
- Click the Edit button of the respective project, and a new entry form will appear.
- Fill in the following details:
-
- Enter the Title Name in the Title field.
- Upload the desired File by clicking the Choose File button.
-
- Once all fields are completed, click the Submit button to apply the updates.
- To download the list, click the Download button the list will be downloaded automatically.
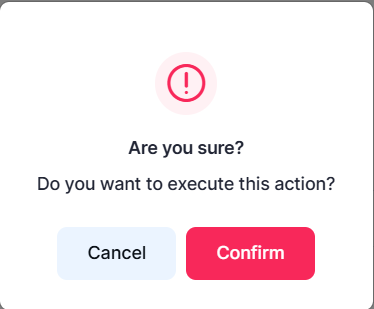
- If you click Delete, a new confirmation window will open.
- If you click Confirm, it will delete it permanently; otherwise, click Cancel. Note: Never back it again.
Note: The same procedure will apply to all Project Files.
How to Add a Meeting
- Log in to the Admin and access the Dashboard from the Admin Panel.
- Navigate to Project from the left menu.
- Click on Project from the left menu a window will appear.
- Click the Options button (three dots) for the respective project, and open a menu with the options: Dashboard, Milestone, Task, File, Meeting, Invoice, Timesheet, Gantt Chart, Edit, and Delete Tab. Or click the three dots in the Grid view of the respective project.
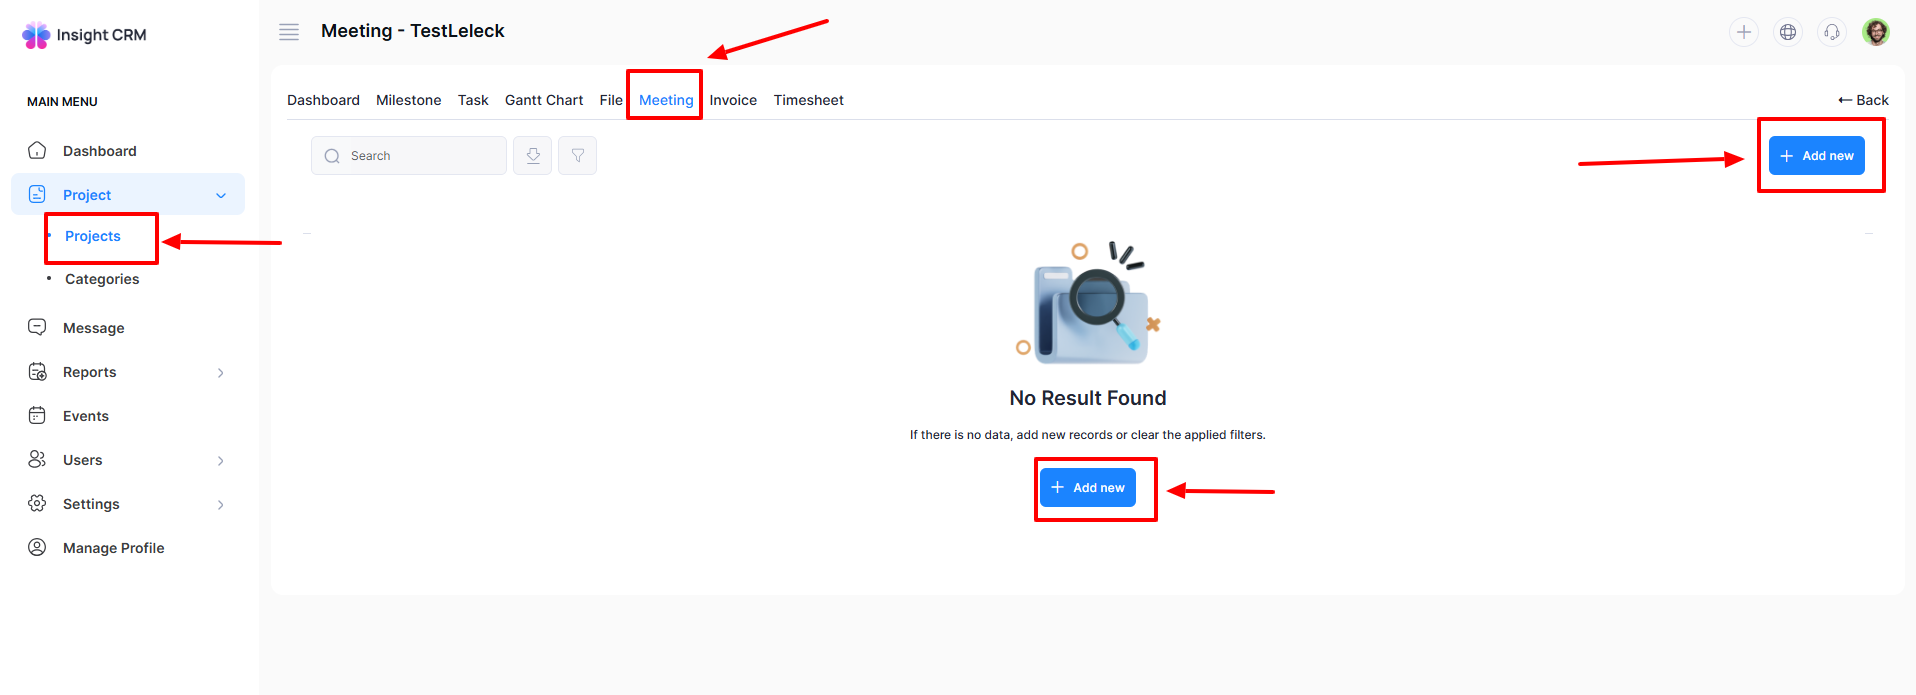
- Finally, click the Meeting Tab a new window will appear.
- Click the Add New button a new entry form will appear to create the Meeting.
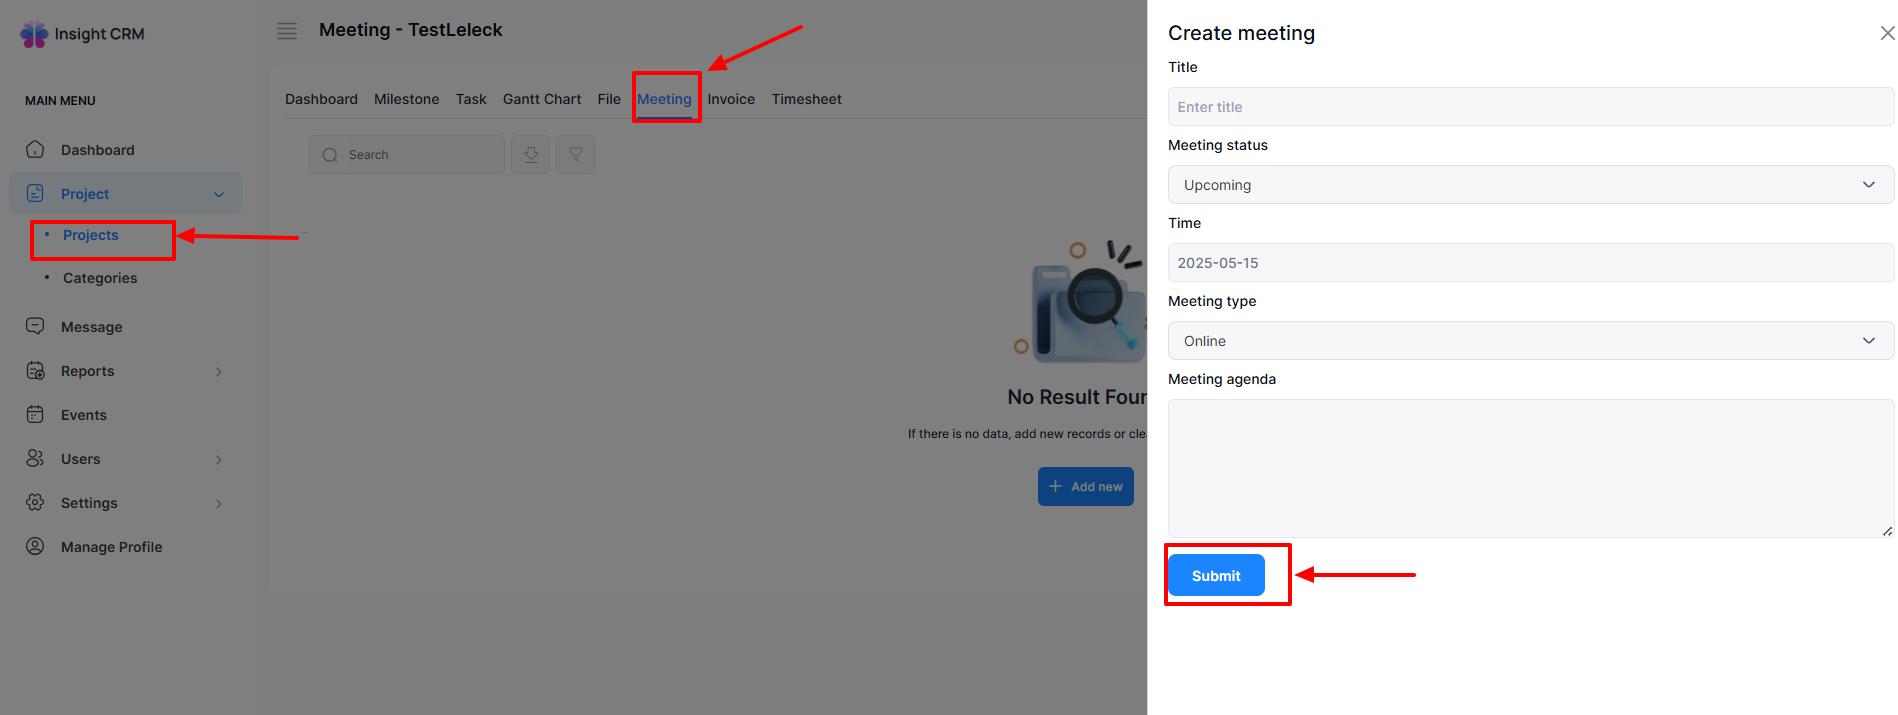
- Fill in the following details:
-
- Enter the Title Name in the Title field.
- Select Meeting status from the Meeting status dropdown menu.
- Select the Date and Time from the Time dropdown calendar and click the Apply button.
- Select Meeting Type for the Meeting Type dropdown menu.
- Type the Meeting Agenda in the Meeting Agenda field.
-
- Click the Submit button to save all the provided information.
How to Edit a Meeting
- Log in to the Admin and access the Dashboard from the Admin Panel.
- Navigate to Project from the left menu.
- Click on Project from the left menu a window will appear.
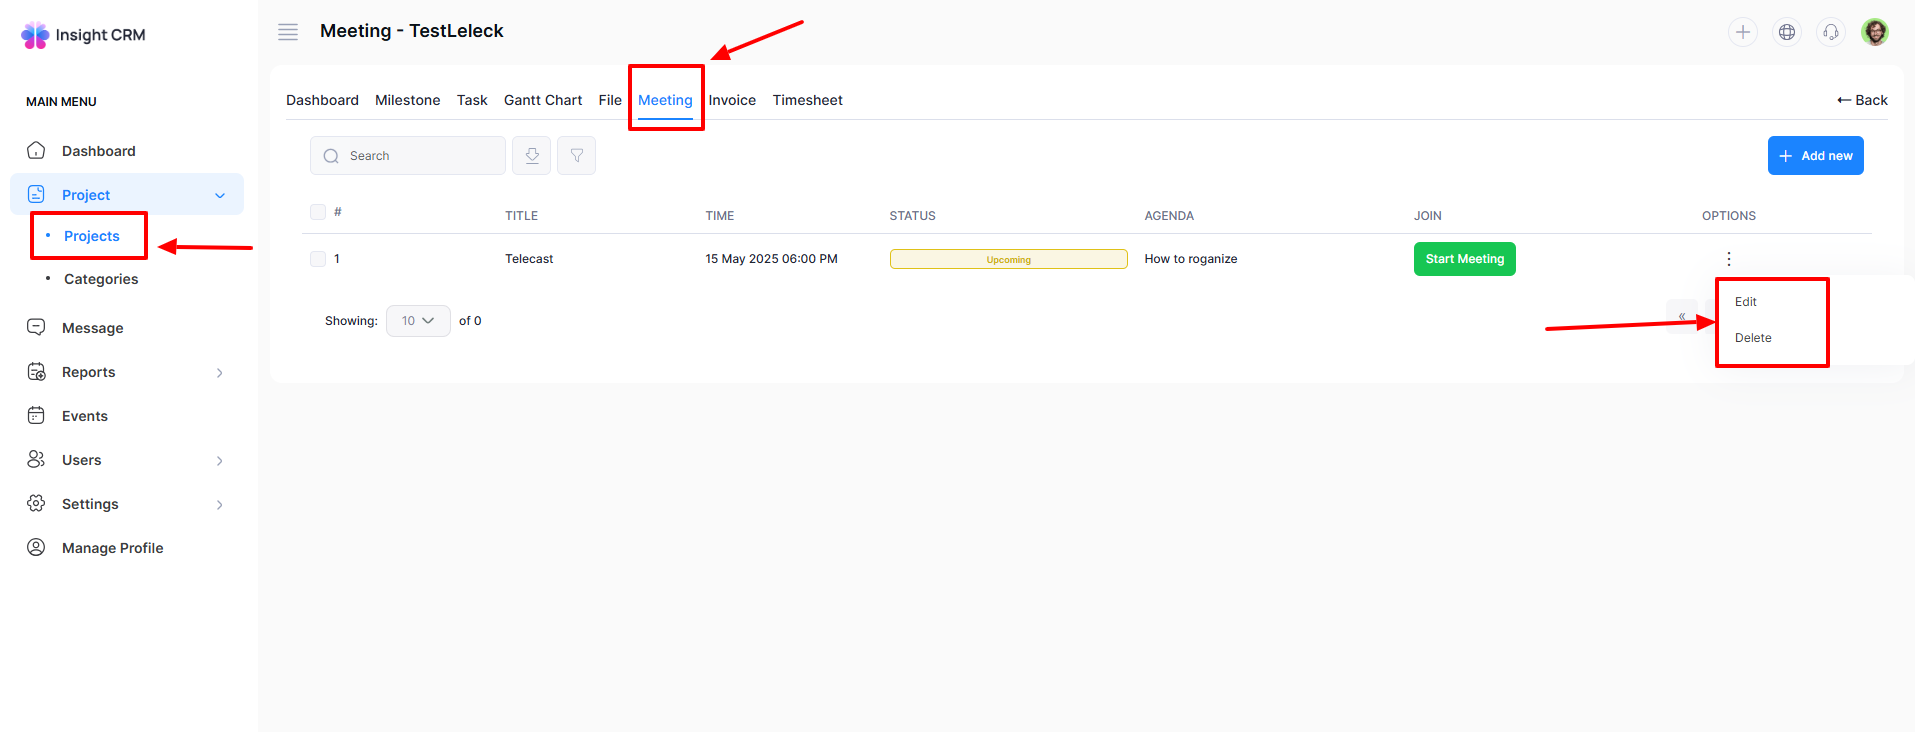
- Click the Options button (three dots) for the respective project, and open a menu with the options: Dashboard, Milestone, Task, File, Meeting, Invoice, Timesheet, Gantt Chart, Edit, and Delete Tab. Or click the three dots in the Grid view of the respective project.
- Finally, click the Meeting Tab, and a new window will appear
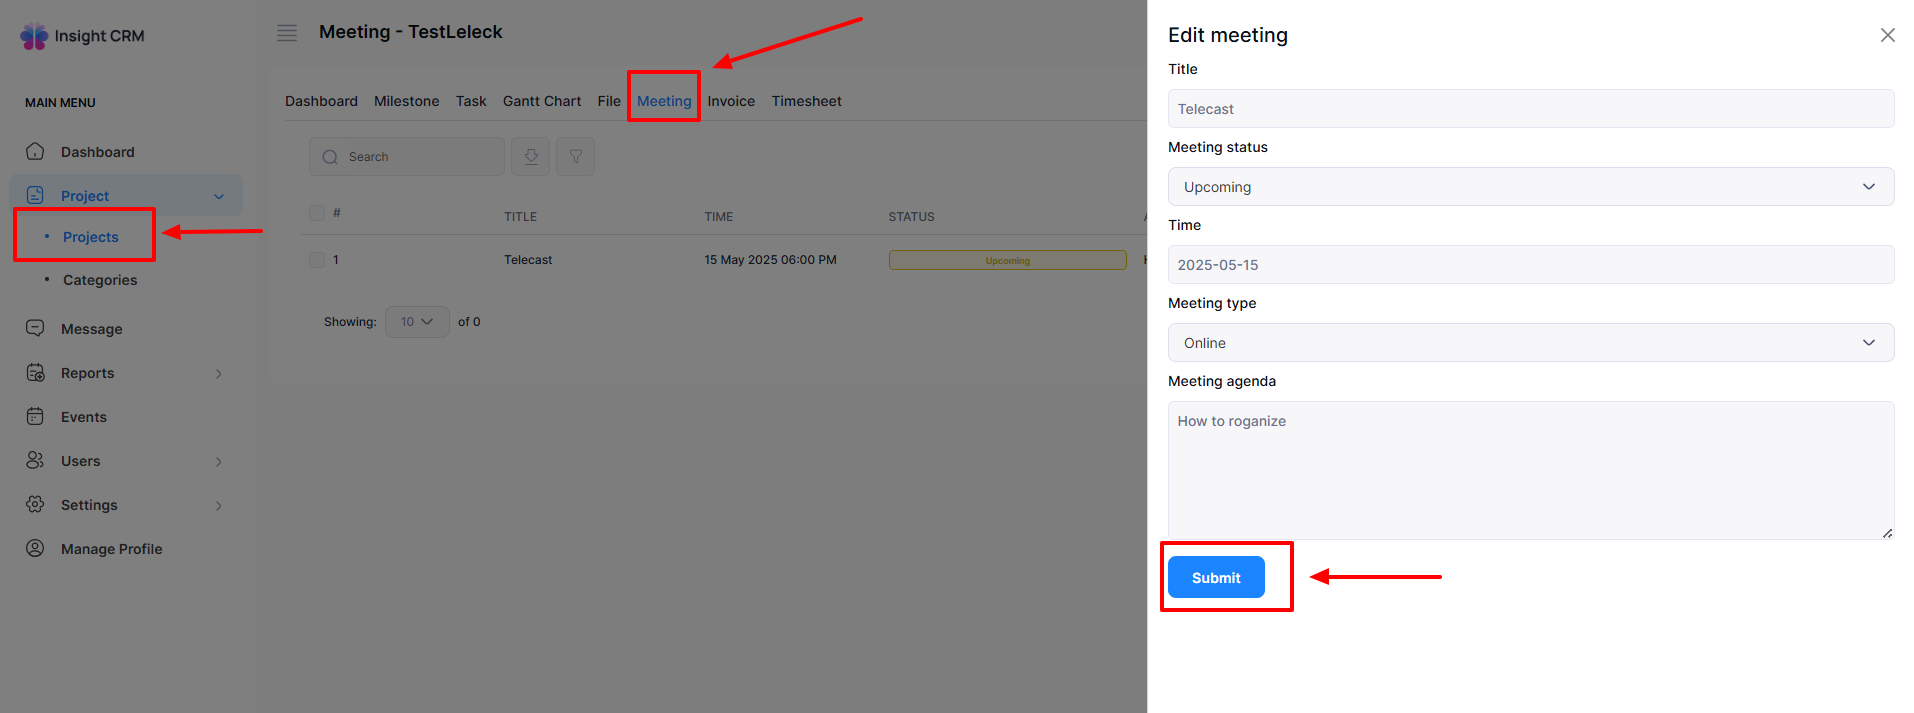
- Click the Edit button, a new entry form will appear for editing.
- Fill in the following details:
-
- Enter the Title Name in the Title field.
- Select Meeting status from the Meeting status dropdown menu.
- Select the Date and Time from the Time dropdown calendar and click the Apply button.
- Select Meeting Type for the Meeting Type dropdown menu.
- Type the Meeting Agenda in the Meeting Agenda field.
-
- Once all fields are completed, click the Submit button to apply the updates.
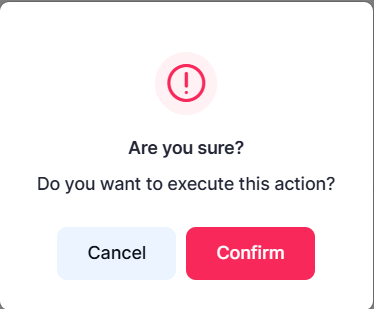
- If you click Delete, a new confirmation window will open.
- If you click Confirm, it will be deleted permanently; otherwise, click Cancel. Note: Never back it again.
Note: The same procedure will apply to all Project Meetings.
How to Start a Meeting
- Log in to the Admin and access the Dashboard from the Admin Panel.
- Navigate to Project from the left menu.
- Click on Project from the left menu a window will appear.
- Click the Options button (three dots) for the respective project, and open a menu with the options: Dashboard, Milestone, Task, File, Meeting, Invoice, Timesheet, Gantt Chart, Edit, and Delete Tab. Or click the three dots in the Grid view of the respective project.
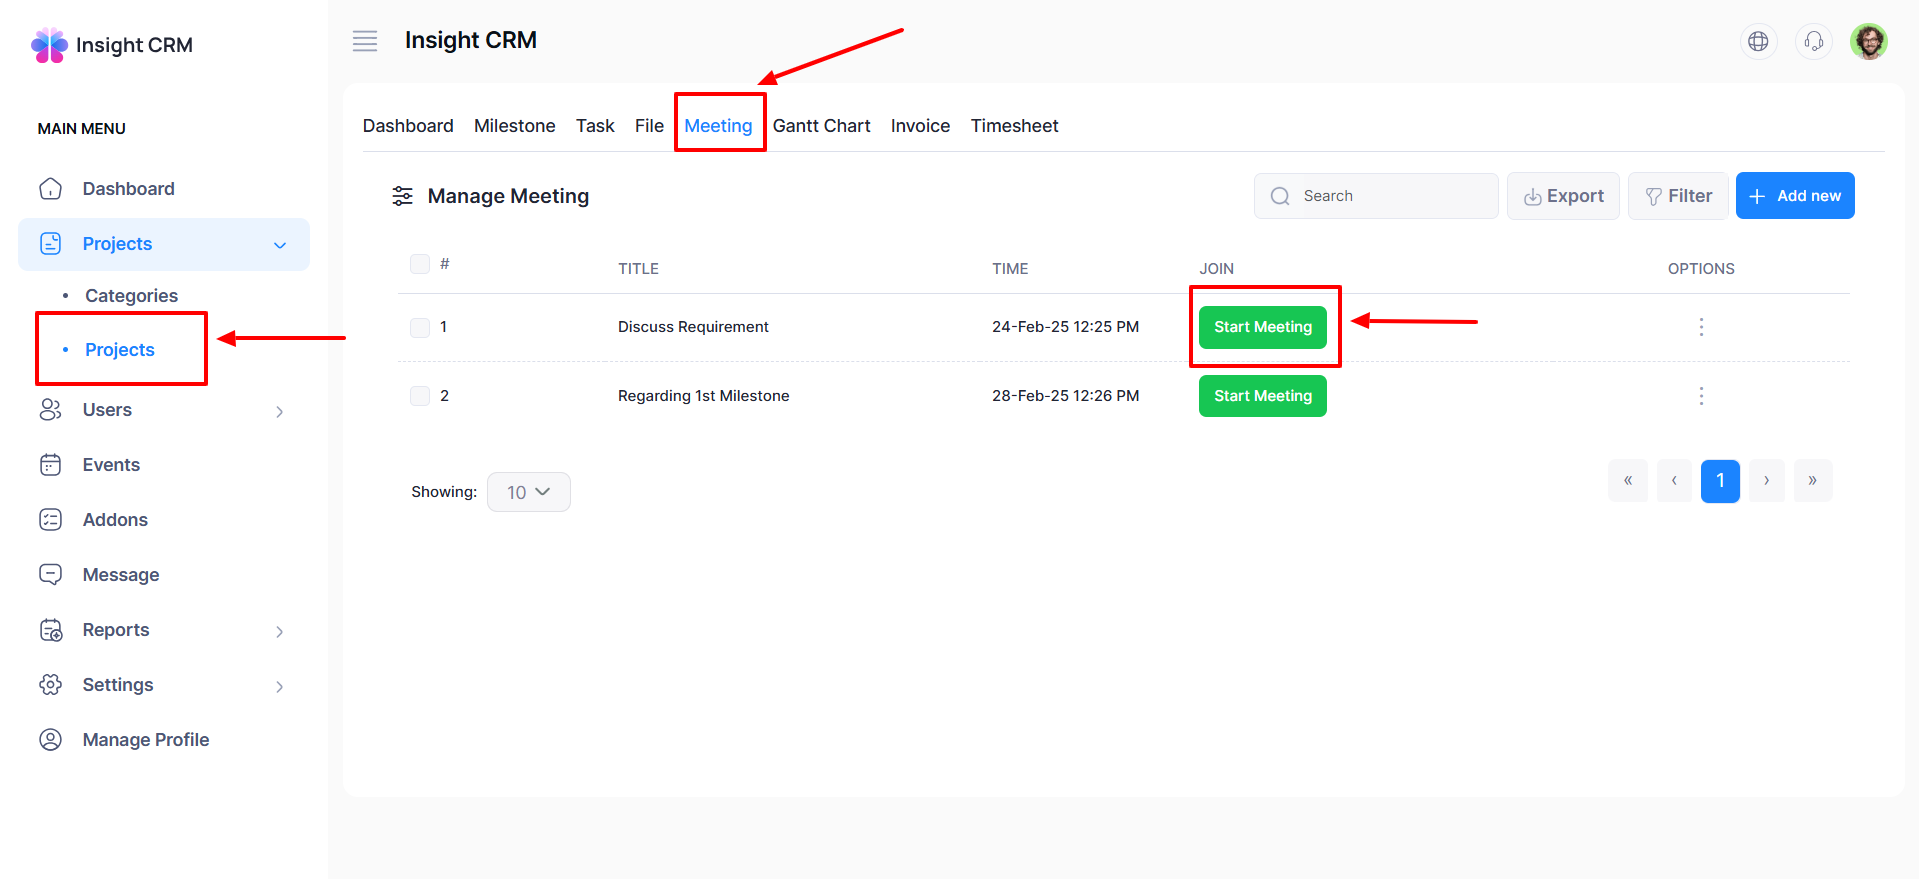
- Finally, click the Meeting Tab, and a new window will appear
- Click the Start Meeting button, automatically open the meeting link.
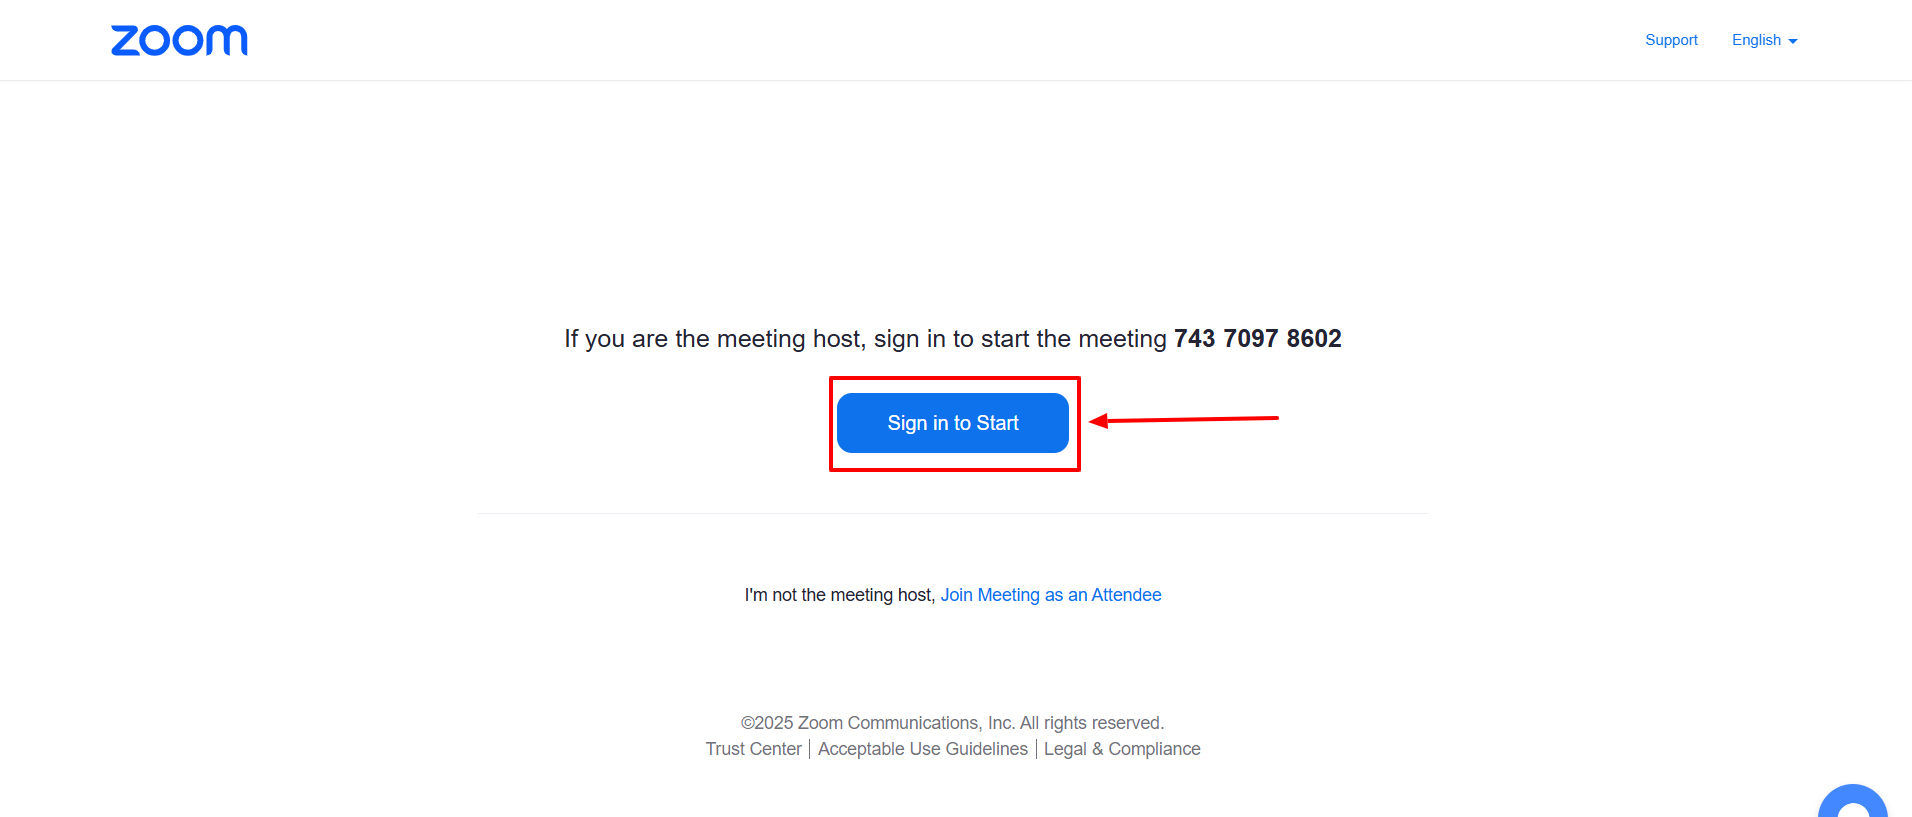
- Next, click the Sign in to start button.
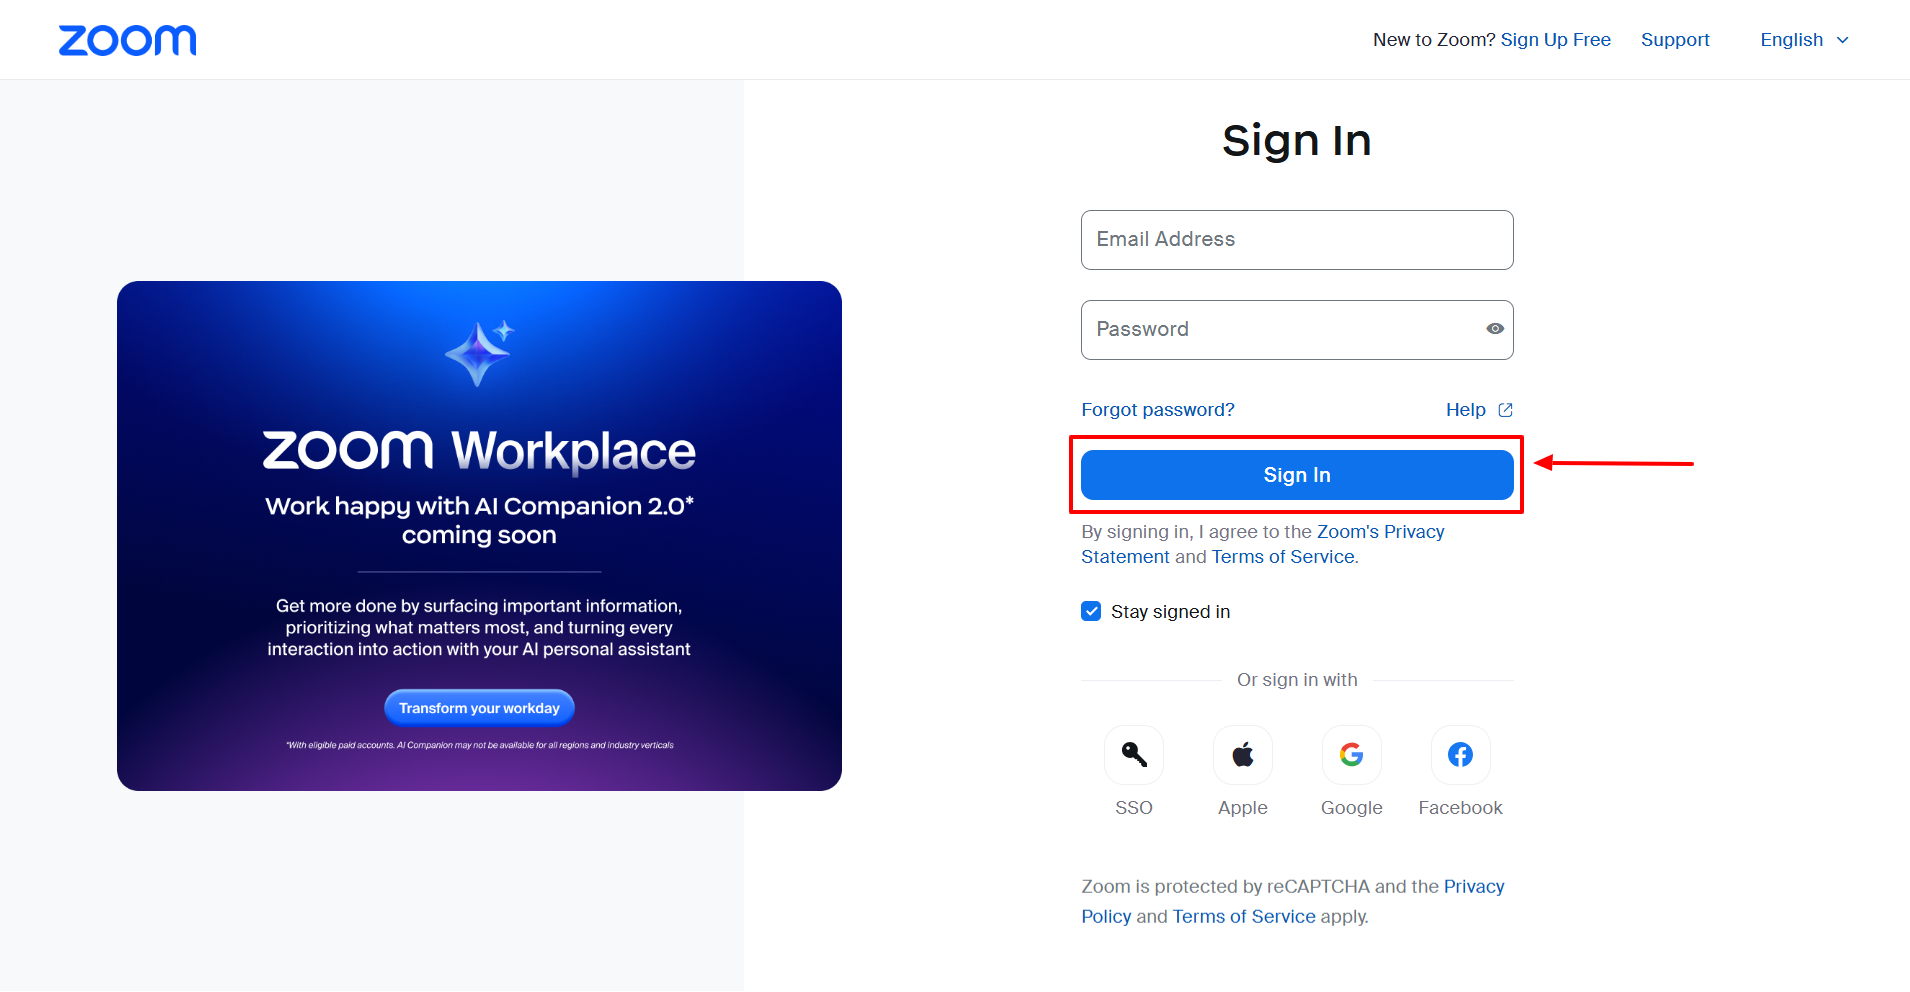
- Provide an Email Address in the Email Address field.
- Provide the Password in the Password field.
- Finally, click the Sign in button to start the meeting.
How to Add an Invoice
- Log in to the Admin and access the Dashboard from the Admin Panel.
- Navigate to Project from the left menu.
- Click on Project from the left menu a window will appear.
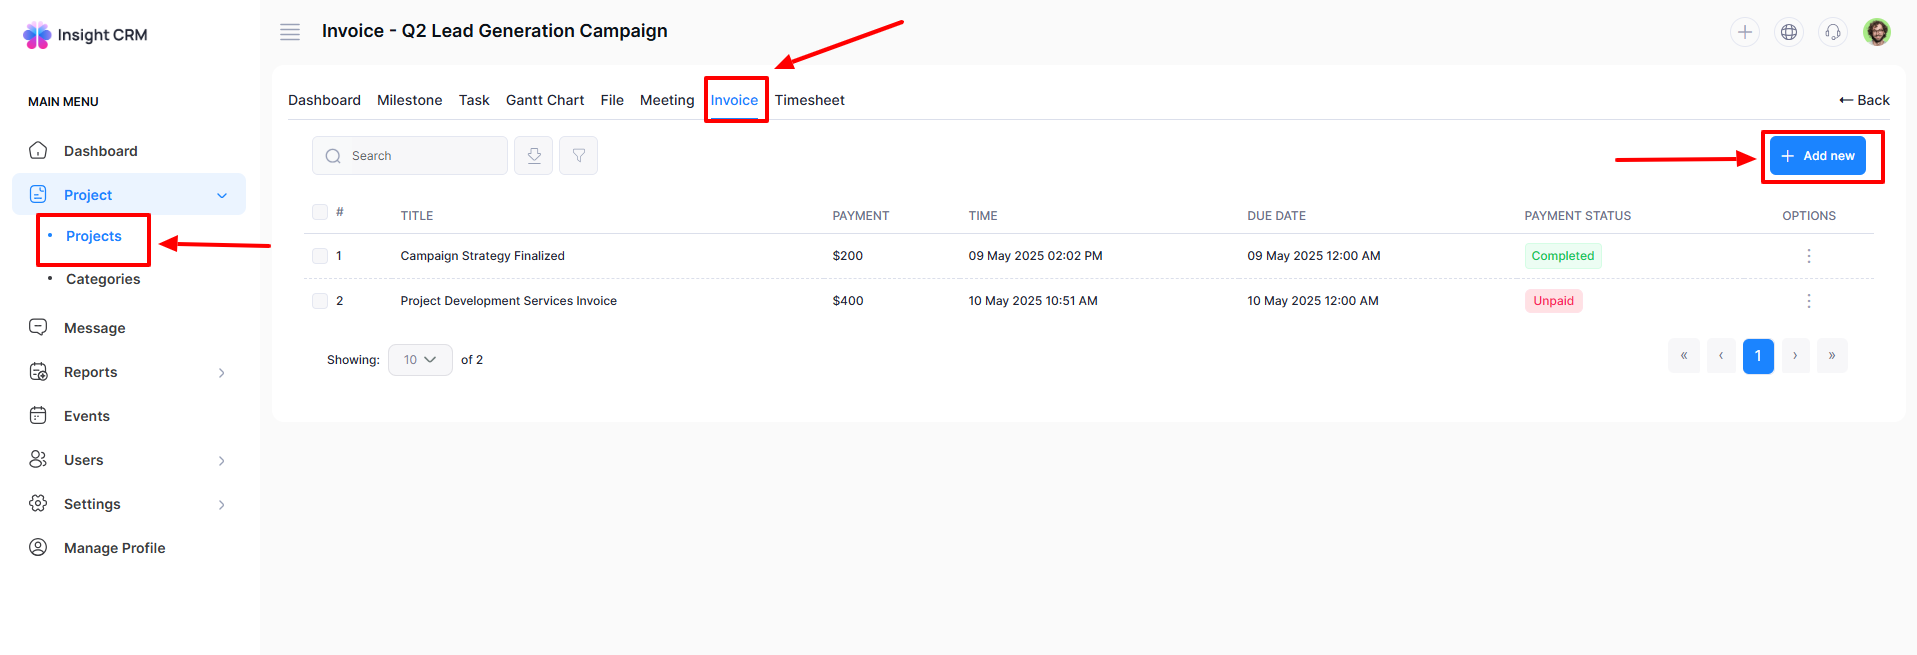
- Click the Options button (three dots) for the respective project, and open a menu with the options: Dashboard, Milestone, Task, File, Meeting, Invoice, Timesheet, Gantt Chart, Edit, and Delete. Or click the three dots in the Grid view of the respective project.
- Finally, click the Invoice Tab of the respective project, and a new window will appear.
- Click the Add New button a new entry form will appear to add an Invoice.
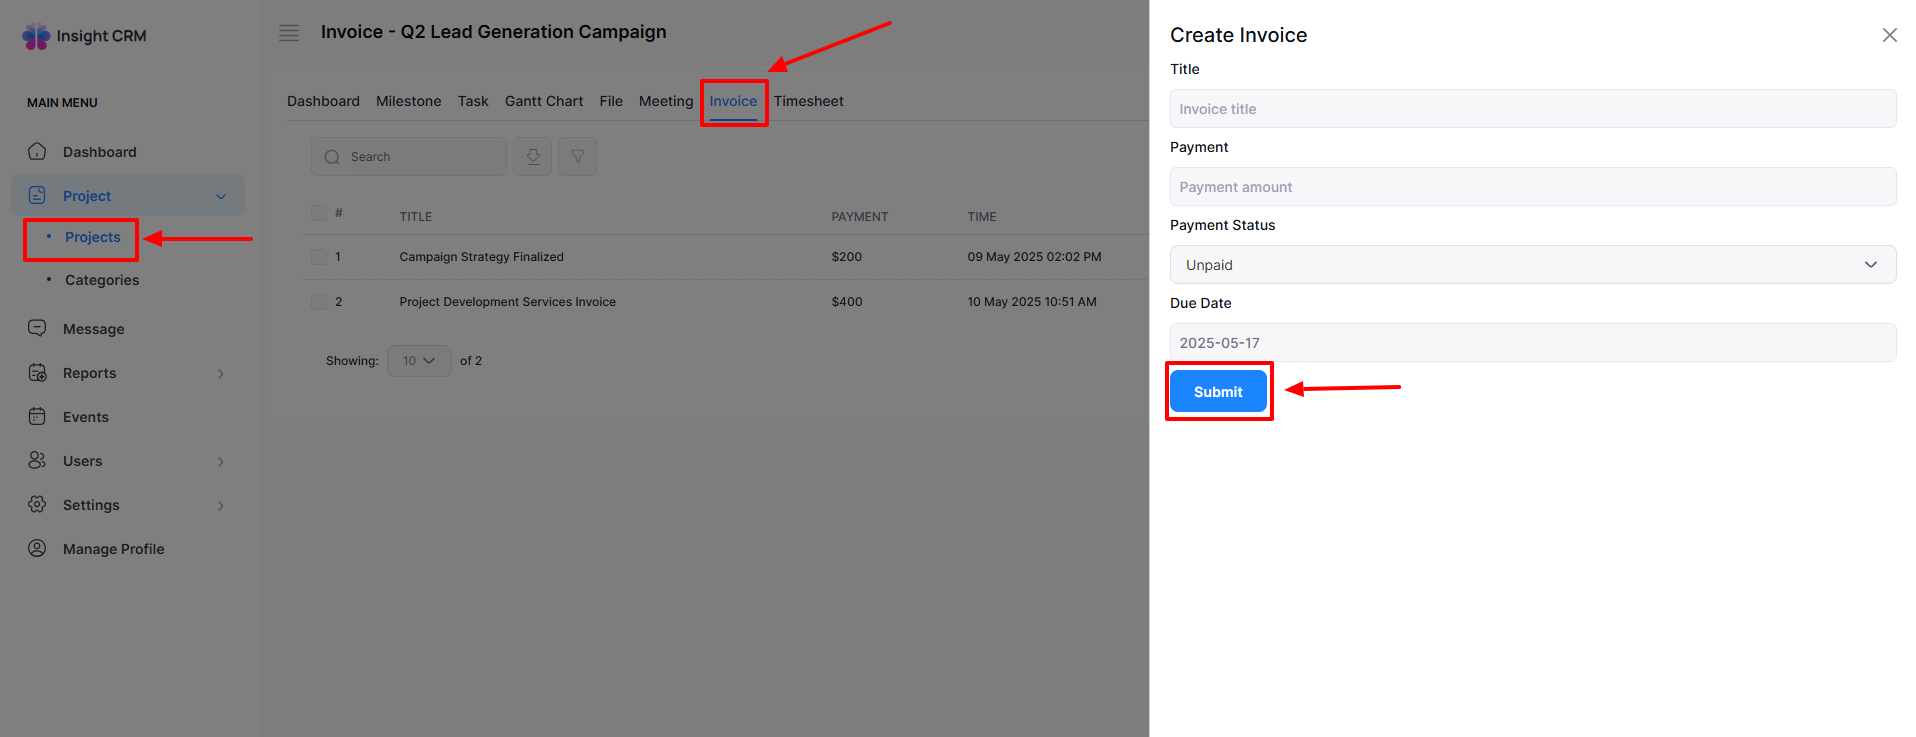
- Fill in the following details:
-
- Enter the Title Name in the Title field.
- Put the Invoice Amount in the Payment Field.
- Enter Payment Status from the Payment Status dropdown menu.
- Select the Due Date from the Due Date dropdown calendar.
-
- Click the Submit button to save all the provided information.
How to Edit an Invoice
Log in to the Admin and access the Dashboard from the Admin Panel.
Navigate to Project from the left menu.
Click on Project from the left menu a window will appear.
Click the Options button (three dots) of the respective project, and open a menu with the options: Dashboard, Milestone, Task, File, Meeting, Invoice, Timesheet, Gantt Chart, Edit, and Delete Tab. Or click the (three dots) from the Grid view to the respective project.
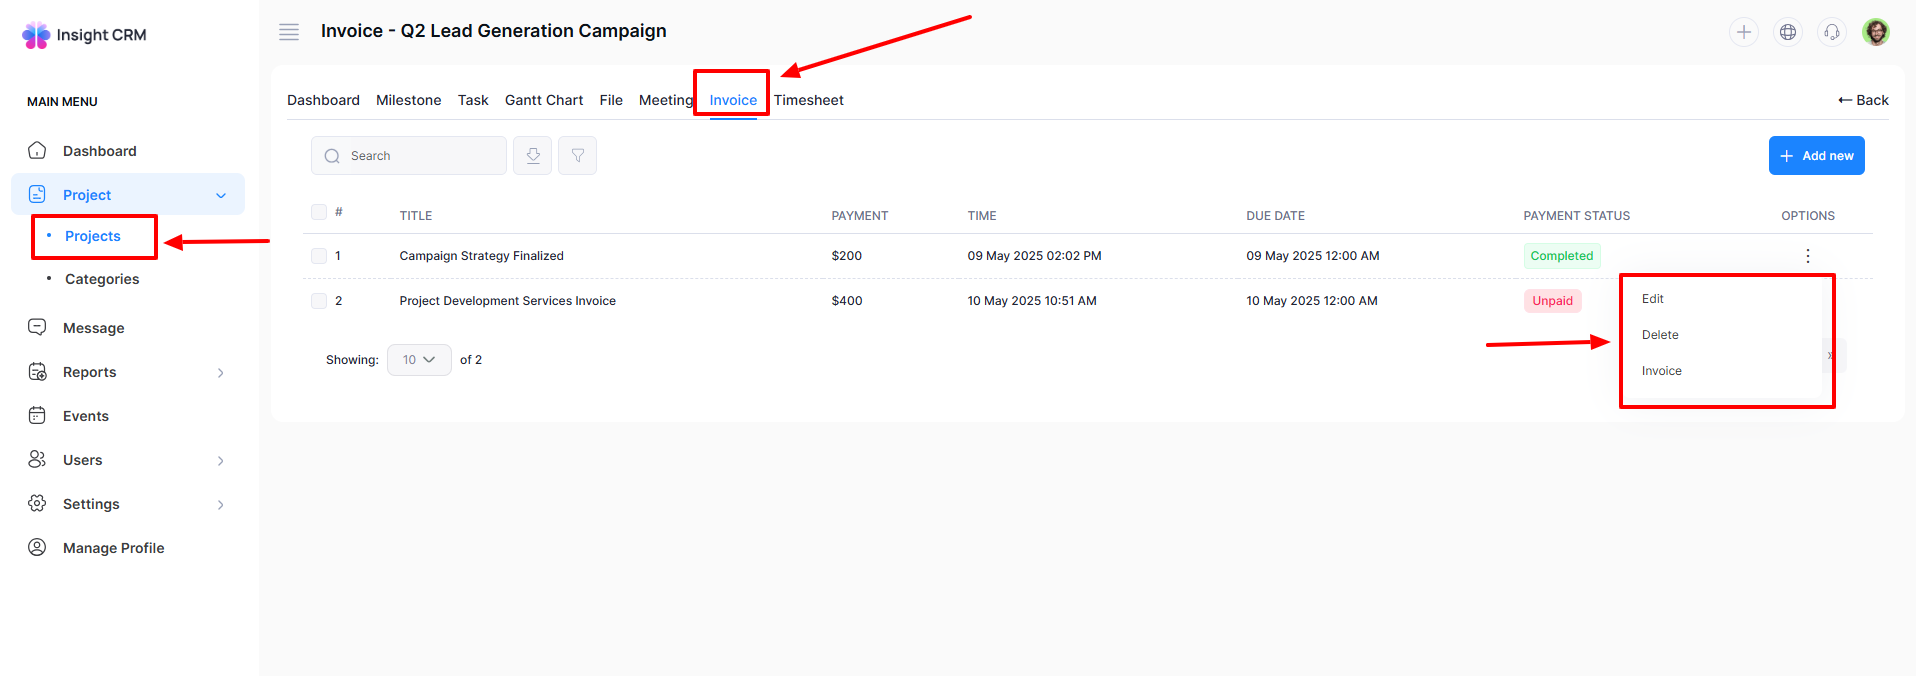
- Finally, click the Invoice Tab a new window will appear.
- Click the Options button (three dots) to open a menu with the options: Edit, Delete, and Invoice.
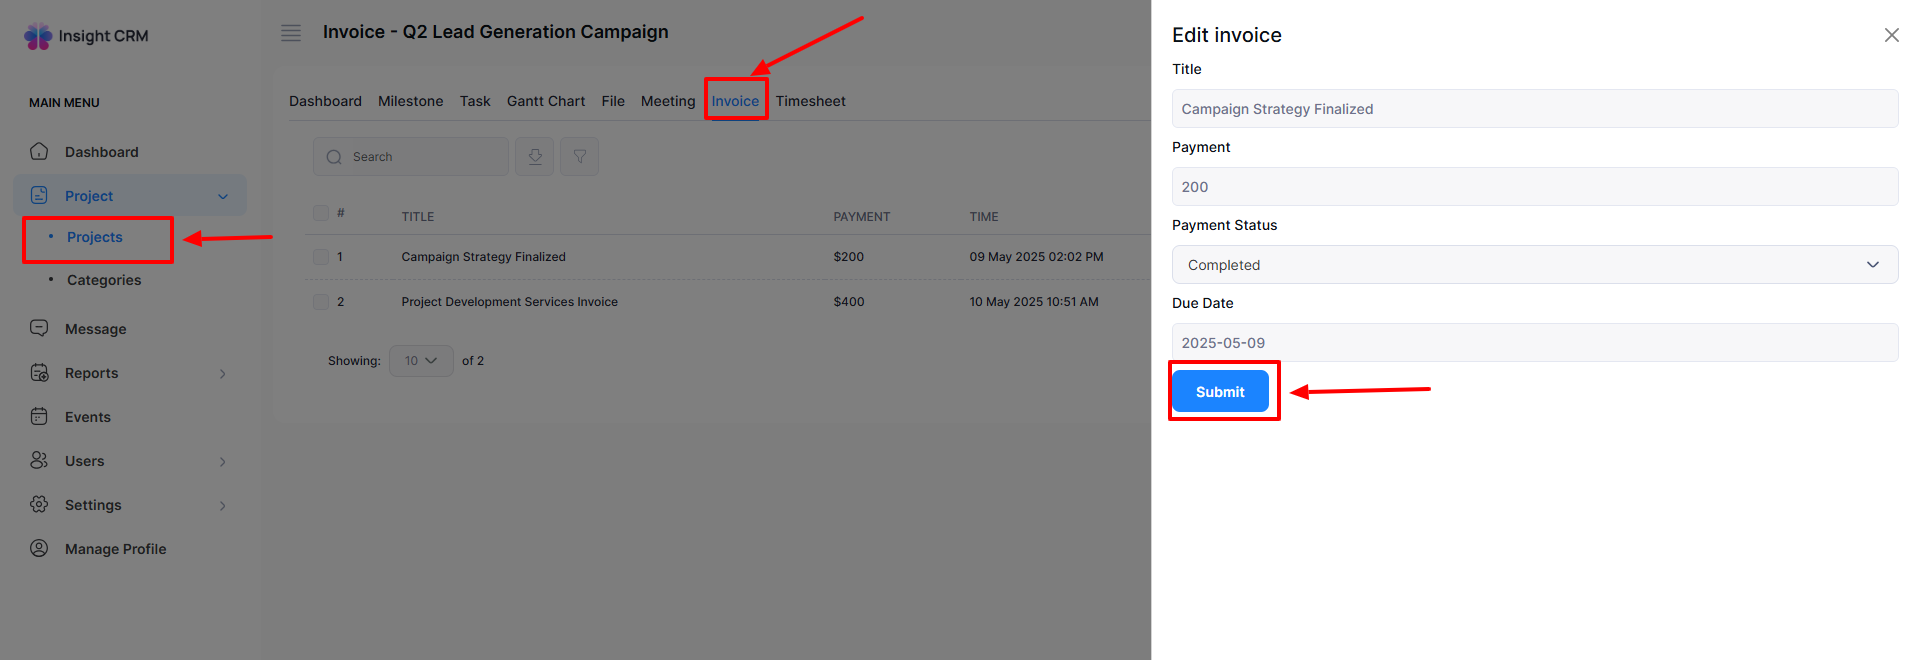
- Click the Edit button of the respective project a new entry form will appear to edit.
- Fill in the following details:
-
- Enter the Title Name in the Title field.
- Put the Invoice Amount in the Payment Field.
- Enter Payment Status from the Payment Status dropdown menu.
- Select the Due Date from the Due Date dropdown calendar.
-
- Once all fields are completed, click the Submit button to apply the updates.
-
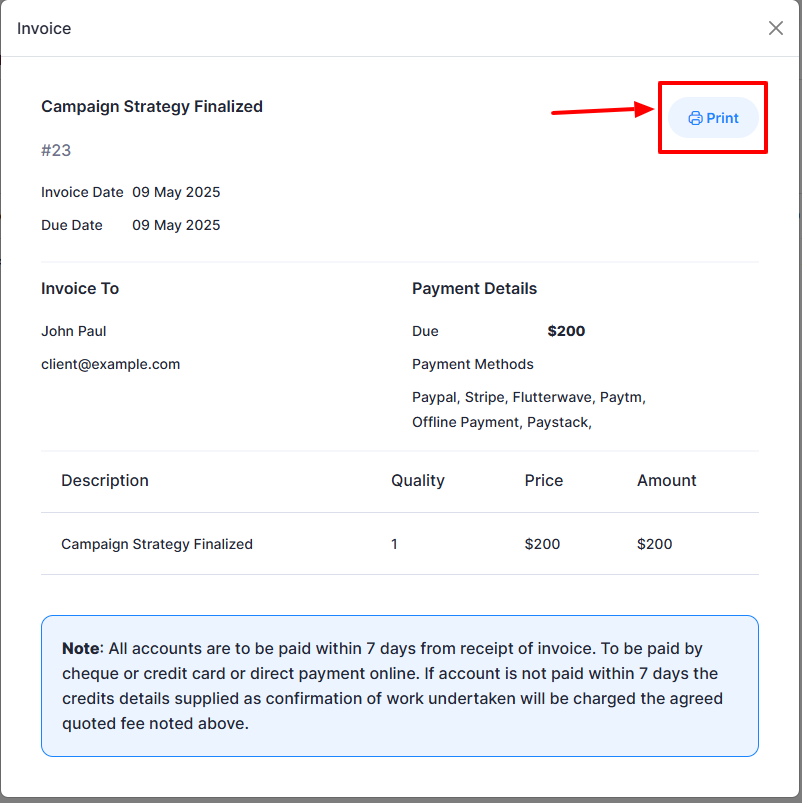
If you click the Invoice button, an Invoice will arise to print.
-
Click the Print button Invoice will be printed.
-
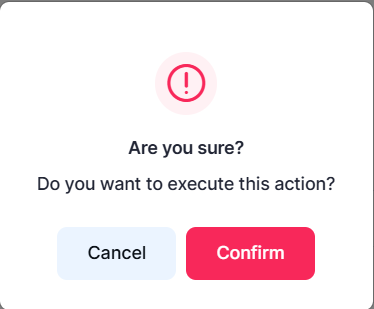
If you click the Delete button to delete the desire, a new confirmation window will open.
-
If you click Confirm, it will delete permanently; otherwise, click Cancel. Note: Never back it again.
Note: The same procedure will apply to all Project Invoices.
How to Add a Timesheet
- Log in to the Admin and access the Dashboard from the Admin Panel.
- Navigate to Project from the left menu.
- Click on Project from the left menu a window will appear.
- Click the Options button (three dots) of the respective project, and open a menu with the options: Dashboard, Milestone, Task, File, Meeting, Invoice, Timesheet, Gantt Chart, Edit, and Delete Tab Or click the (three dots) from the Grid view of the respective project.
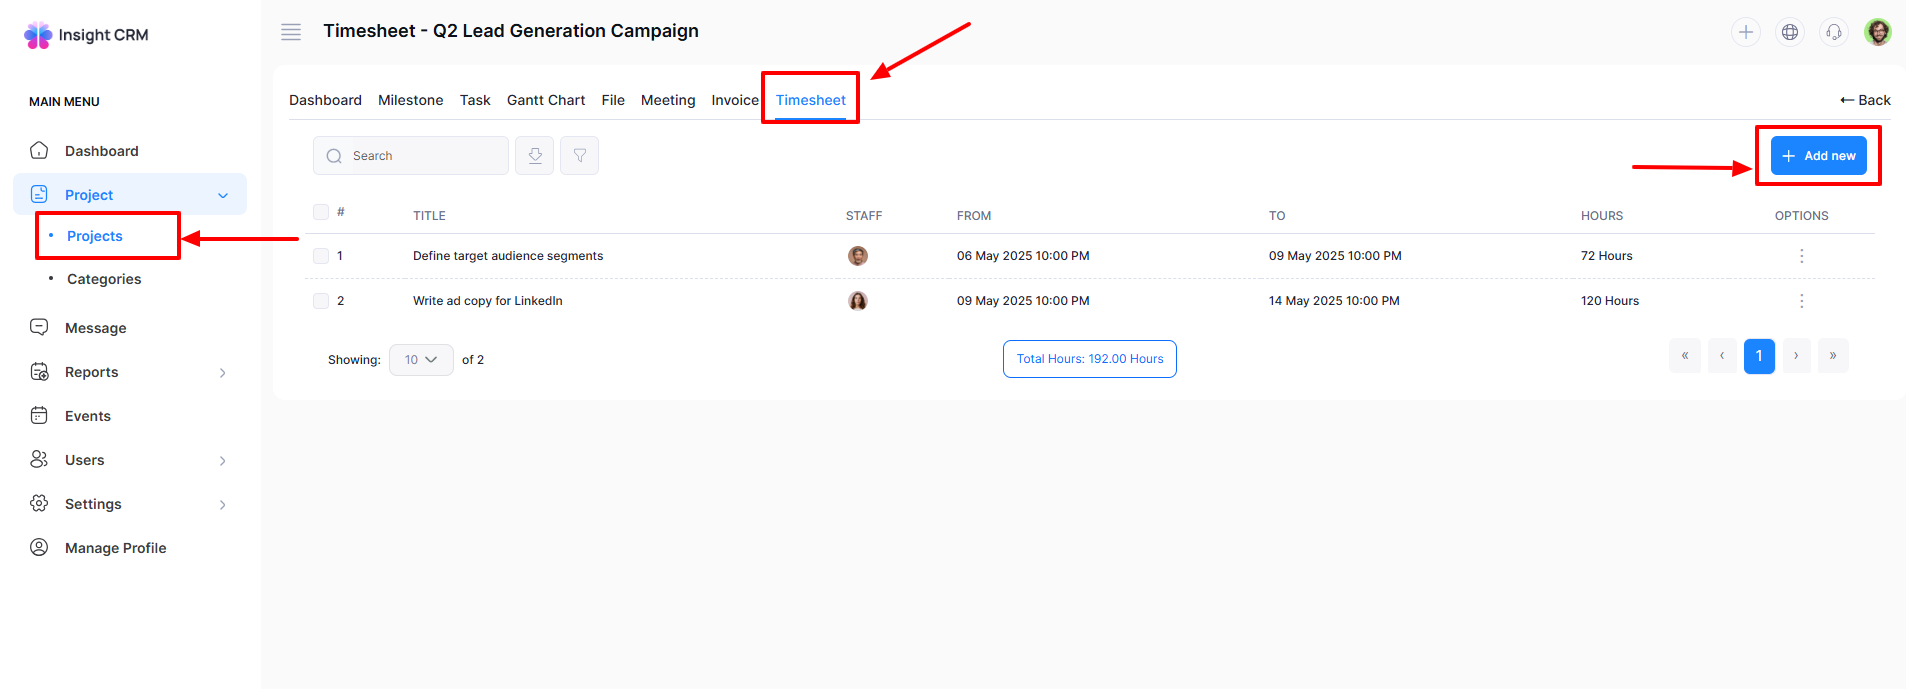
- Finally, click the Timesheet Tab a new window will appear.
- Click the Add New button a new entry form will appear to add an Invoice.
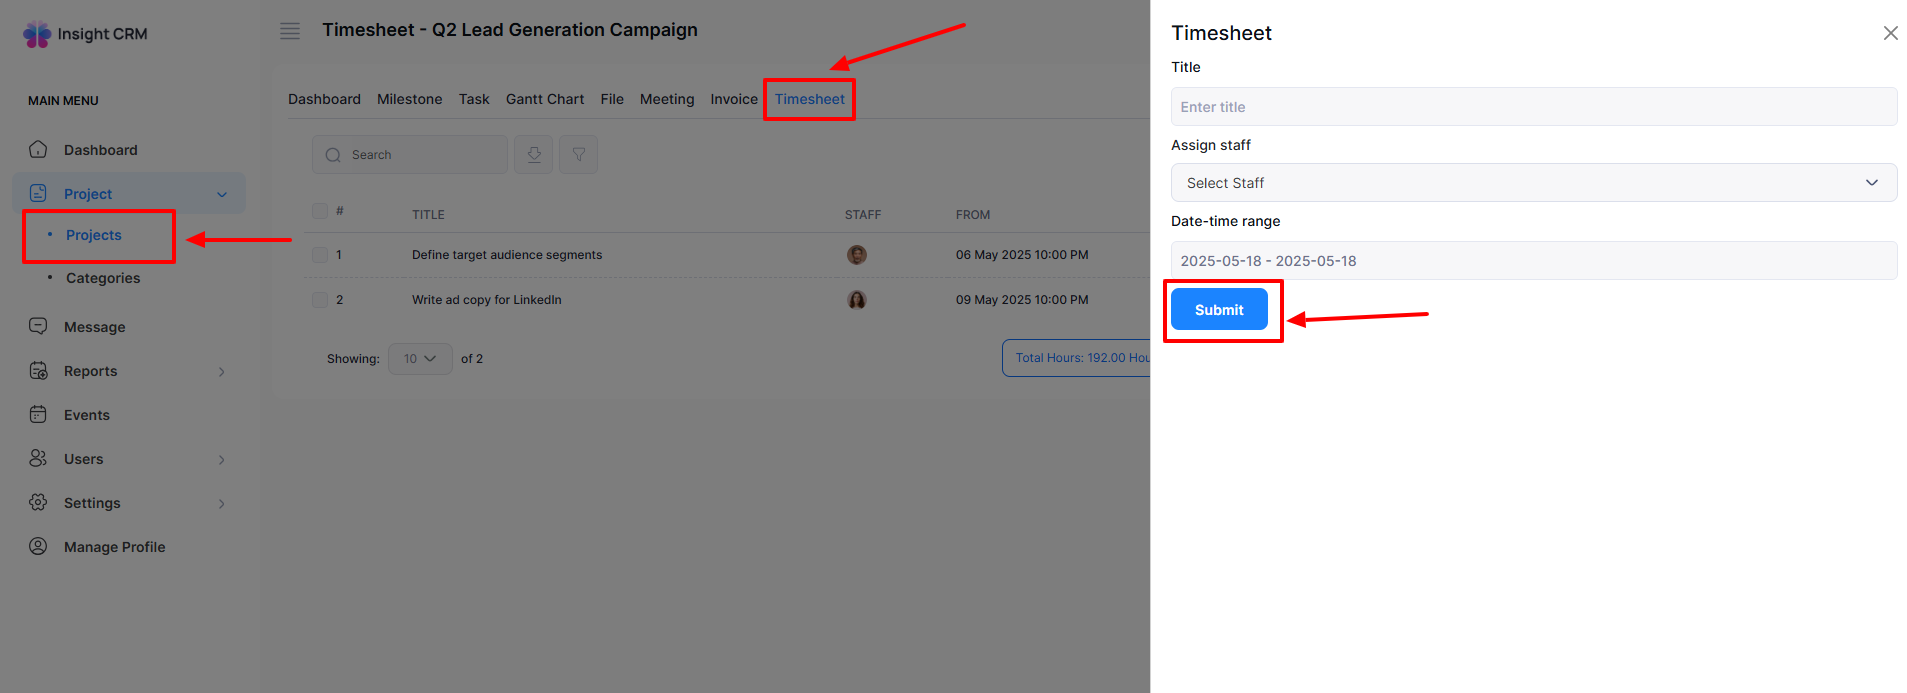
- Fill in the following details:
- Enter the Title Name in the Title field.
- Select Assign Staff from the Assign Staff dropdown menu.
- Select the Date Time Range from the Date Time Range dropdown calendar and click Apply.
- Click the Submit button to save all the provided information.
How to Edit a Timesheet
- Log in to the Admin and access the Dashboard from the Admin Panel.
- Navigate to Project from the left menu.
- Click on Project from the left menu a window will appear.
- Click the Options button (three dots) for the respective project, and open a menu with the options: Dashboard, Milestone, Task, File, Meeting, Invoice, Timesheet, Gantt Chart, Edit, and Delete Tab. Or click the three dots in the Grid view of the respective project.
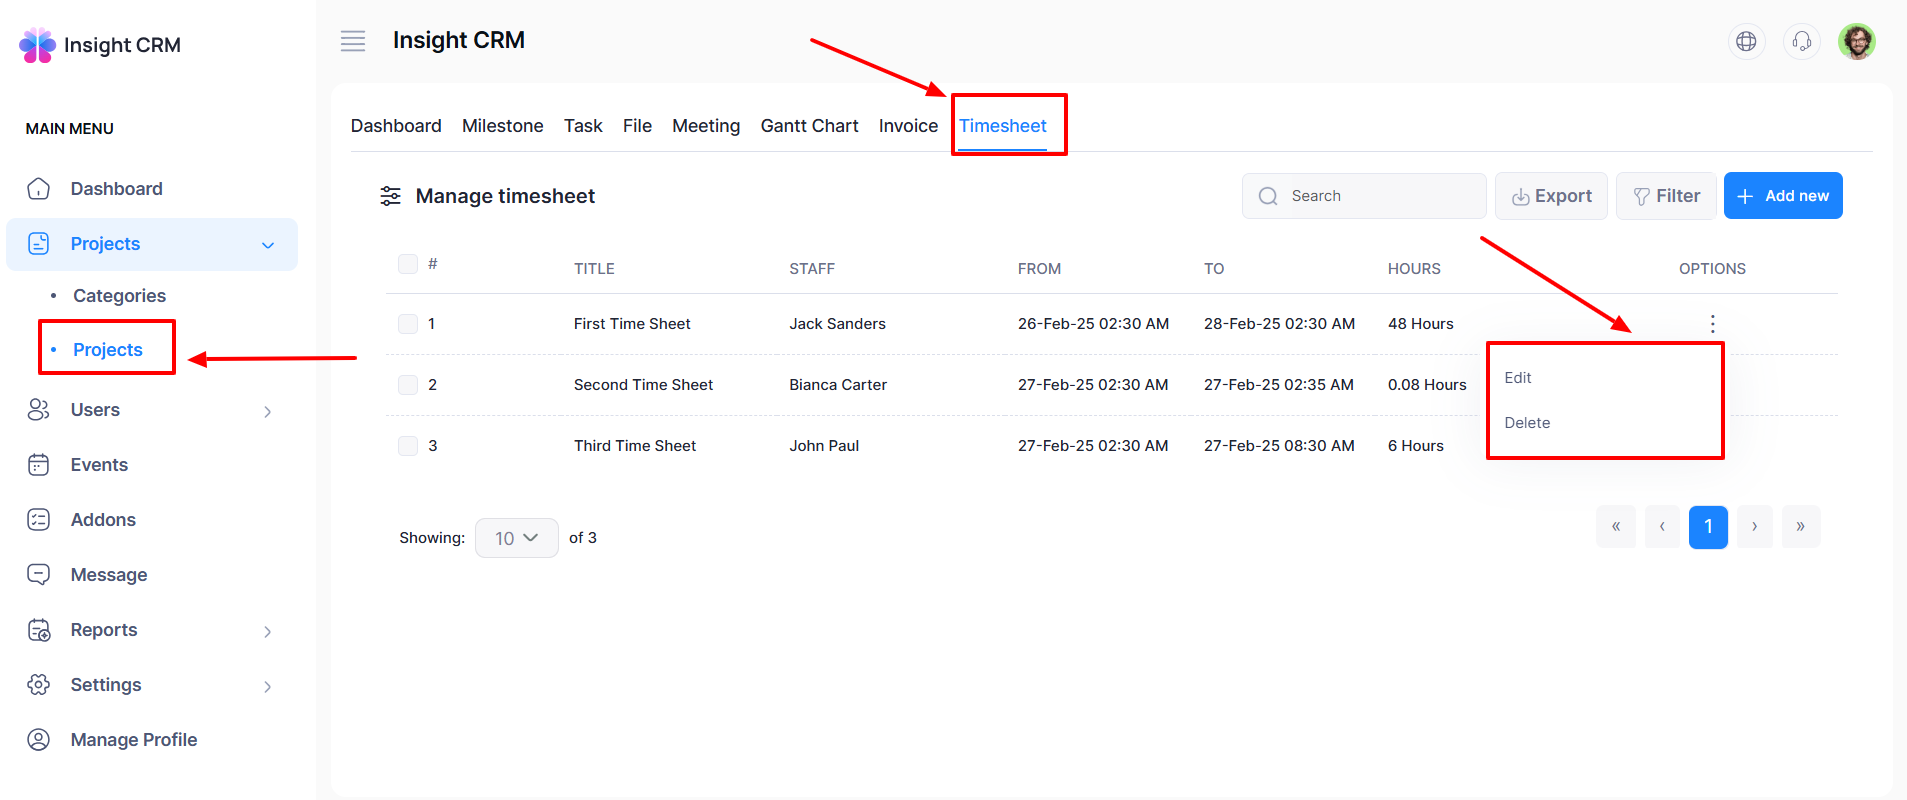
- Finally, click the Timesheet Tab a new window will appear.
- Click the Options button (three dots) to open a menu with the options: Edit and Delete.
- Click the Edit button of the respective project a new entry form will appear to edit.
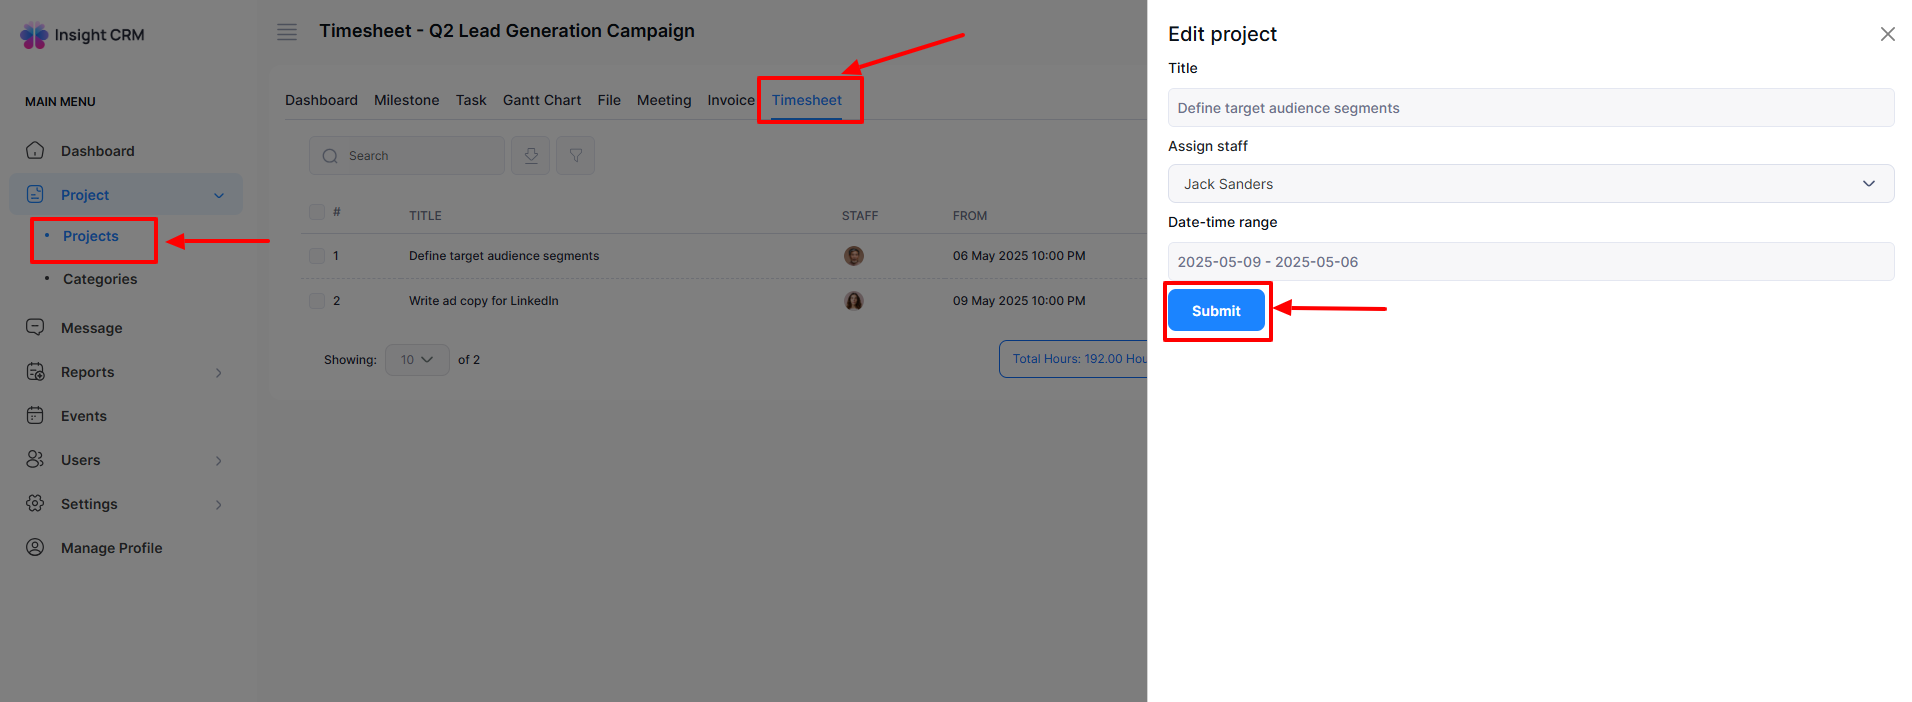
- Fill in the following details:
-
- Enter the Title Name in the Title field.
- Select Assign Staff from the Assign Staff dropdown menu.
- Select the Date Time Range from the Date Time Range dropdown calendar and click Apply.
-
- Once all fields are completed, click the Submit button to apply the updates.
- If you click the Delete button, a new confirmation window will appear.
- If you click Confirm, it will delete permanently; otherwise, click Cancel. Note: Never back it again.
Note: The same procedure will apply to all Project Timesheets.
Was this article helpful to you?
Contact us and we will get back to you as soon as possible

