How to Manage Payment Settings
In Insight CRM Laravel, Payment Settings help businesses efficiently manage payment methods. Admins can configure gateways, set currency preferences, and enable secure transactions. This simplifies payment processes, enhances customer trust, and supports seamless business operations for improved revenue and growth.
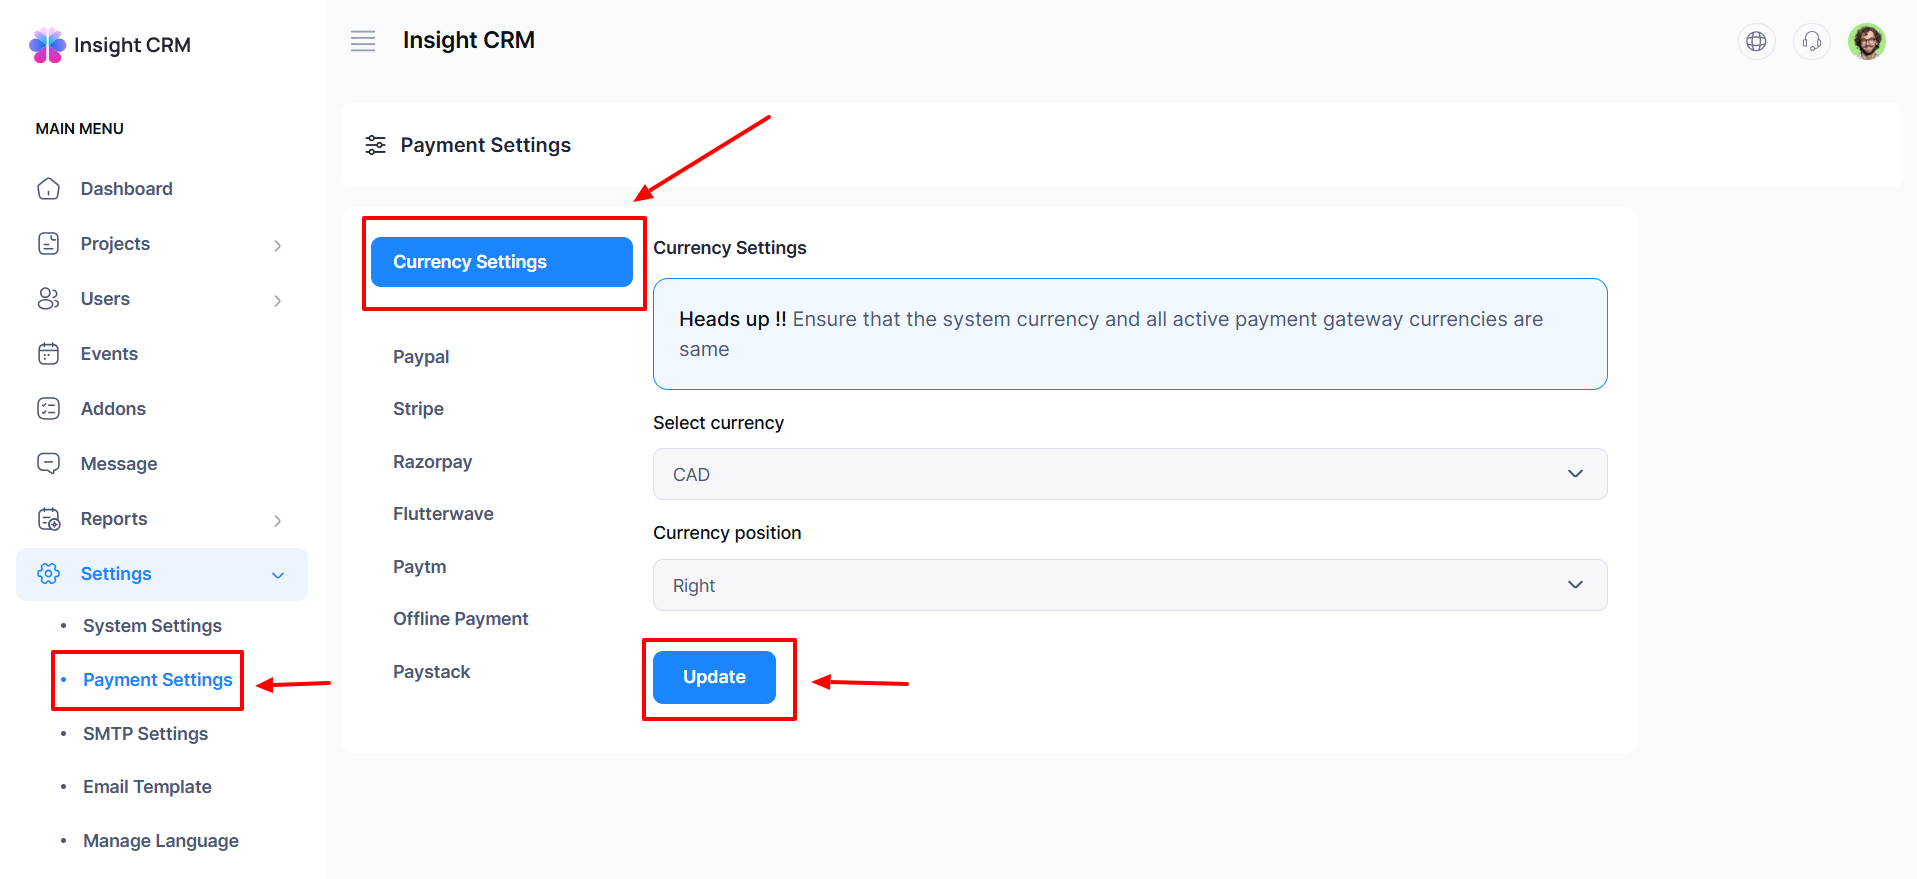
- Log in to the Admin and access the Dashboard from the Admin Panel.
- Navigate to Settings from the left menu.
- In the left sub-menu, choose Payment Settings, and a new window will pop up.
- Fill out the required fields:
-
- Select Currency: Select the Currency dropdown menu.
- Choose Currency Position: Select the Currency Position dropdown menu.
-
- Once all fields are completed, click the Update button to save the changes.
How to Manage PayPal Settings
- Log in to the Admin and access the Dashboard from the Admin Panel.
- Navigate to Settings from the left menu.
- In the left sub-menu, choose Payment Settings, and a new window will pop up.
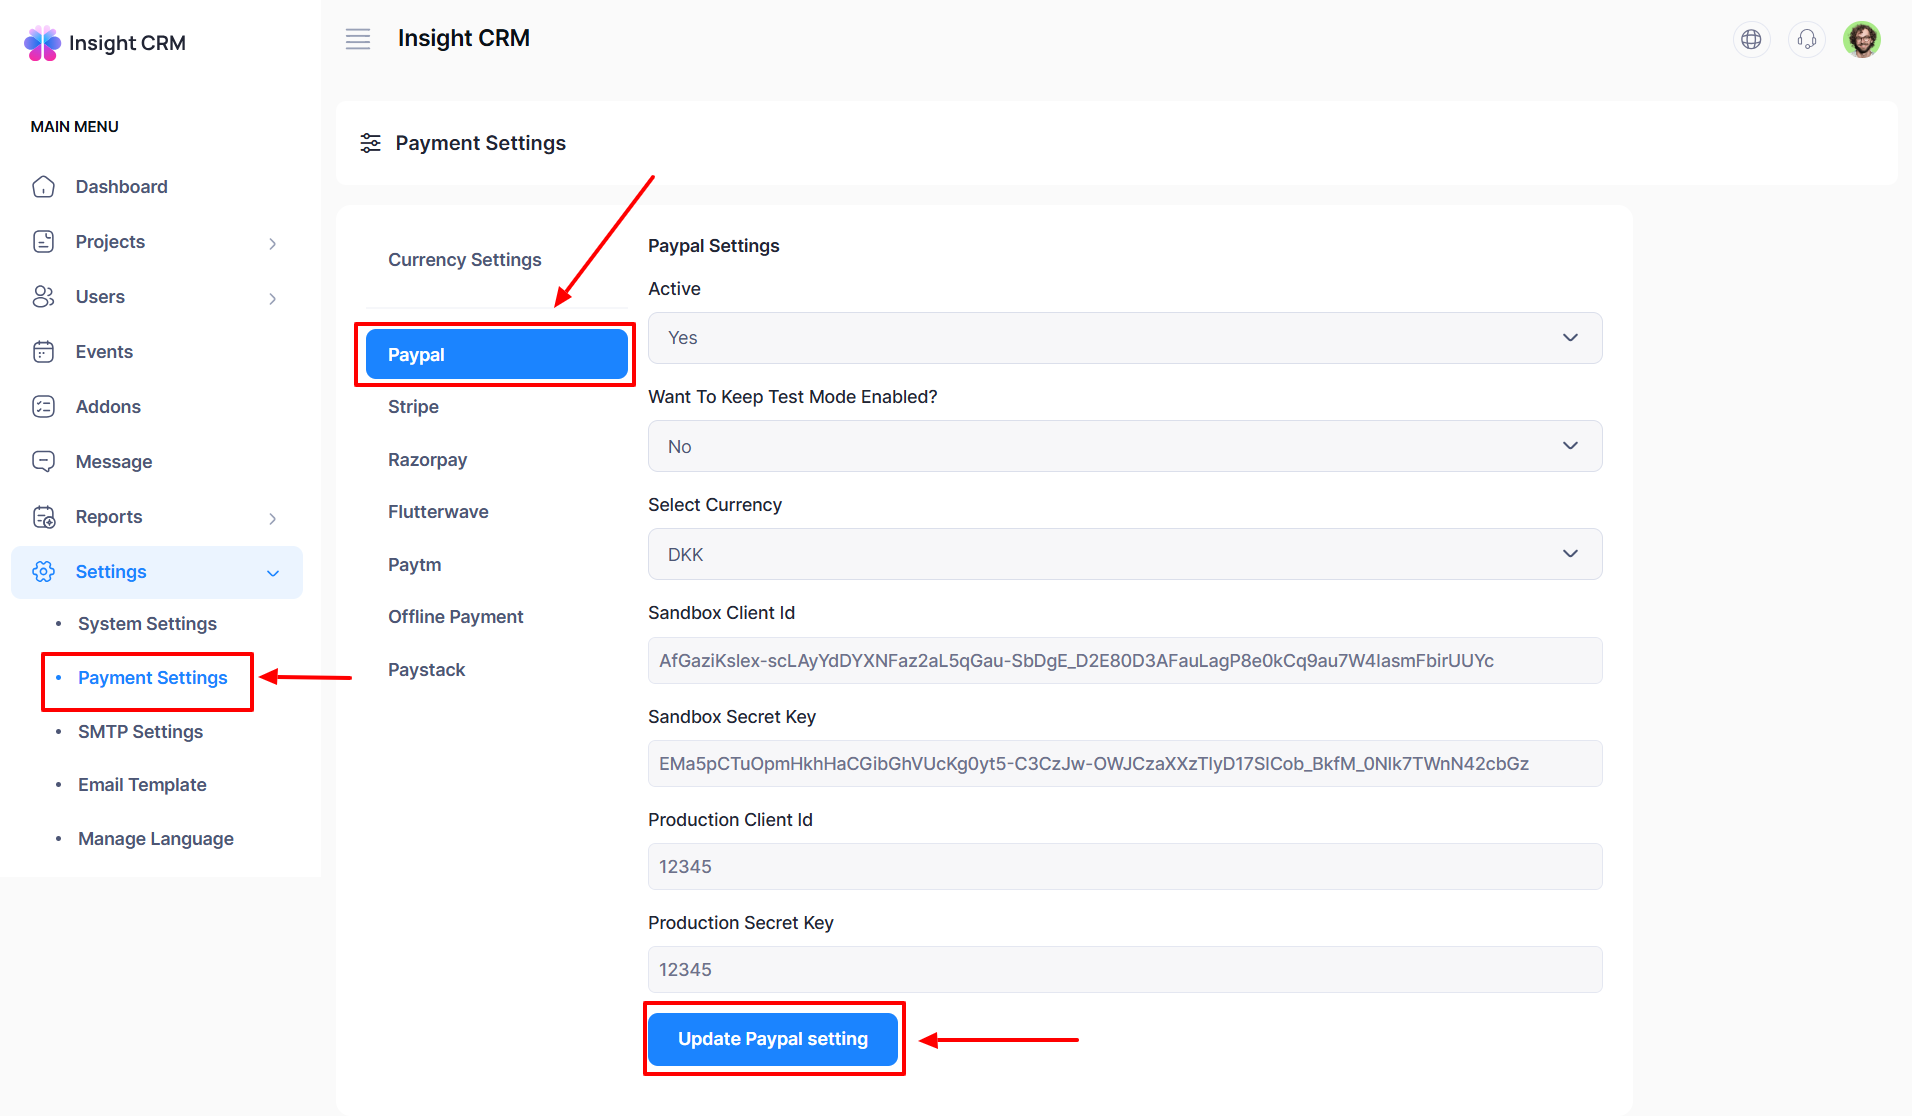
- Click the PayPal button an entry form will appear.
- Fill out the required fields:
-
- Active: Select from the dropdown menu.
- Want to keep test mode enabled: Select from the dropdown menu.
- Select Currency: Choose from the dropdown menu.
- Sandbox Client ID: Put Client ID in the respective field.
- Sandbox Secret Key: Enter the Secret Key in the desired field.
- Production Client ID: Type the production client ID relevant field.
- Production Secret Key: Put the Production Secret Key in the respective field.
-
- Once all fields are completed, click the Update PayPal Settings button to save the changes.
How to Manage Stripe Settings
- Log in to the Admin and access the Dashboard from the Admin Panel.
- Navigate to Settings from the left menu.
- In the left sub-menu, choose Payment Settings, and a new window will pop up.
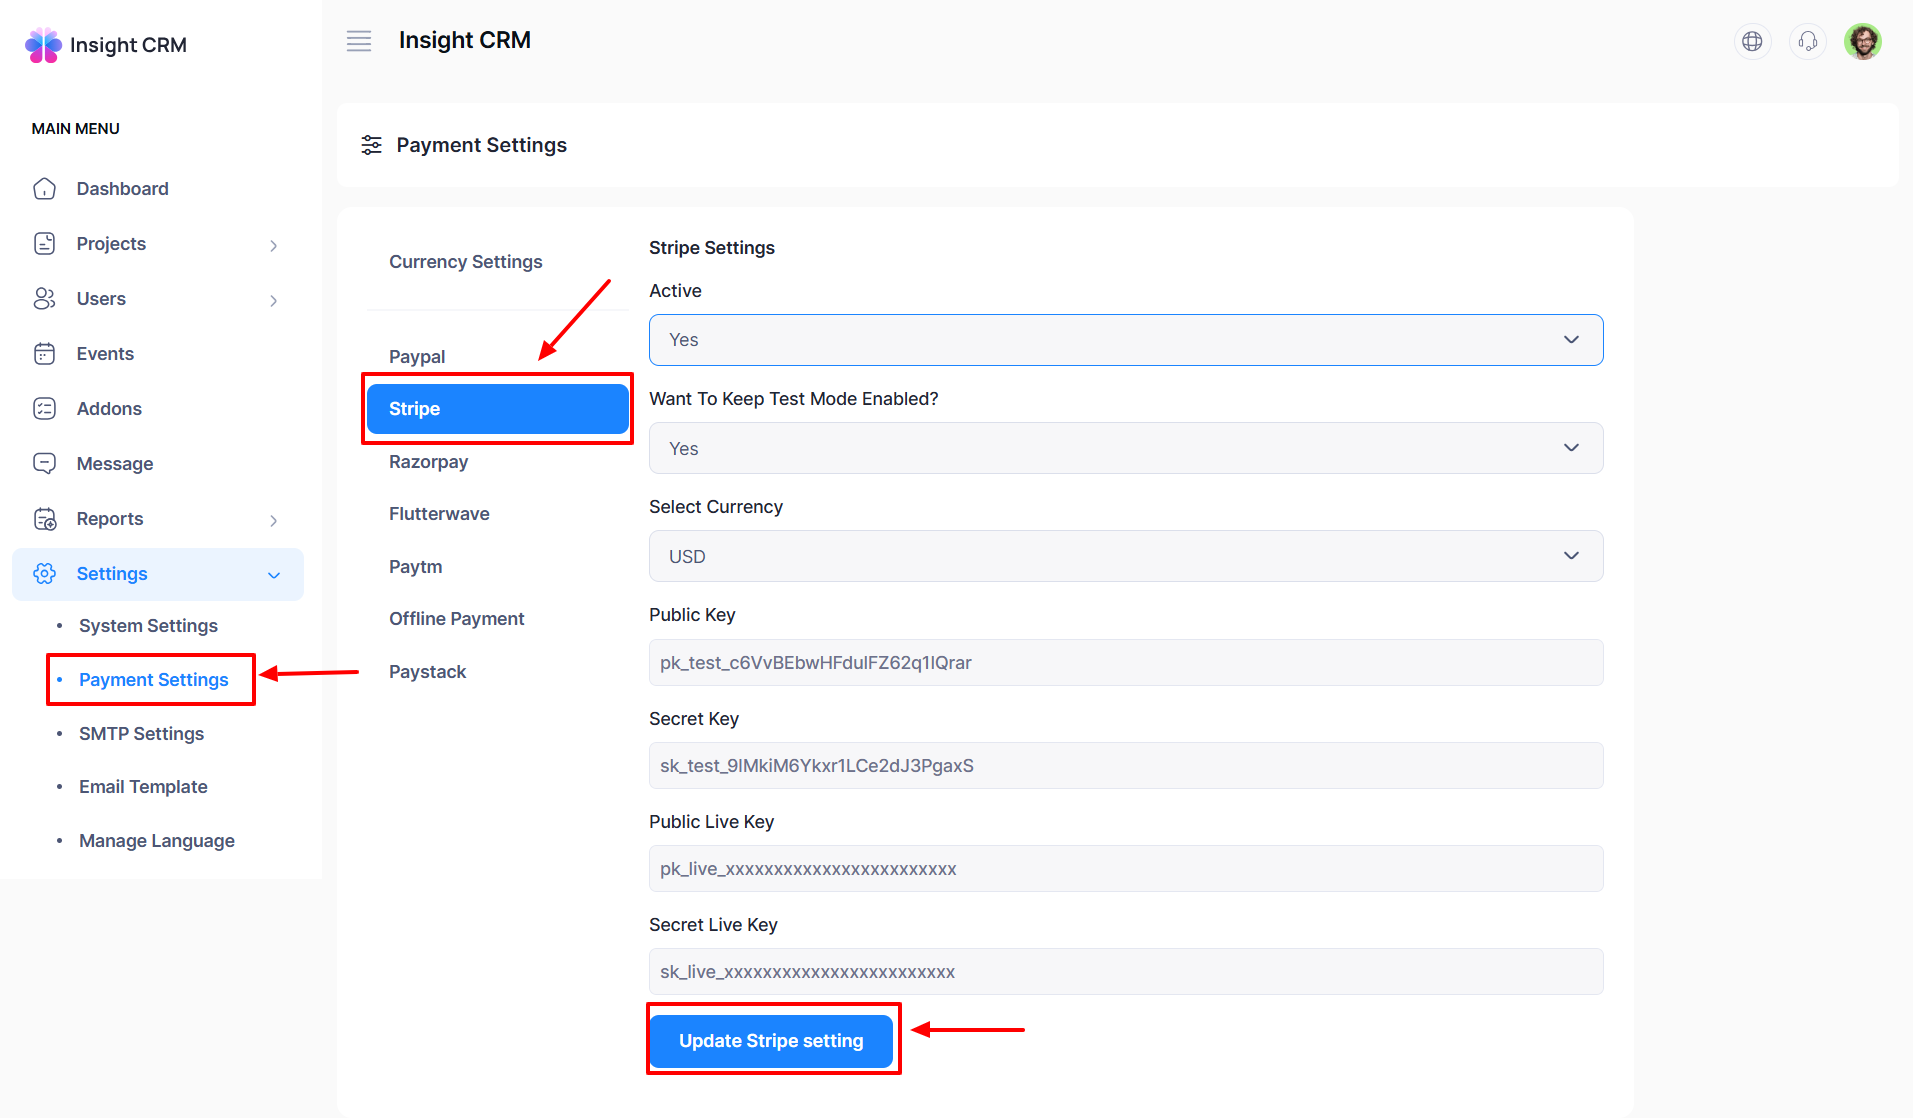
- Click the Stripe button an entry form will appear.
- Fill out the required fields:
-
- Active: Select from the dropdown menu.
- Want to keep test mode enabled: Select from the dropdown menu.
- Select Currency: Choose from the dropdown menu.
- Public Key: Put the Public Key in the respective field.
- Secret Key: Enter the Secret Key in the desired field.
- Public Live Key: Enter the Public Live key in the desired field.
- Secret Live Key: Enter the Secret Live Key in the respective field.
-
- Once all fields are completed, click the Update Stripe Settings button to save the changes.
How to Manage Razorpay Settings
- Log in to the Admin and access the Dashboard from the Admin Panel.
- Navigate to Settings from the left menu.
- In the left sub-menu, choose Payment Settings, and a new window will pop up.
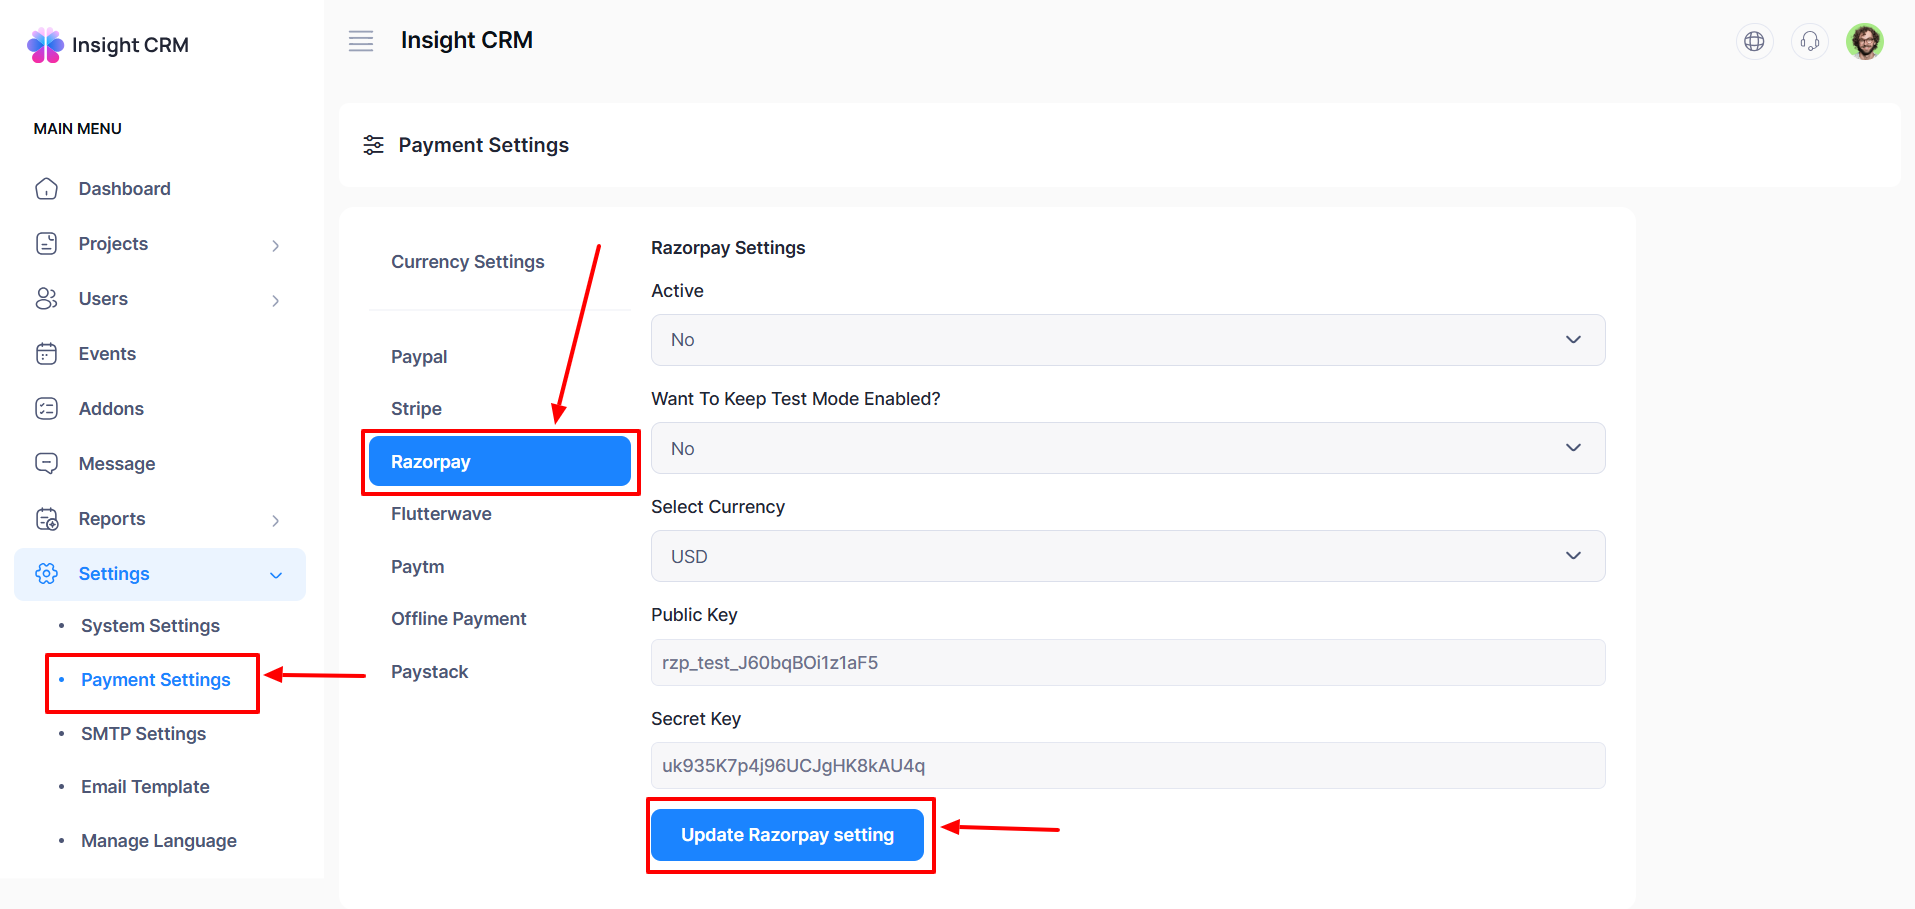
- Click the Razorpay button an entry form will appear.
- Fill out the required fields:
-
- Active: Select from the dropdown menu.
- Want to keep test mode enabled: Select from the dropdown menu.
- Select Currency: Choose from the dropdown menu.
- Public Key: Put the Public Key in the respective field.
- Secret Key: Enter the Secret Key in the desired field.
-
- Once all fields are completed, click the Update Razorpay Settings button to save the changes.
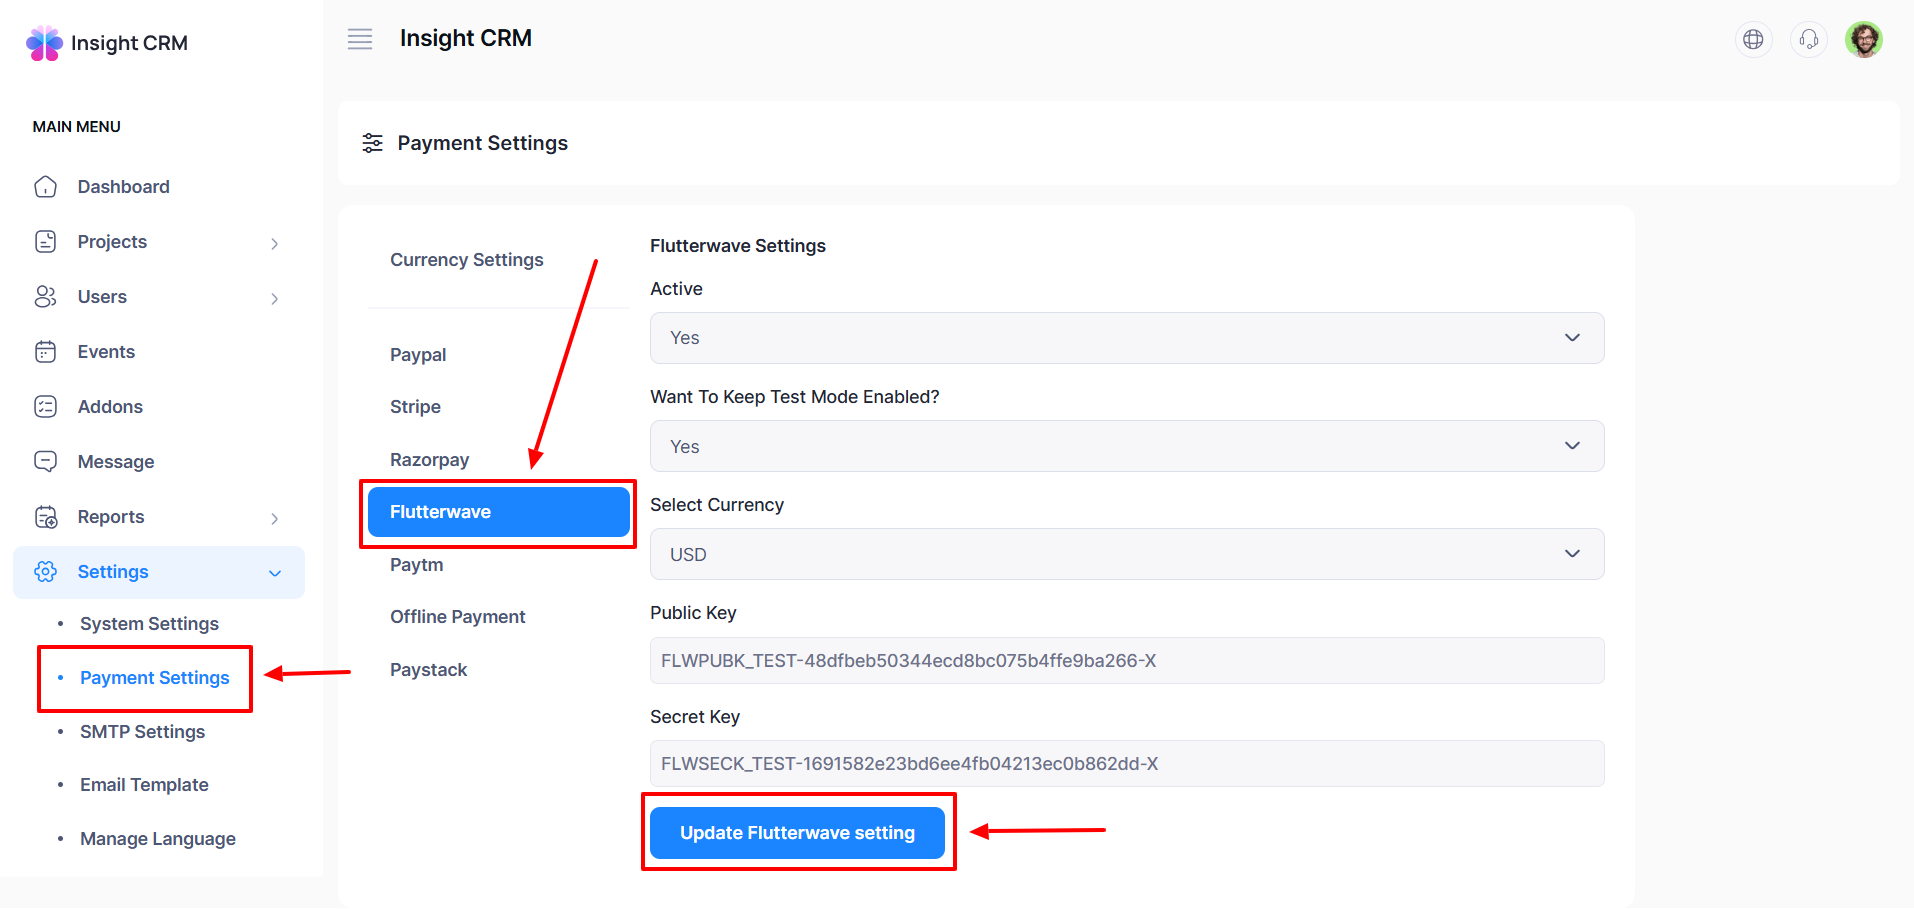
How to Manage Flutterwave Settings
- Log in to the Admin and access the Dashboard from the Admin Panel.
- Navigate to Settings from the left menu.
- In the left sub-menu, choose Payment Settings, and a new window will pop up.
- Click the Flutterwave button, and an entry form will appear.
- Fill out the required fields:
-
- Active: Select from the dropdown menu.
- Want to keep test mode enabled: Select from the dropdown menu.
- Select Currency: Choose from the dropdown menu.
- Public Key: Put the Public Key in the respective field.
- Secret Key: Enter the Secret Key in the desired field.
-
- Once all fields are completed, click the Update Flutterwave Settings button to save the changes.
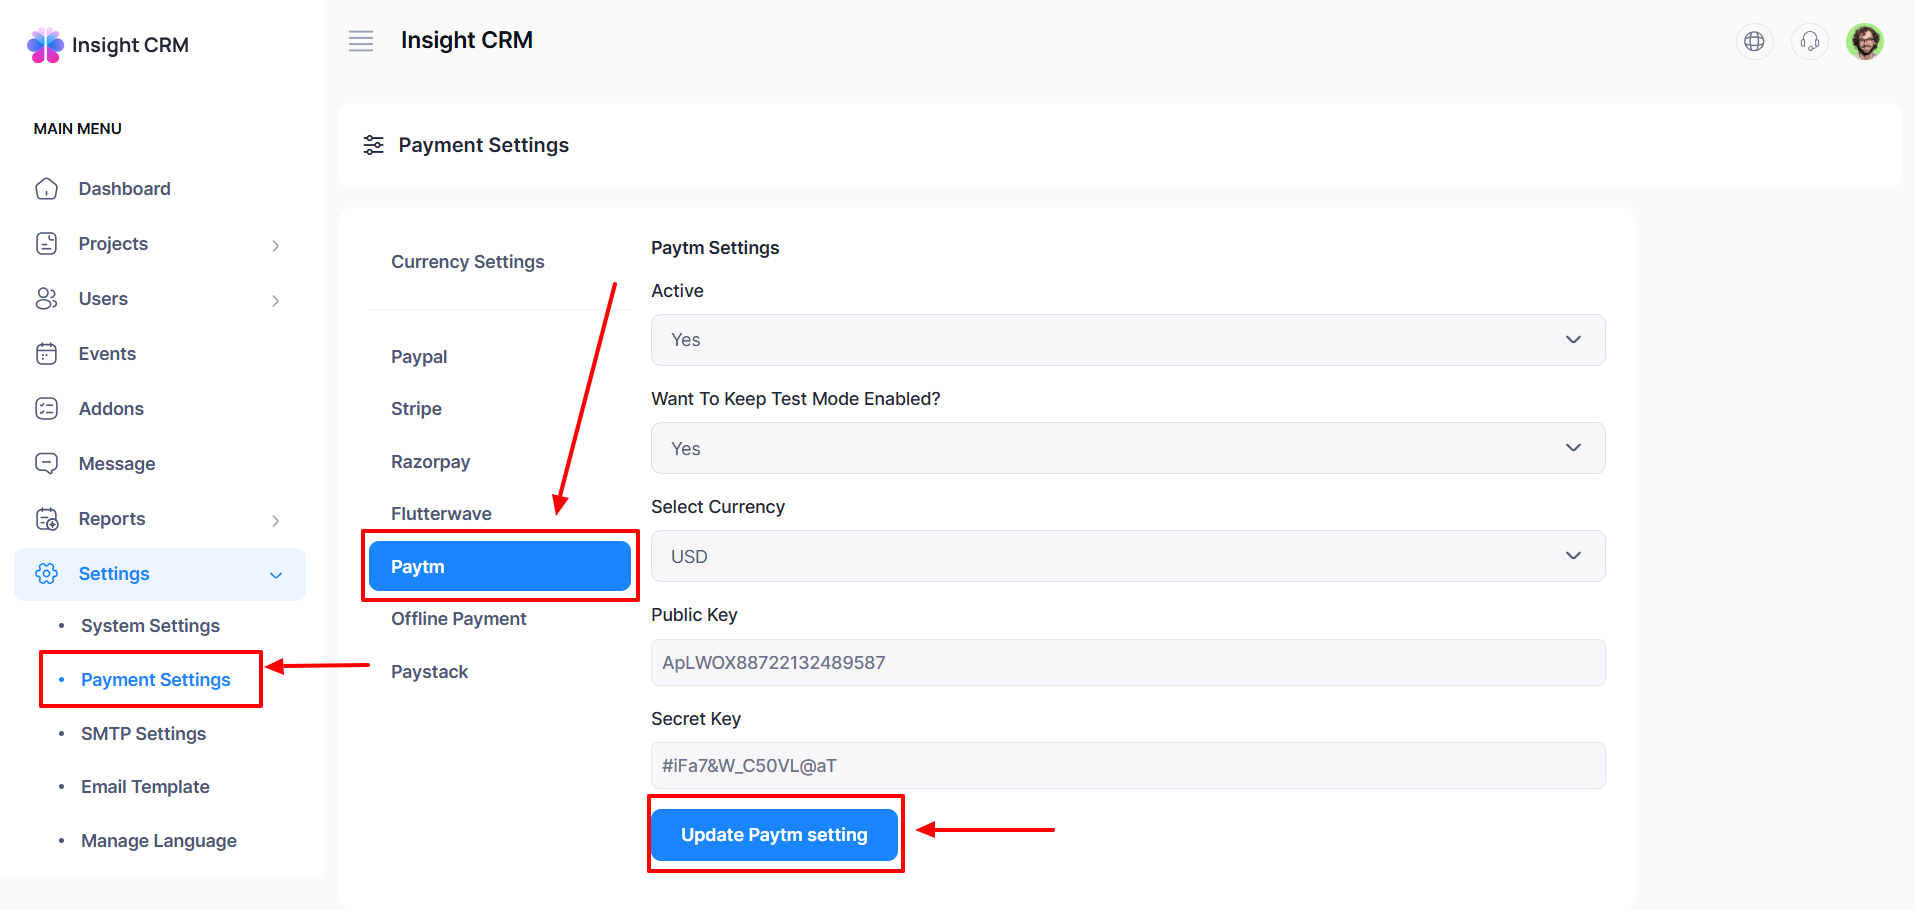
How to Manage Paytm Settings
- Log in to the Admin and access the Dashboard from the Admin Panel.
- Navigate to Settings from the left menu.
- In the left sub-menu, choose Payment Settings, and a new window will pop up.
- Click the Paytm button an entry form will appear.
- Fill out the required fields:
-
- Active: Select from the dropdown menu.
- Want to keep test mode enabled: Select from the dropdown menu.
- Select Currency: Choose from the dropdown menu.
- Public Key: Put the Public Key in the respective field.
- Secret Key: Enter the Secret Key in the desired field.
-
- Once all fields are completed, click the Update Paytm Settings button to save the changes.
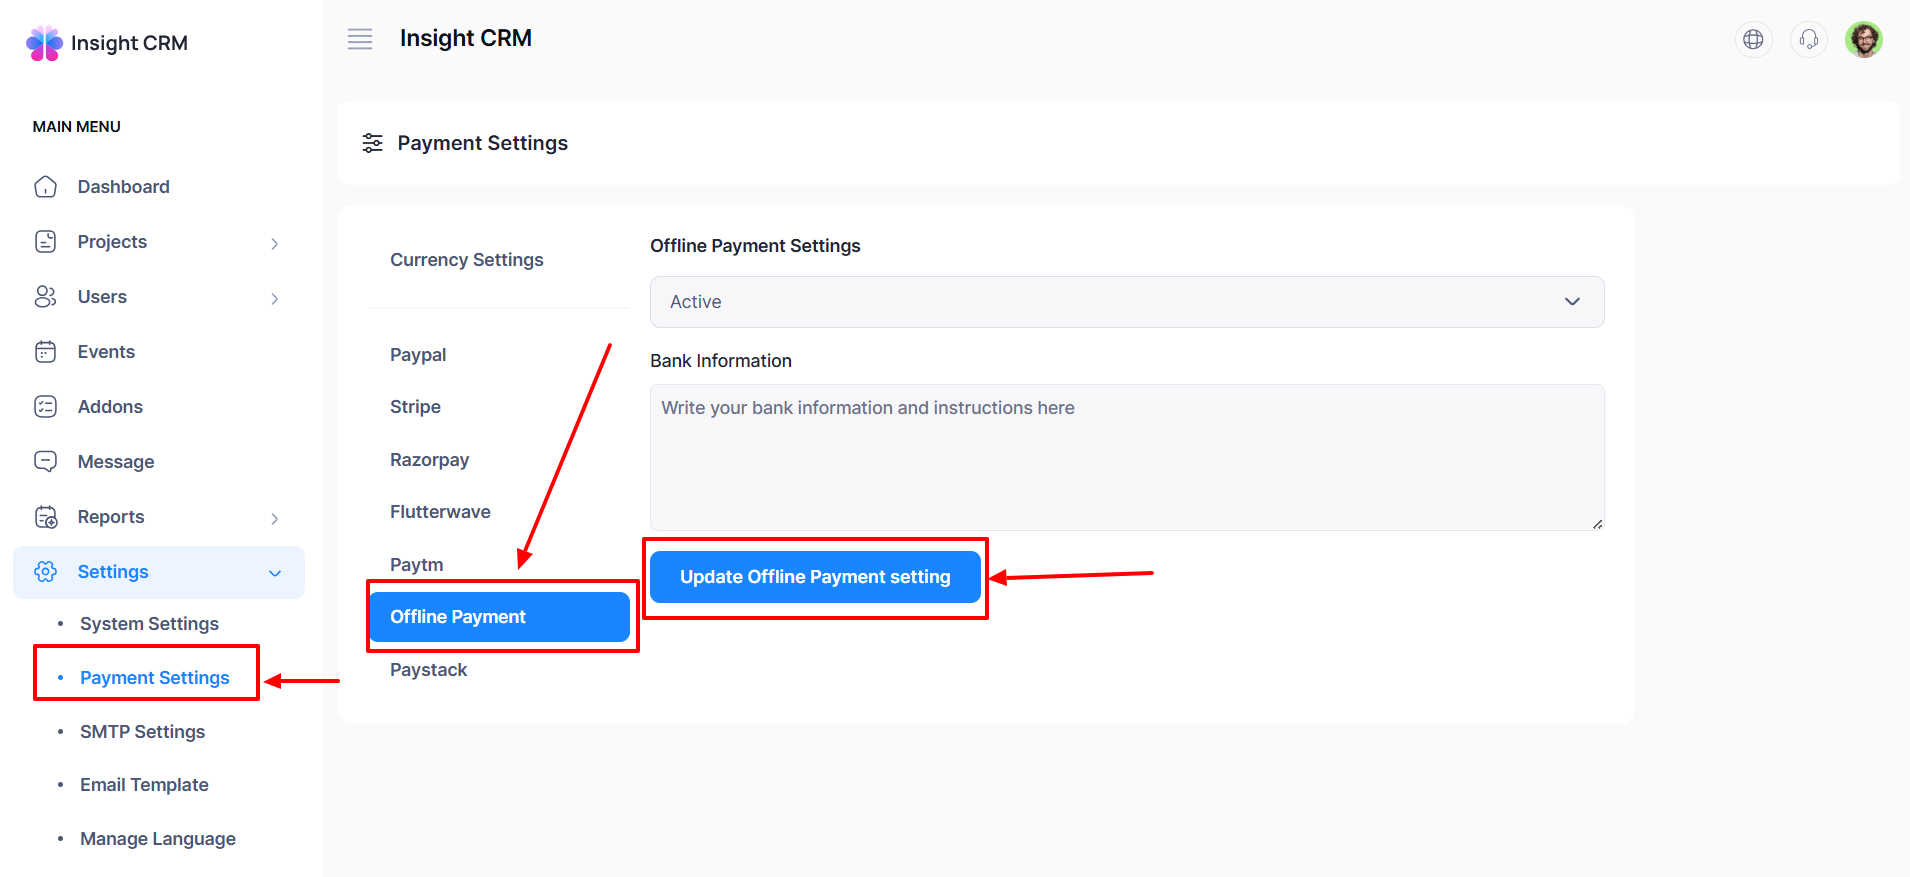
How to Manage Offline Payment Settings
- Log in to the Admin and access the Dashboard from the Admin Panel.
- Navigate to Settings from the left menu.
- In the left sub-menu, choose Payment Settings, and a new window will pop up.
- Click the Paytm button an entry form will appear.
- Fill out the required fields:
-
- Offline Payment Settings: Select from the dropdown menu.
- Bank Information: Provide detailed Bank information.
-
- Once all fields are completed, click the Update Offline Payment Settings button to save the changes.
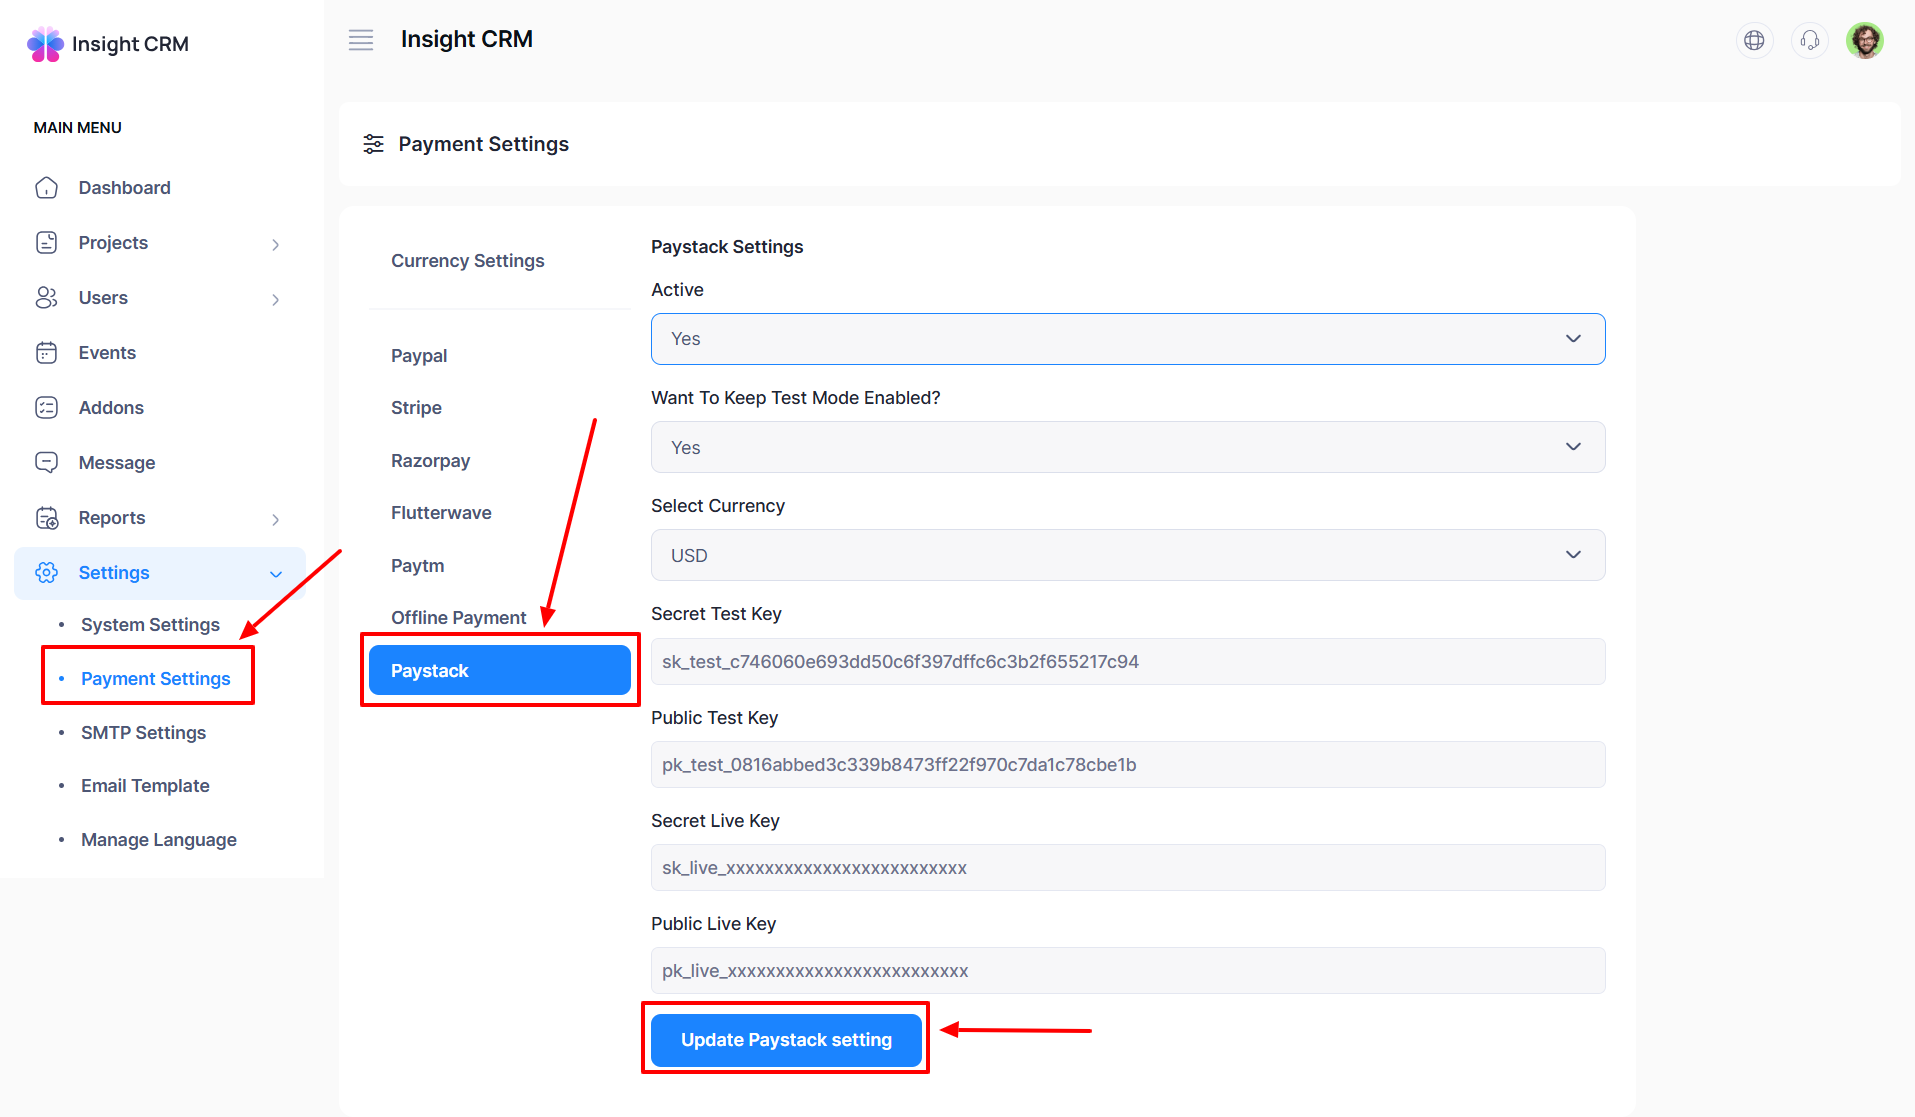
How to Manage Paystack Settings
- Log in to the Admin and access the Dashboard from the Admin Panel.
- Navigate to Settings from the left menu.
- In the left sub-menu, choose Payment Settings, and a new window will pop up.
- Click the Paystack button an entry form will appear.
- Fill out the required fields:
-
- Active: Select from the dropdown menu.
- Want to keep test mode enabled: Select from the dropdown menu.
- Select Currency: Choose from the dropdown menu.
- Secret Test Key: Enter the Public Live key in the desired field.
- Public Test Key: Put the Public Key in the respective field.
- Secret Live Key: Enter the Secret Live Key in the respective field.
- Public Live Key: Type the Public Live key in the desired field.
-
- Once all fields are completed, click the Update Paystack Settings button to save the changes.
Was this article helpful to you?
How can we help?
Contact us and we will get back to you as soon as possible

