How to Manage Website Settings
In Atlas Laravel, Website Settings lets businesses customize their platform effortlessly. Admins can manage site details, branding, and key configurations to align with business goals. This enhances user experience, strengthens brand identity, and ensures a professional, optimized website for growth.
-
Log in as Admin and access the Dashboard from the Admin Panel.
-
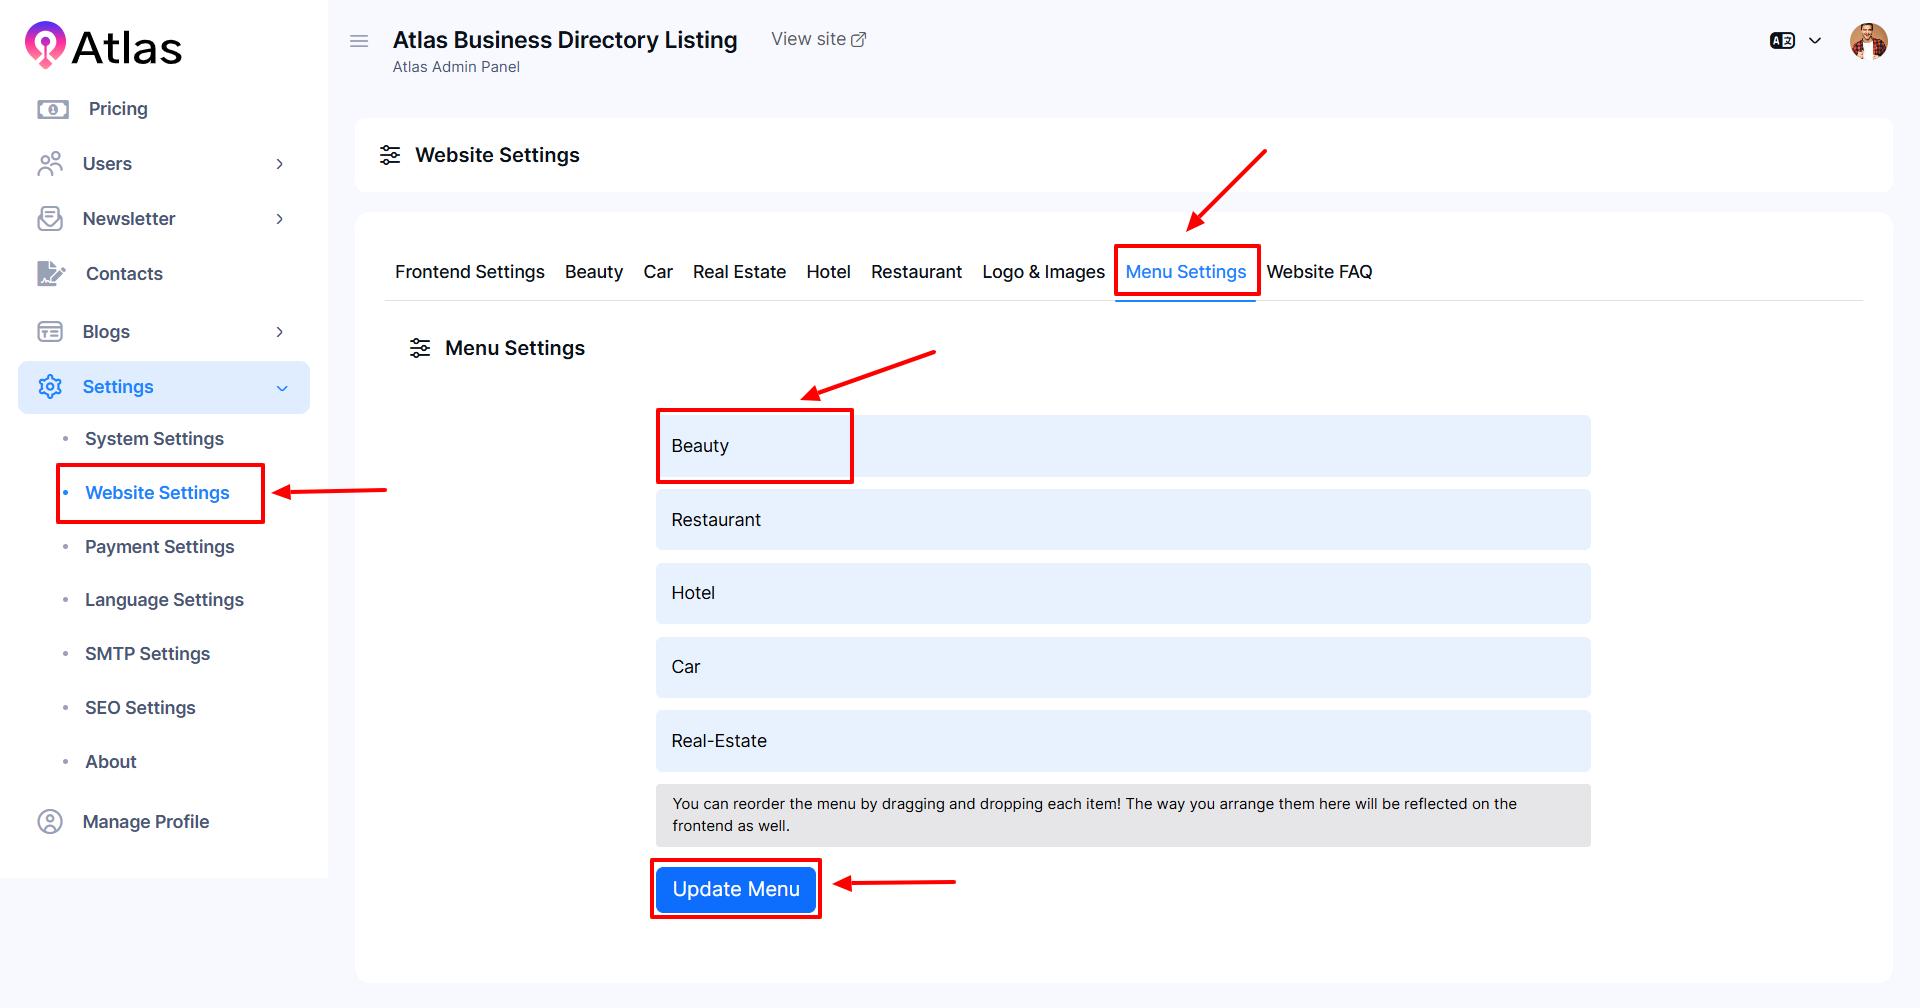
Navigate to Settings from the left menu
-
In the left sub-menu, click Website Settings. A new window will open with the following tabs: Frontend Settings, Beauty, Car, Real Estate, Hotel, Restaurant, Logo & Image, Menu Settings, and Website FAQ.
-
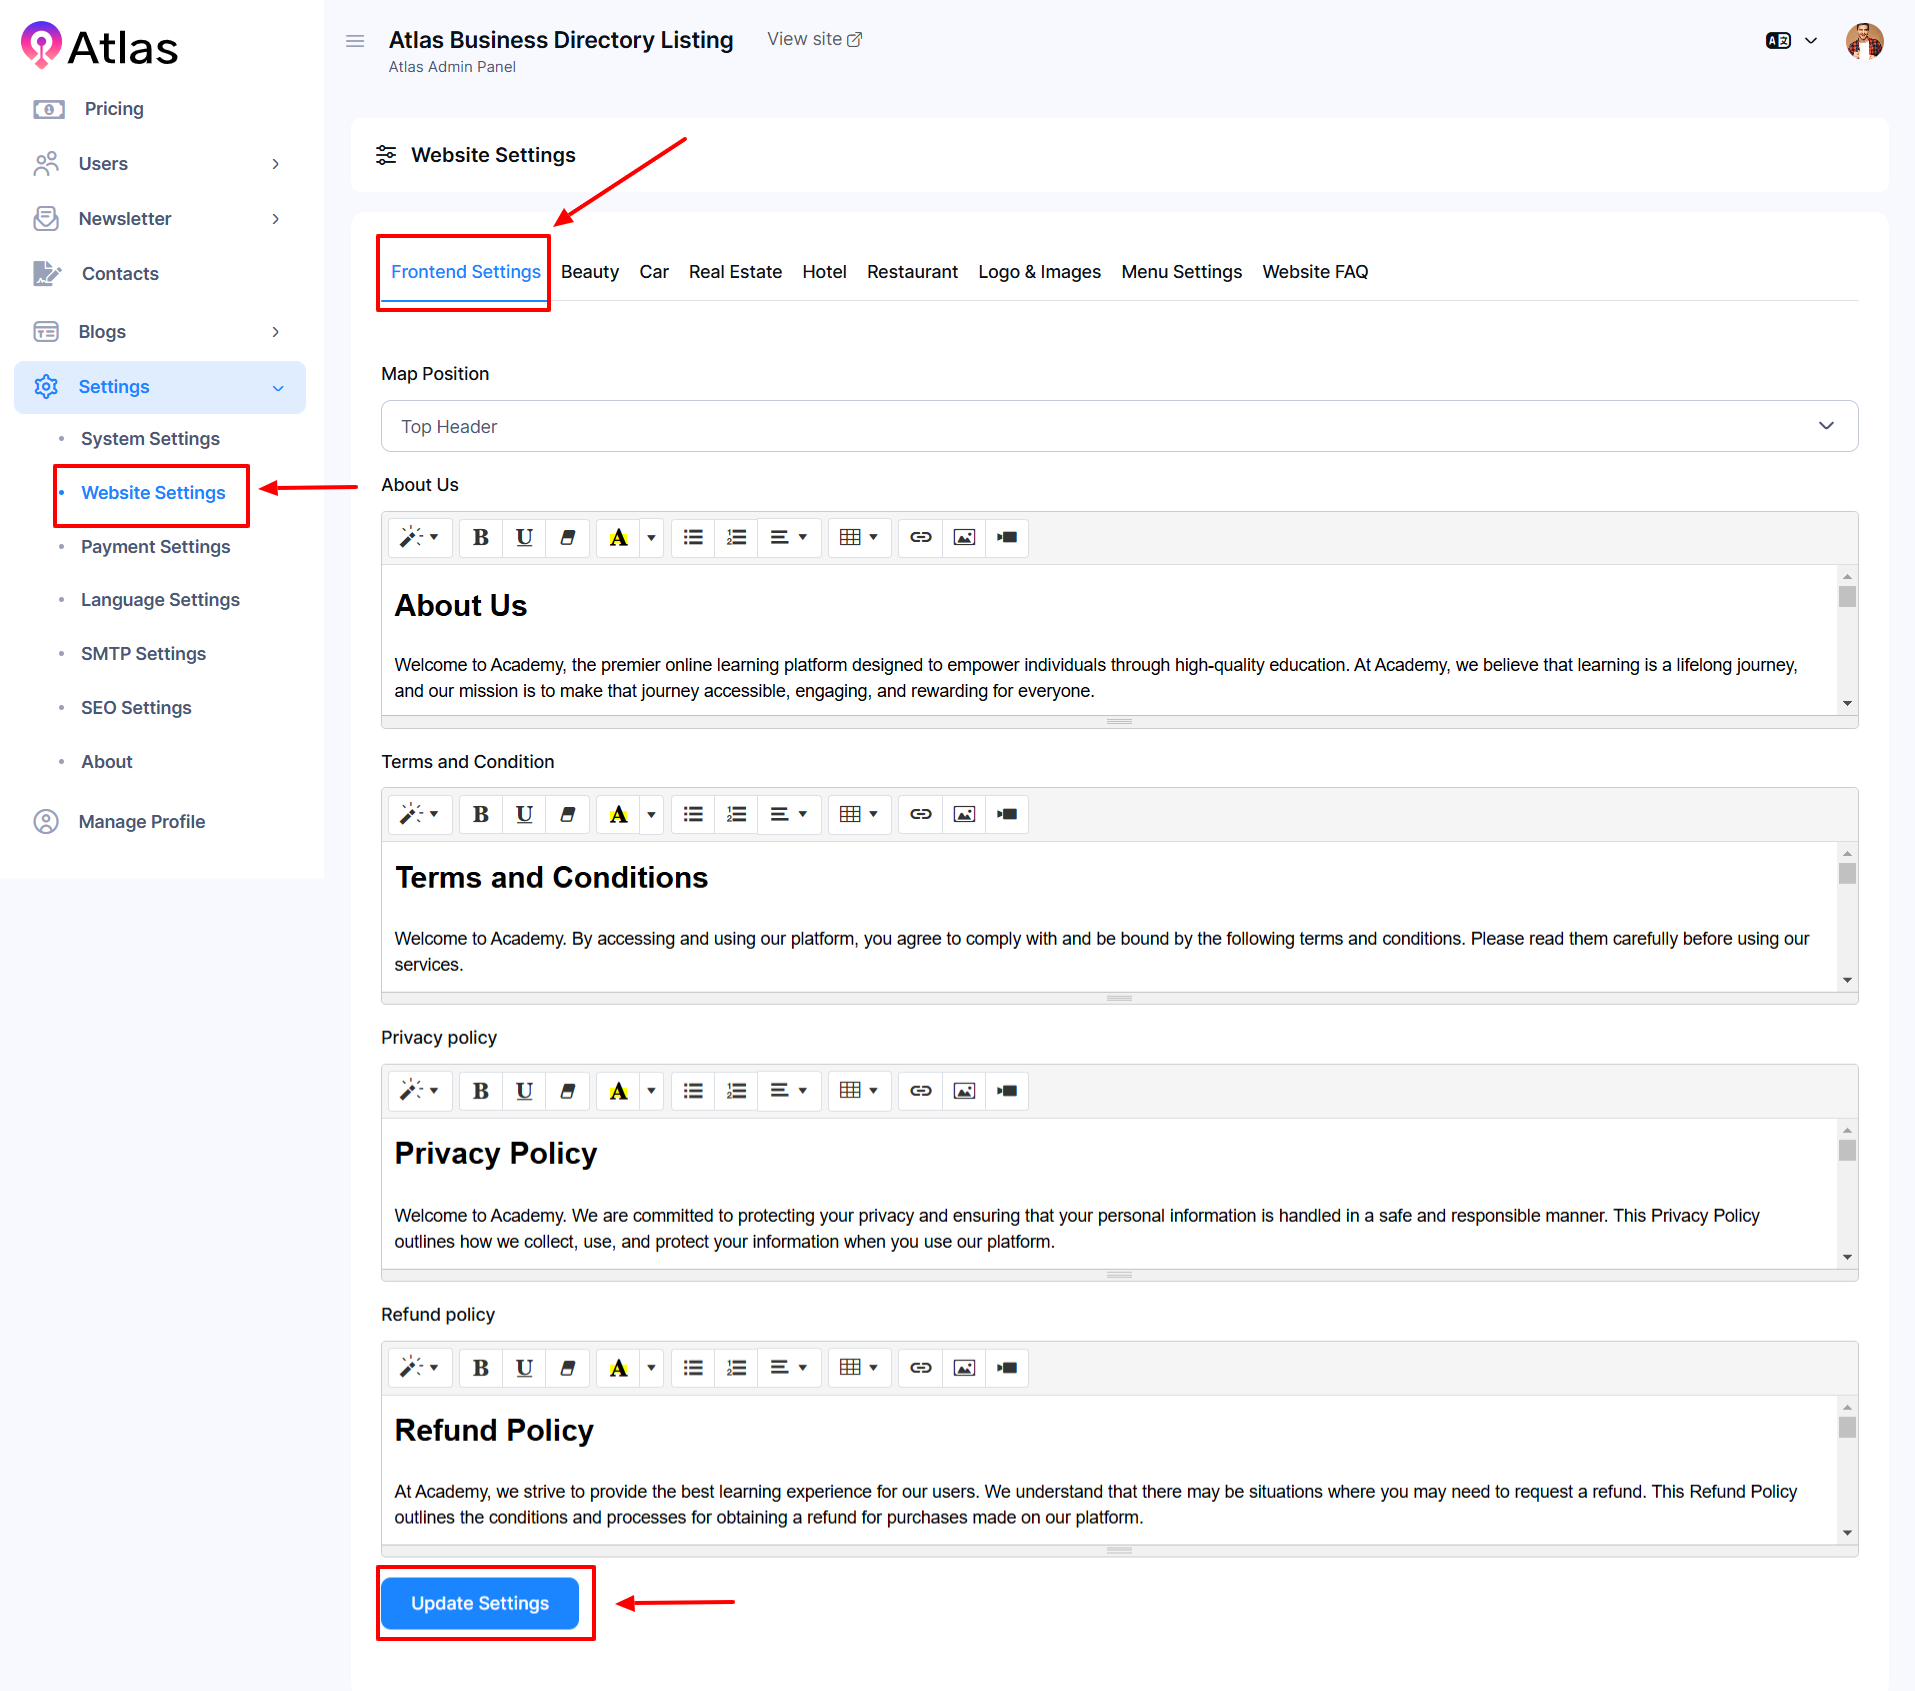
Click the Frontend Settings Tab to access the entry form.
-
Fill out the required fields:
-
-
Map Position: Select a map position from the map position dropdown menu.
-
About us: Enter your site about.
-
Terms and conditions: Input the terms and conditions.
-
Privacy Policy: Provide your privacy policy.
-
Refund Policy: Add your refund policy.
-
-
-
Once all fields are completed, click Update Settings to apply the updates.
Beauty Settings
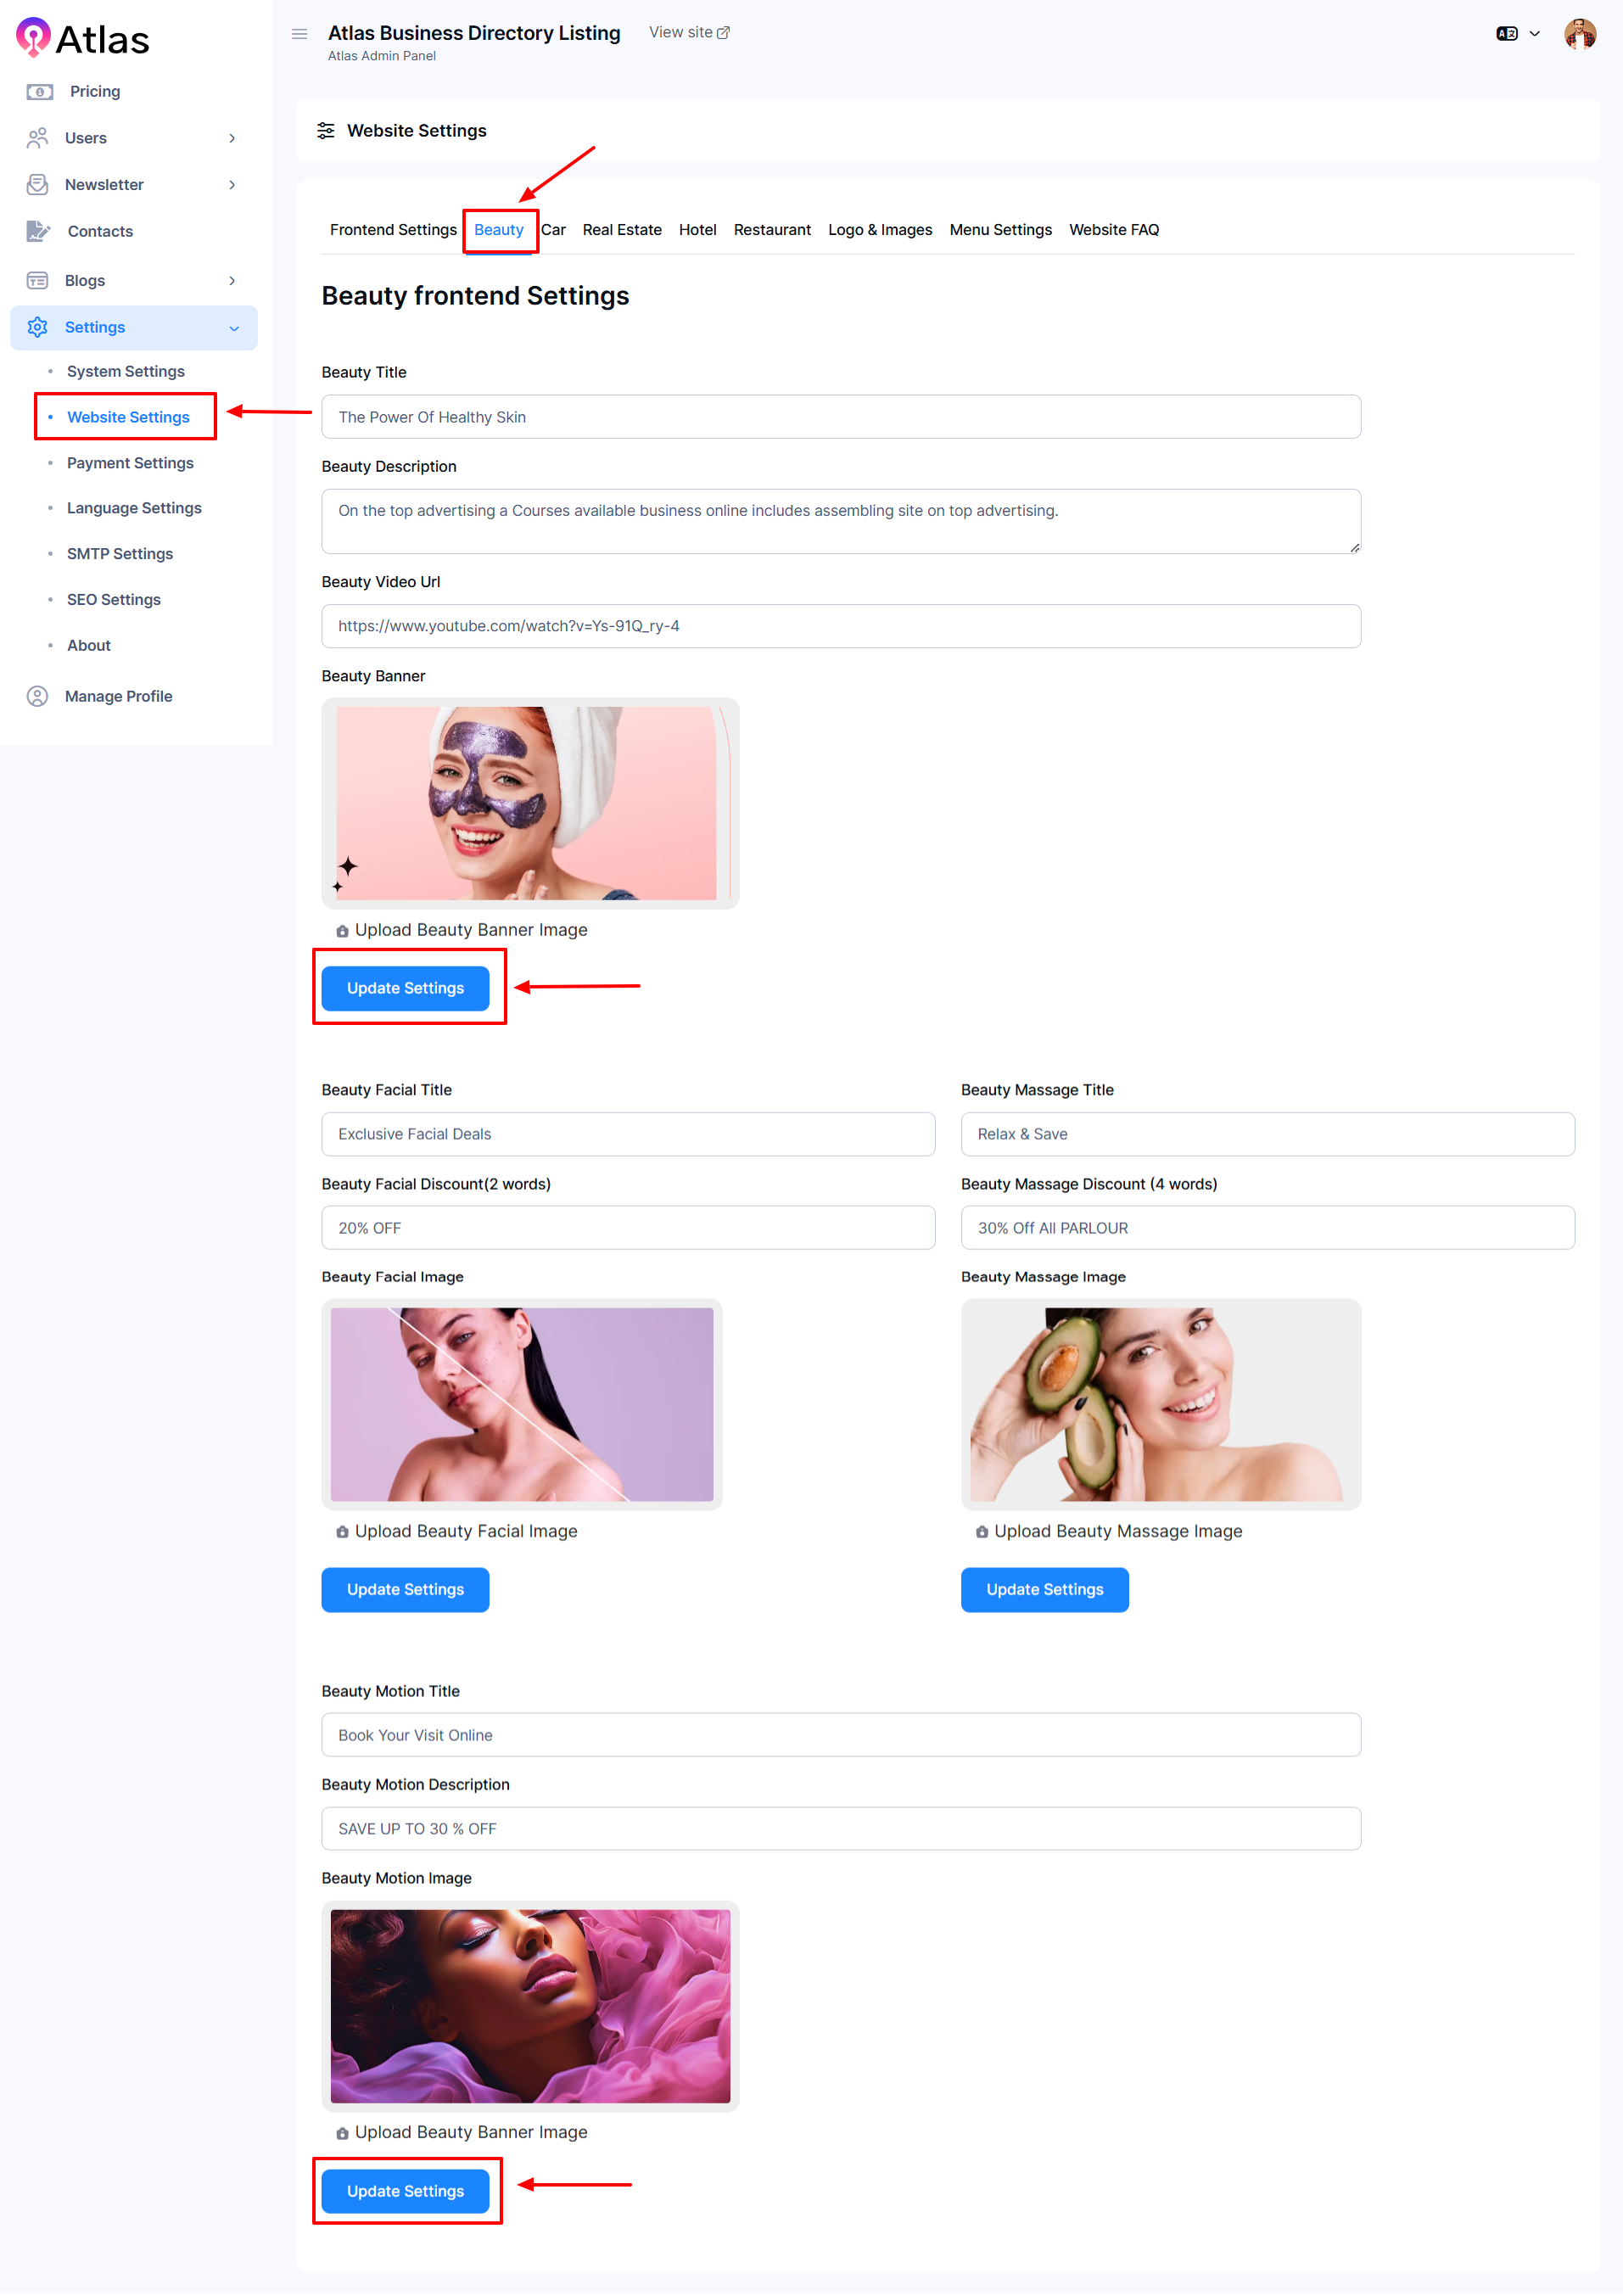
- Click the Beauty Tab to access the entry form.
- Fill out the required fields:
-
- Beauty Title: Add the beauty title name.
- Beauty Description: Enter the description of beauty.
- Beauty Video URL: Provide the video URL.
- Beauty Banner: Click the upload beauty banner image.
-
- Once all fields are completed, click Update Settings to apply the updates.
Cart Settings
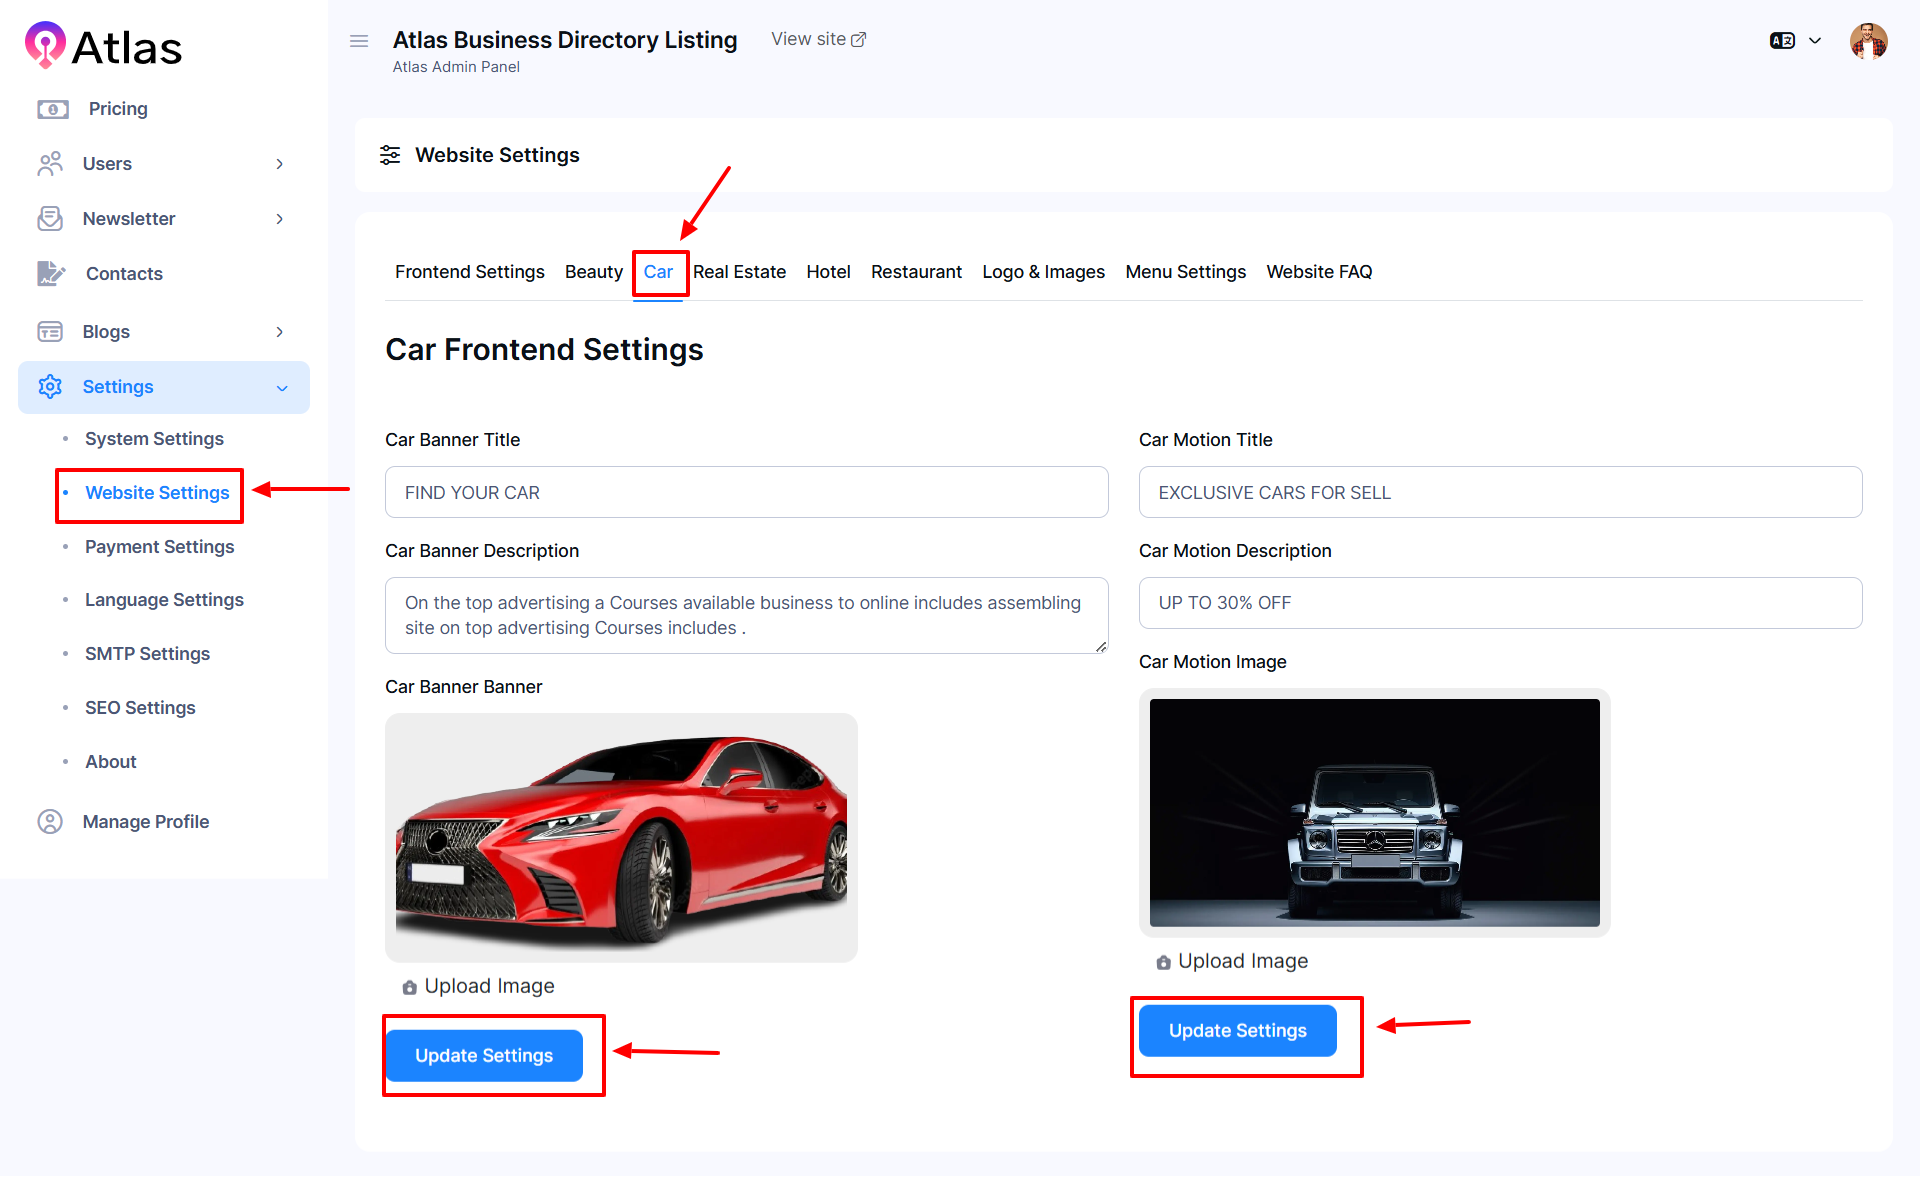
- Click the Car Tab to access the entry form.
- Fill out the required fields:
-
- Car Banner Title: Add the title of the car banner.
- Car Botion Title: Enter the car motion title.
- Car Banner Description: Provide the desired description.
- Car Motion Description: Provide the desired description.
- Car Banner: Click the upload image to upload the banner image.
- Car Motion Image: Click the upload image to upload the motion image.
-
- Once all fields are completed, click Update Settings to apply the updates.
Real Estate Settings
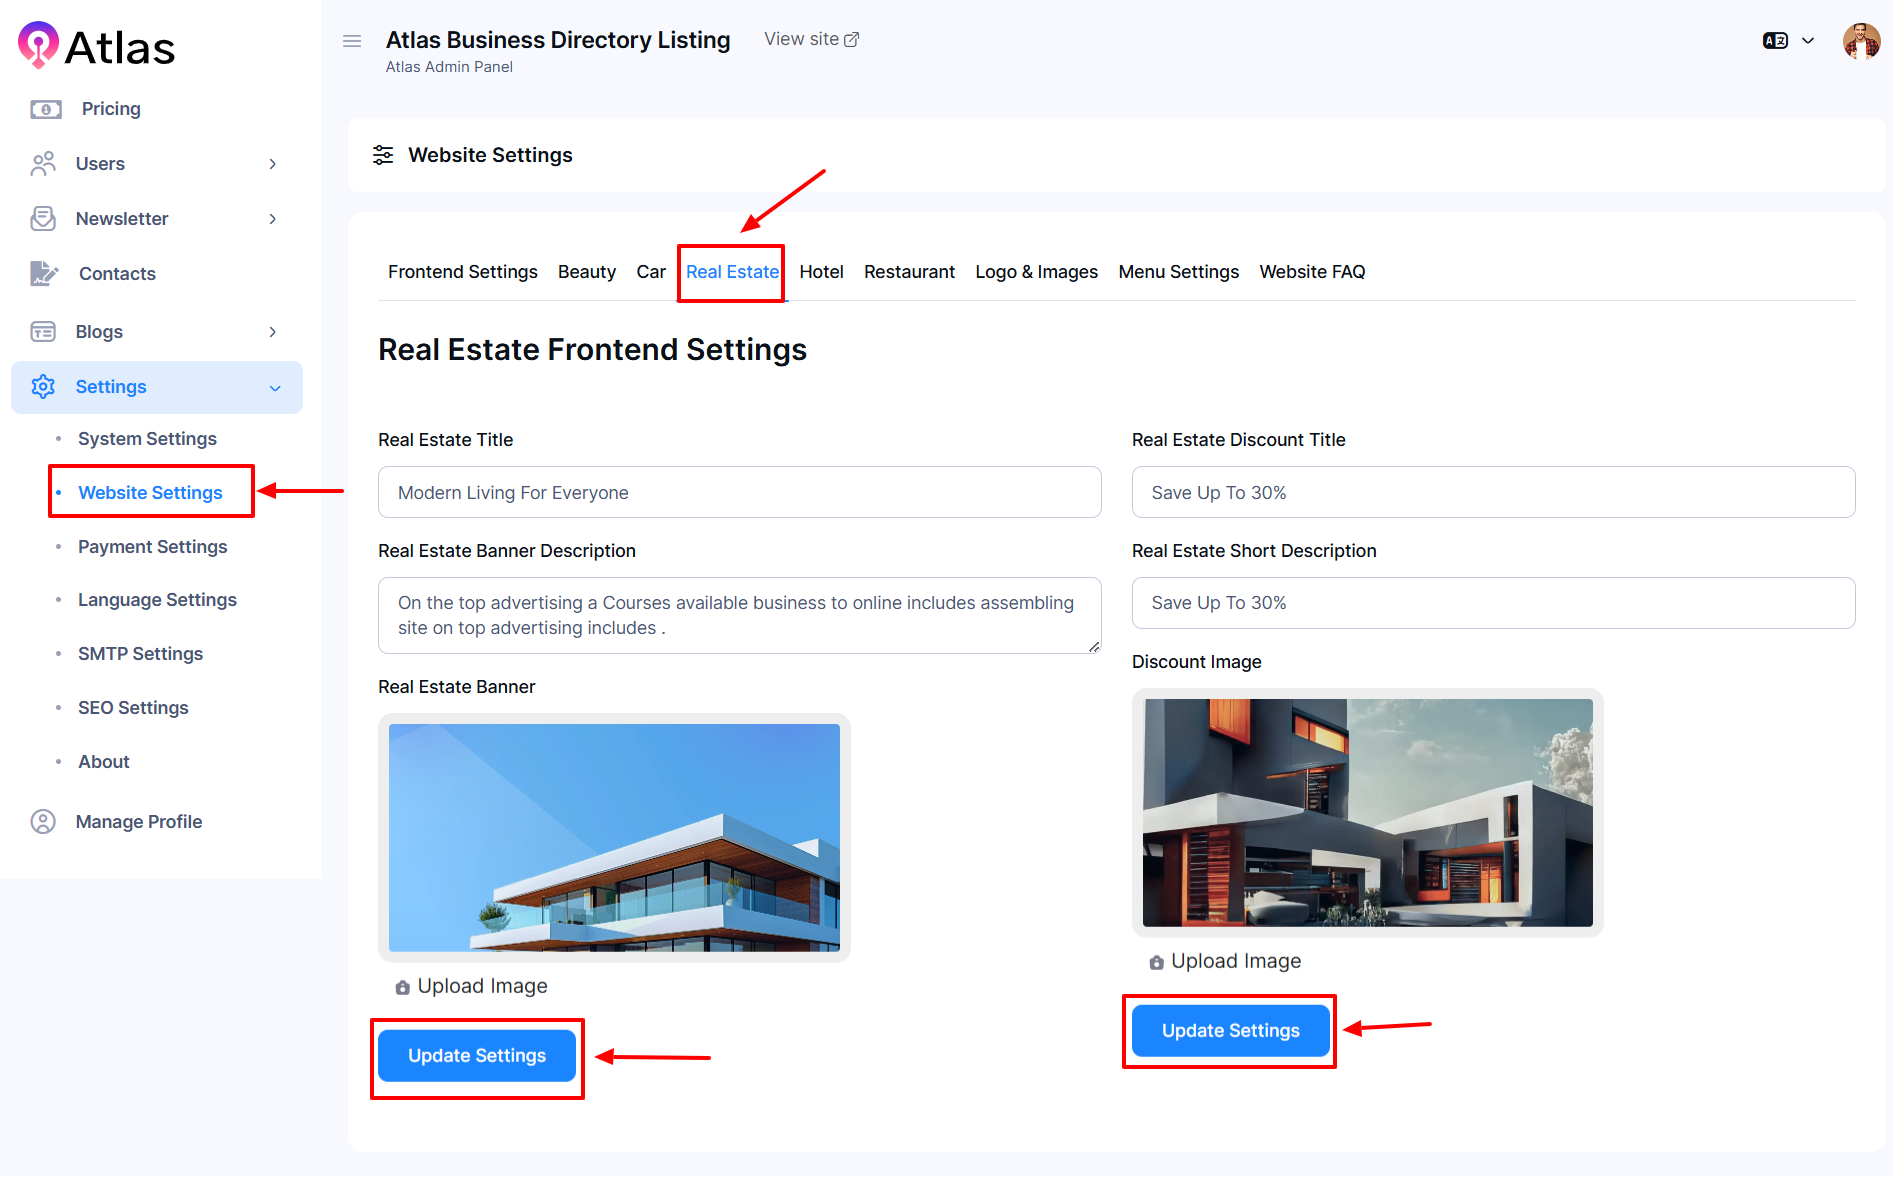
- Click the Real Estate Tab to access the entry form.
- Fill out the required fields:
-
- Real Estate Title: Add the title of the Real Estate.
- Real Estate Discount Title: Enter the real estate discount title.
- Real Estate Banner Description: Provide the desired description.
- Real Estate Short Description: Provide the desired description.
- Real Estate Banner: Click upload image to upload the banner image.
- Real Estate Discount Image: Click upload image to upload the discount image.
-
- Once all fields are completed, click Update Settings to apply the updates.
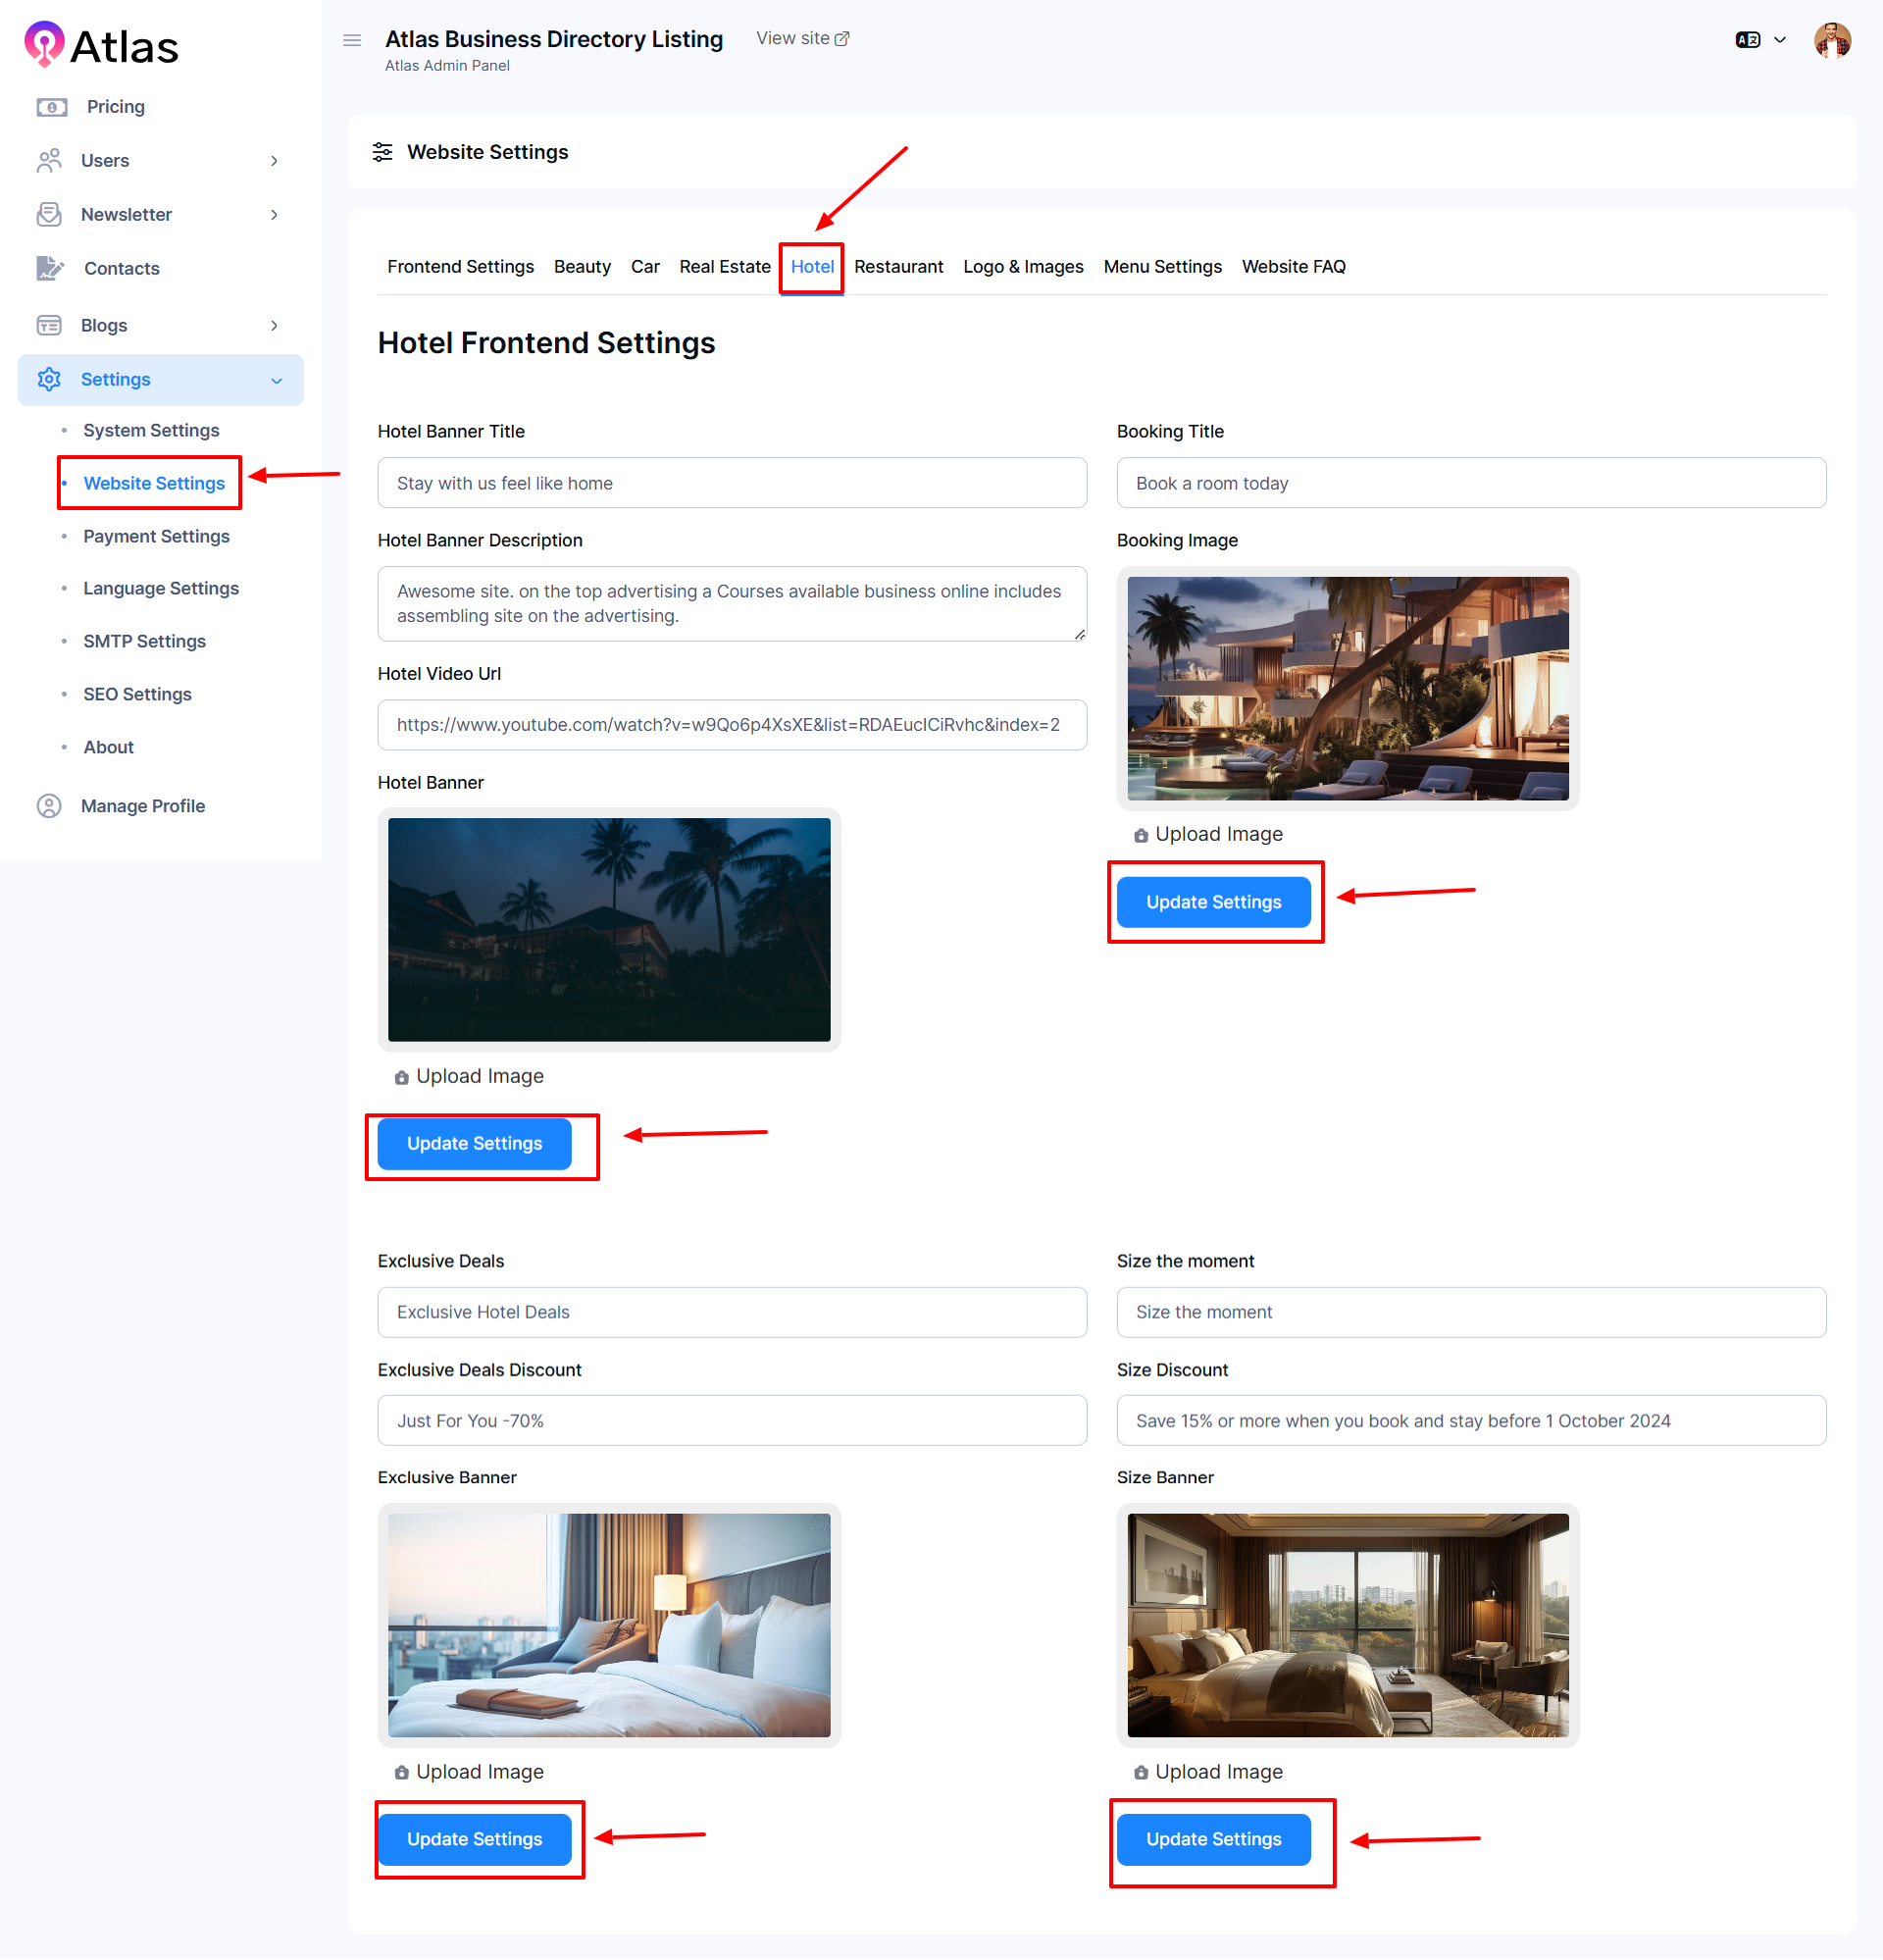
Hotel Settings
- Click the Hotel Tab to access the entry form.
- Fill out the required fields:
-
- Hotel Banner Title: Add the title of the hotel banner.
- Booking Title: Enter the title of the booking.
- Hotel Banner Description: Provide the desired description.
- Booking Image: Provide the desired image.
- Hotel Video URL: Provide the video URL.
- Hotel Banner Image: Click Upload the image of the hotel.
- Booking Image: Click Upload the image of the booking.
-
- Once all fields are completed, click Update Settings to apply the updates.
-
- Executive Deals: Type the desired information.
- Size the Moment: Type the moment size.
- Exclusive Deals Discount: Enter the discount.
- Size Discount: Provide the desired information.
-
- Once all fields are completed, click Update Settings to apply the updates.
Restaurant Settings
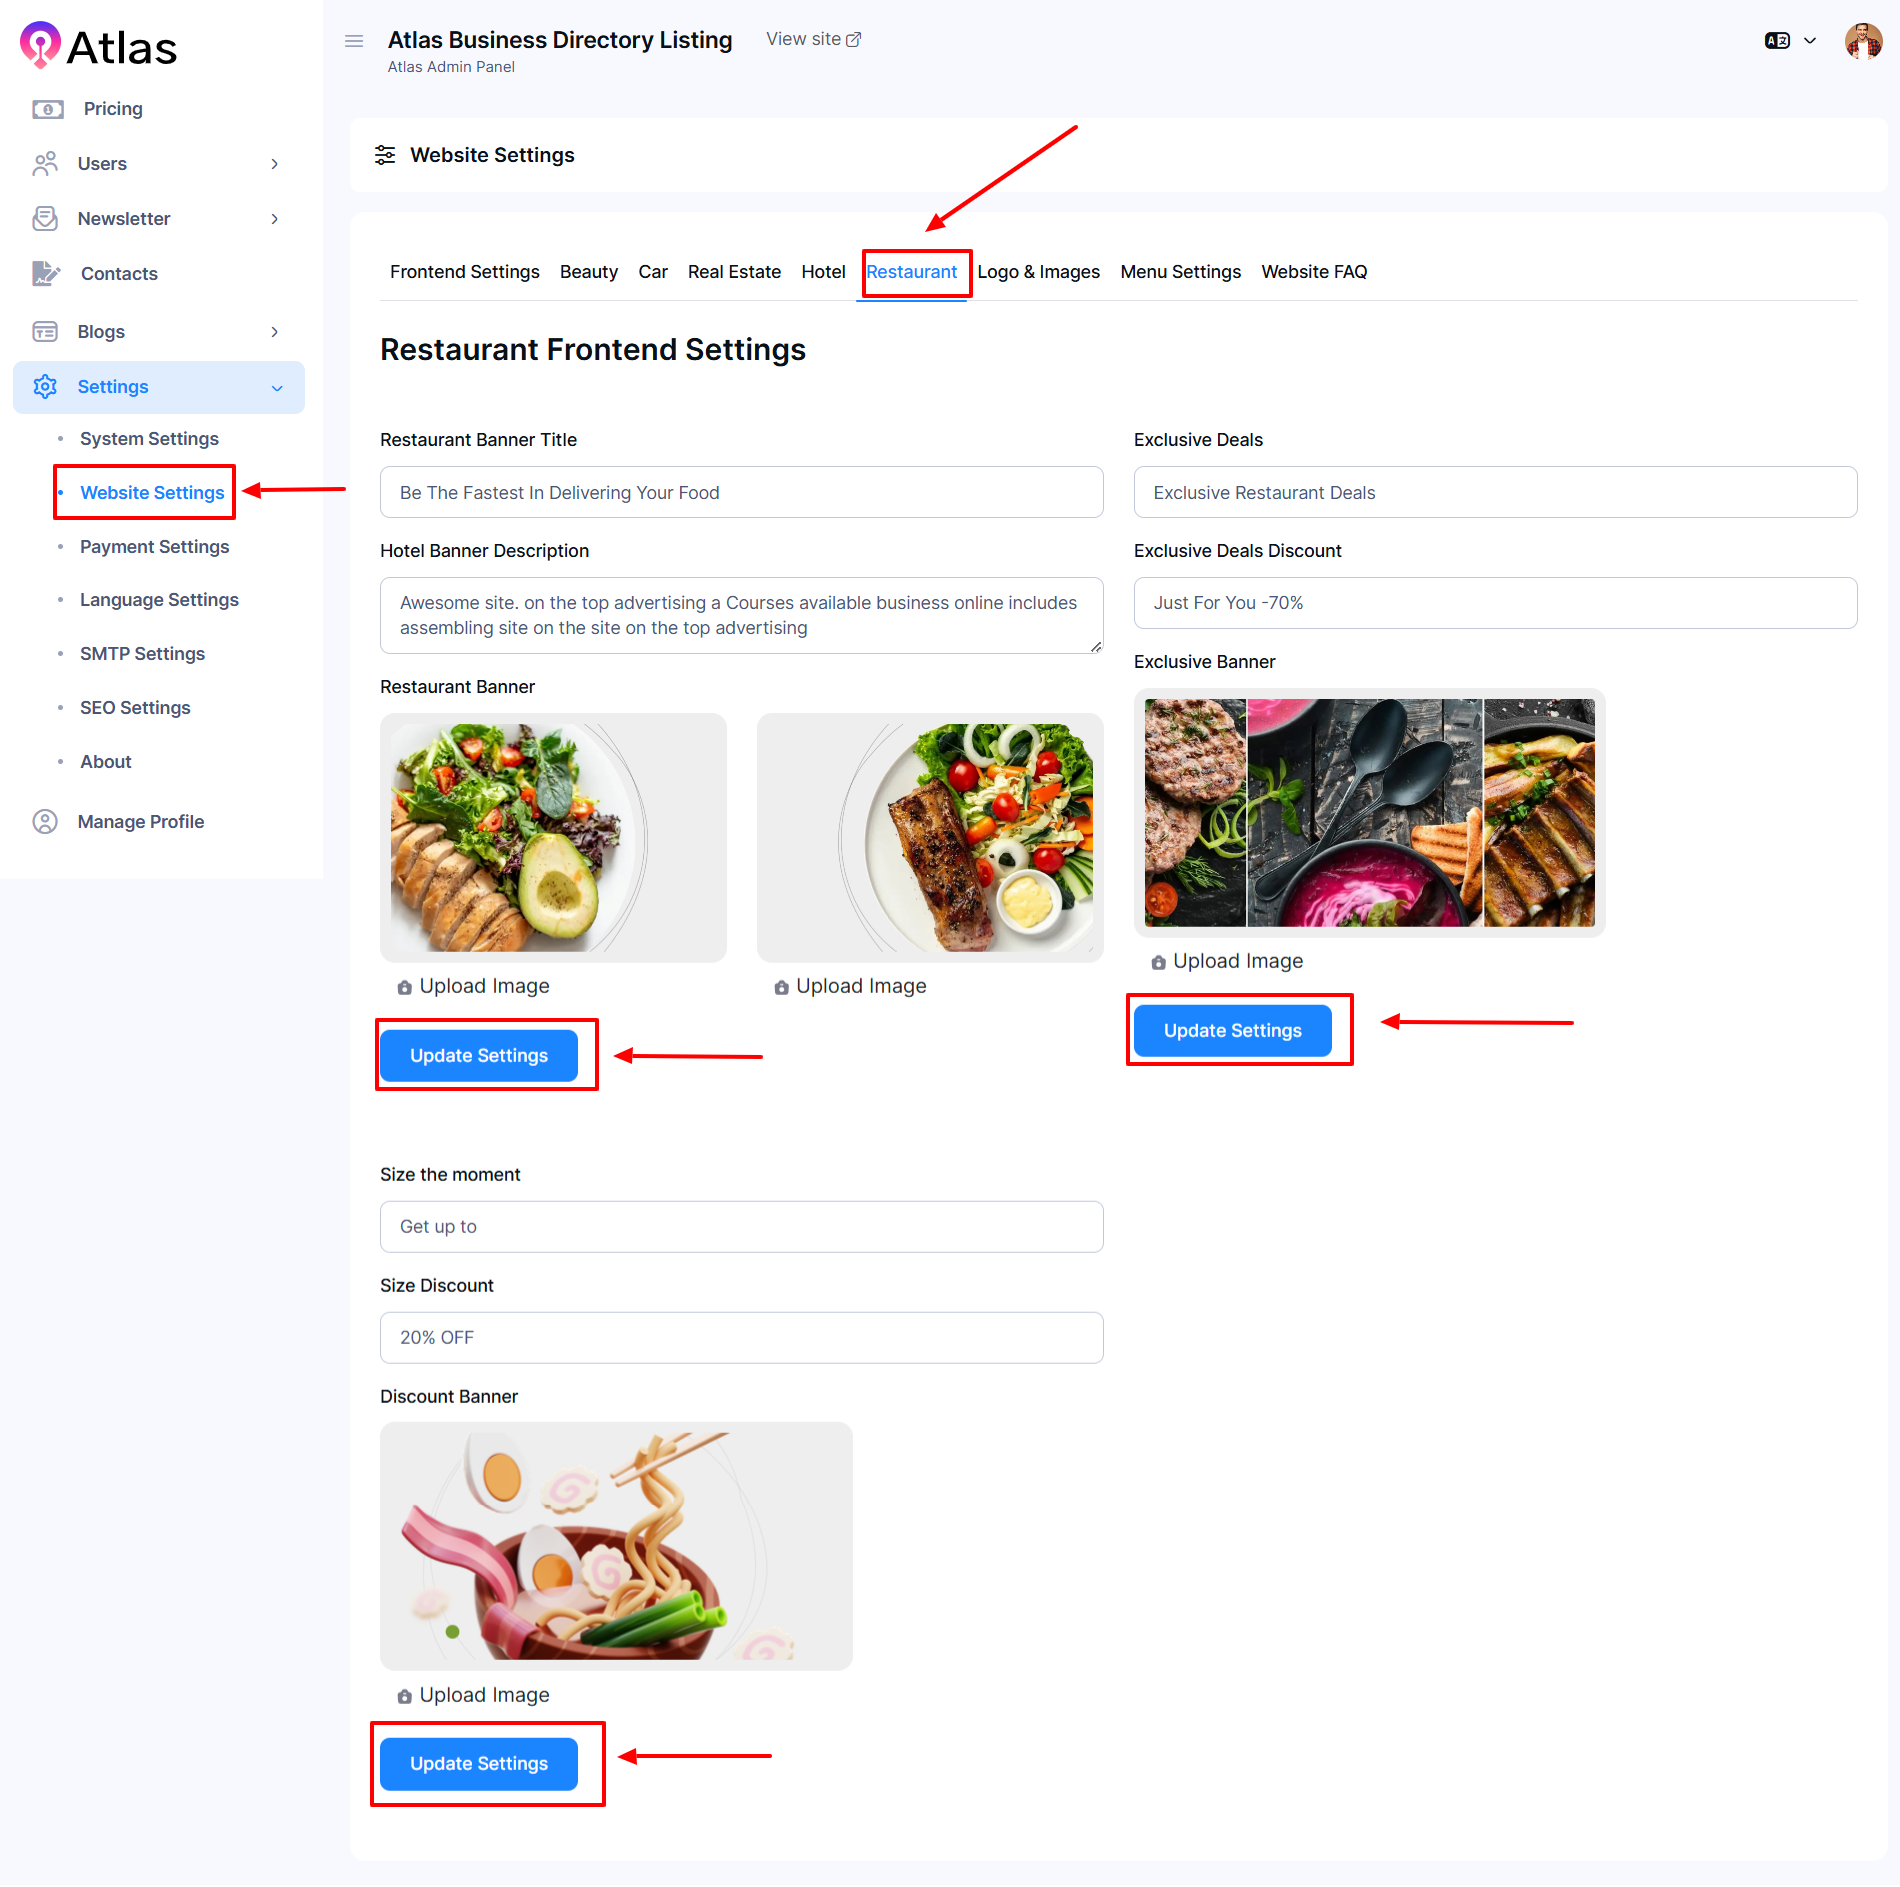
- Click the Restaurant Tab to access the entry form.
- Fill out the required fields:
-
- Restaurant Banner Title: Add the title of the restaurant banner.
- Exclusive Deals: Enter the desired information.
- Hotel Banner Description: Provide the desired description.
- Exclusive Deals Discount: Enter the discount.
- Size the Moment: Provide the desired information.
- Size Discount: Provide the desired information.
- Discount Banner: Upload the desired image by clicking Upload Image.
-
- Once all fields are completed, click Update Settings to apply the updates.
Logo & Images Settings
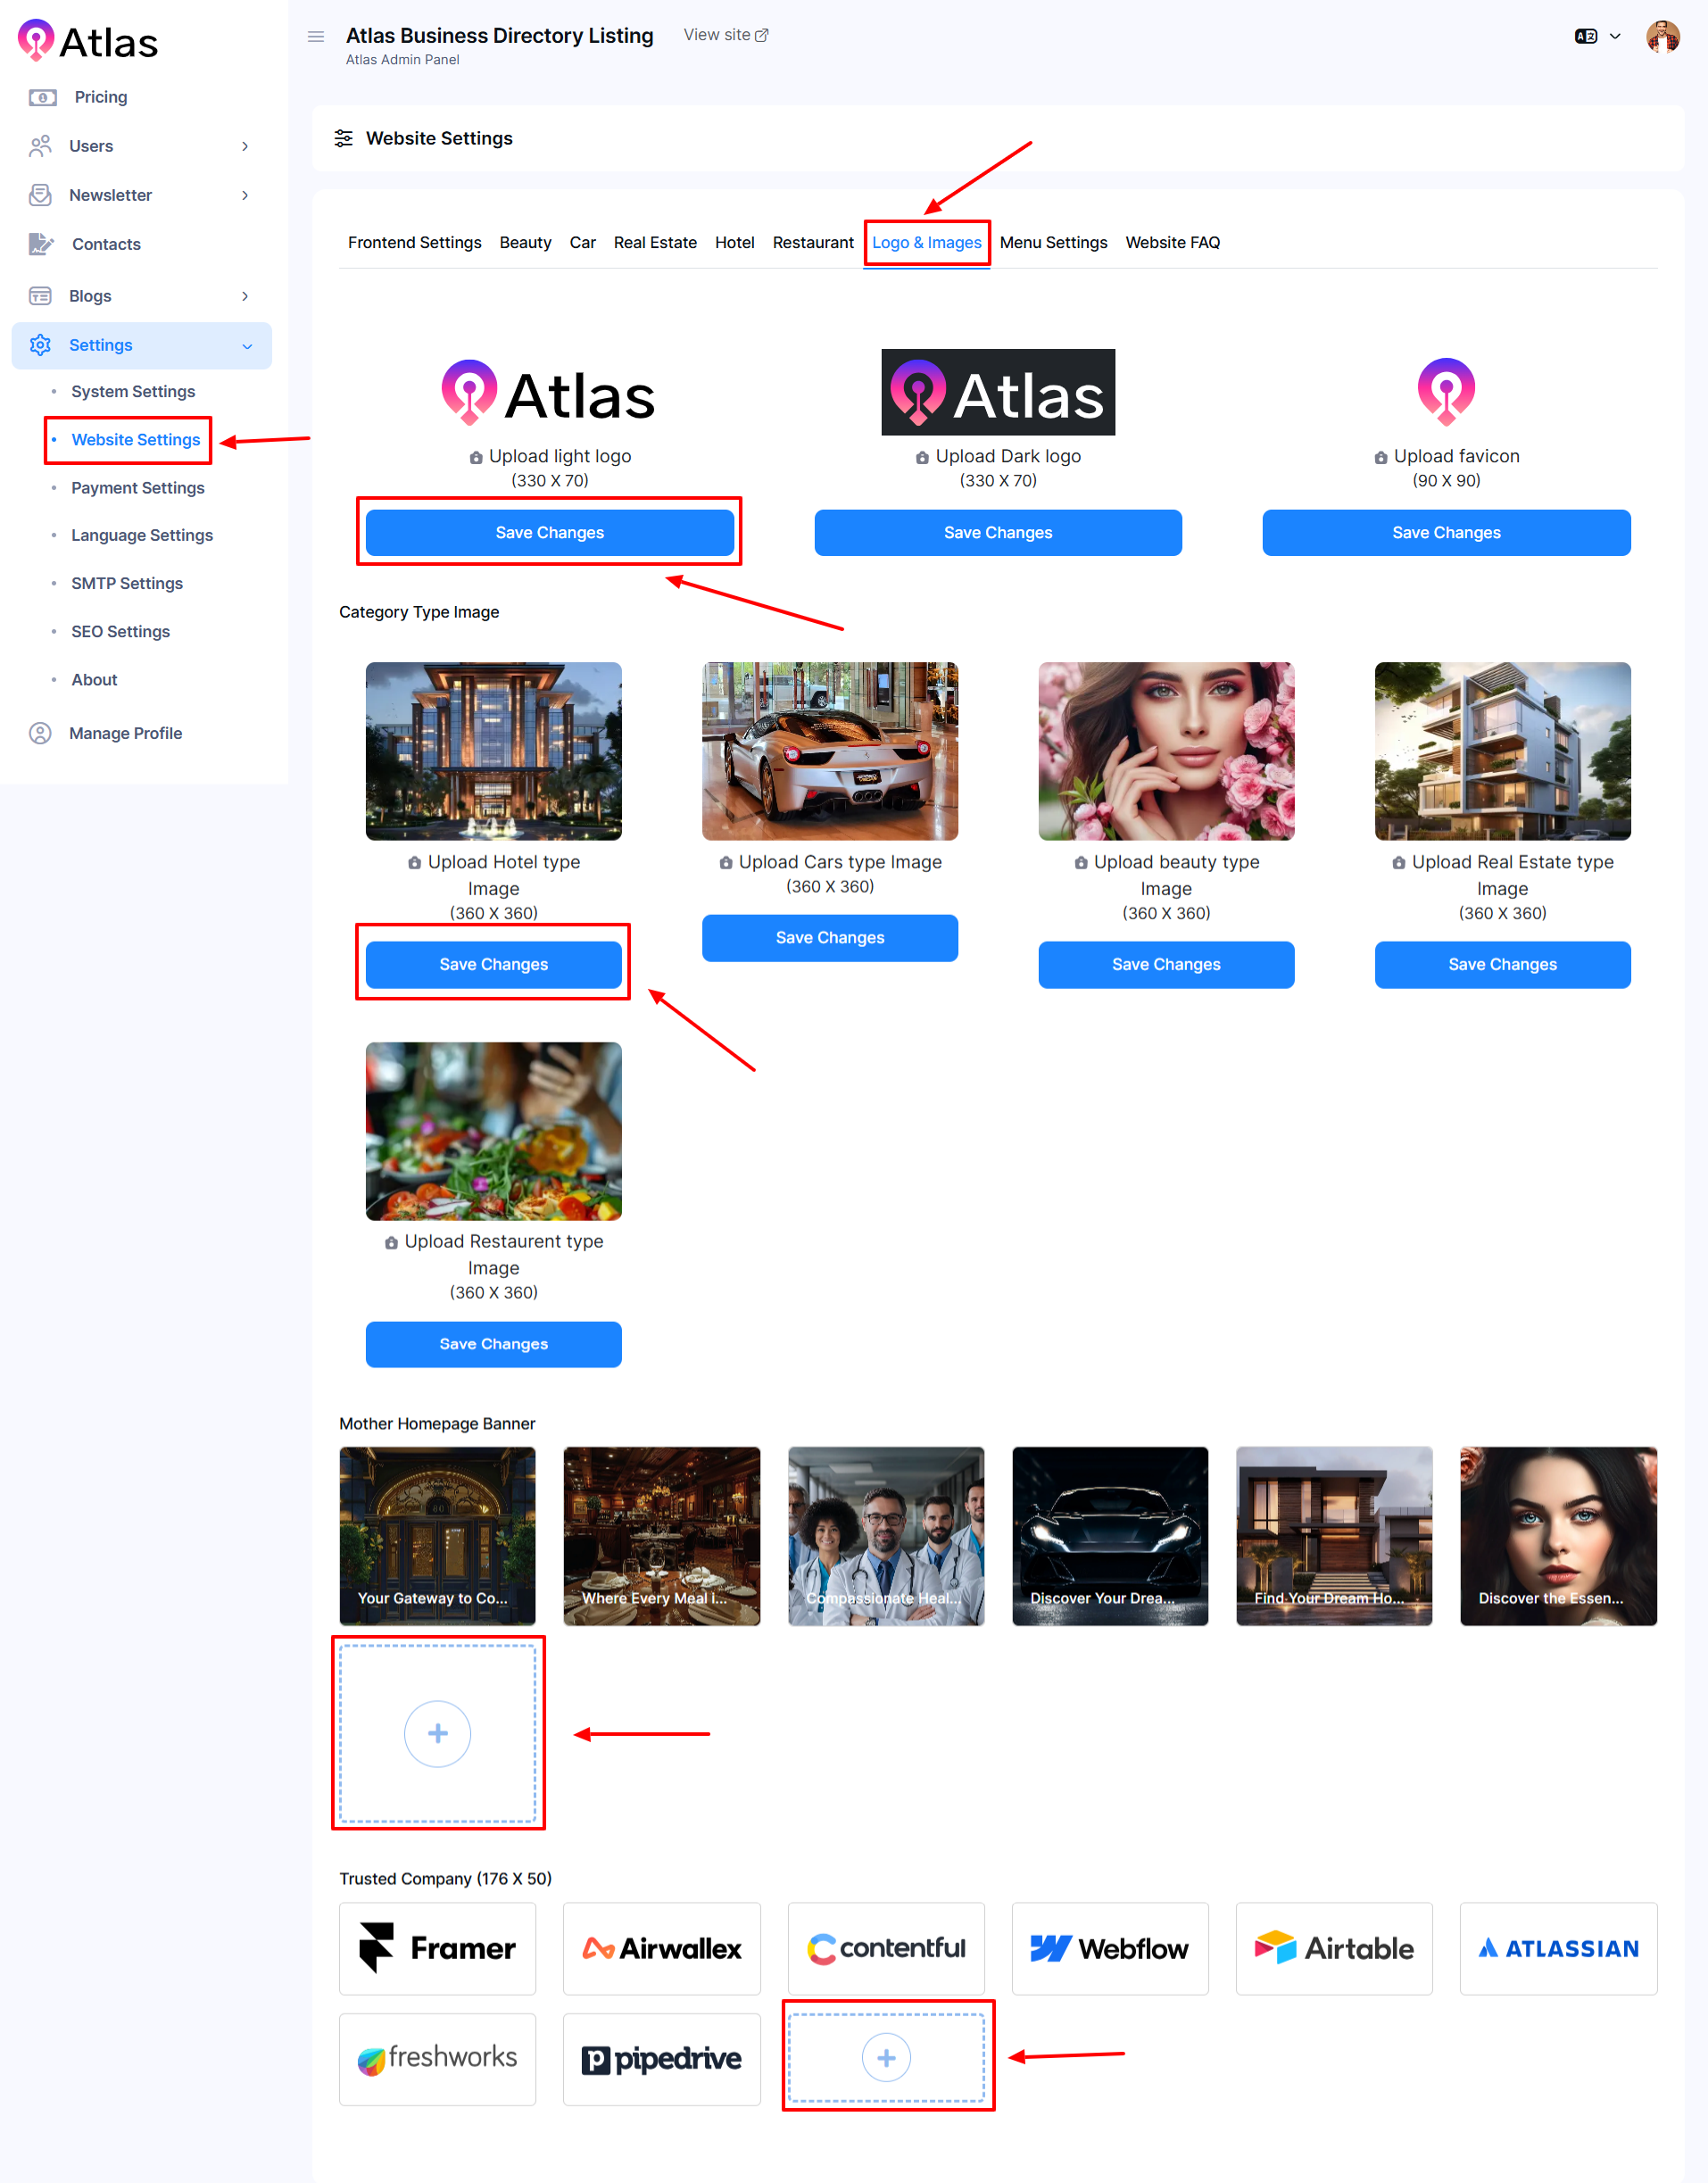
- Click the Logo & Images Tab to access the entry form.
- Fill out the required fields:
-
- Upload Logo: Enter the logo by clicking Upload Logo.
- Save Changes: Click the Save Changes button to save the information.
- Category Type Image: Enter the desired image by clicking Upload image.
- Save Changes: Click the Save Changes button to save the information.
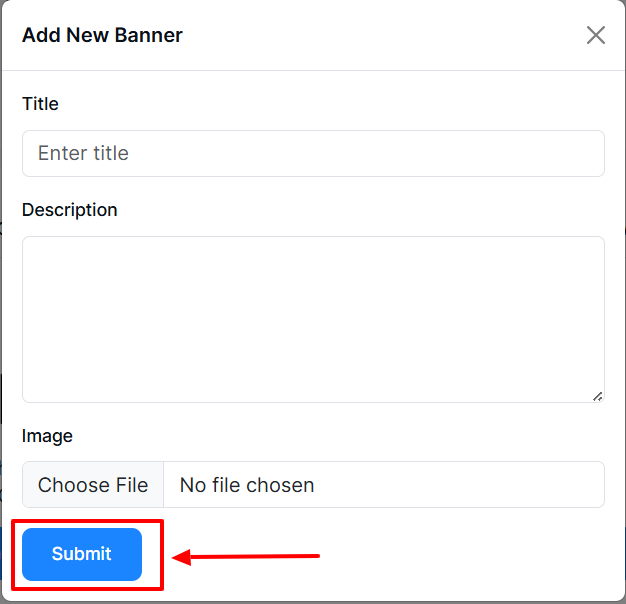
- Mother Homepage Banner: Click the Plus (+) sign button an entry form will appear.
- Title: Provide the desired title in the Title field.
- Description: Enter the desired description in the description field.
- Image: Click the Choose File to upload the desired image.
- Submit Button: Click the submit button to update the information.
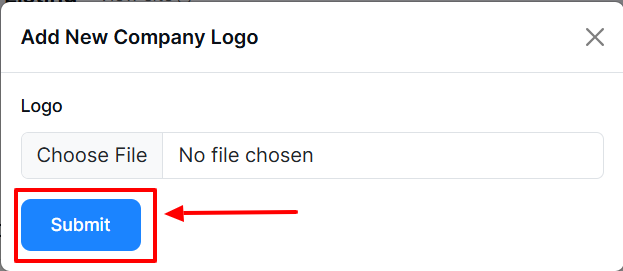
- Trusted Company: Click the Plus (+) sign button an entry form will appear.
- Logo: Click the Choose File to upload the desired Logo.
- Submit Button: Click the submit button to update the information.
-
Menu Settings
- Click the Menu Settings Tab to access the entry form.
-
- Select the amenities' name, drag & move according to your demand (Up or Down).
-
- Once all is completed, click Update Menu to apply the updates.
Website FAQ Settings
- Click the Website FAQ Tab to access the entry form.
- Fill out the required fields:
-
- Question: Retype the question in the question field or add a new question by clicking the Plus (+) sign button. Similarly, the questions can be deleted by clicking the Minus (-) sign button.
- Answer: Retype the question in the question field or add a new question by clicking the Plus (+) sign button. Similarly, the answer can be deleted by clicking the Minus (-) sign button.
-
- Once all fields are completed, click Save Changes to apply the updates.

Was this article helpful to you?
Contact us and we will get back to you as soon as possible

