Bootcamp
What is Bootcamp?
A Bootcamp is an intense, targeted program created to transmit particular skills and information in a comparatively short amount of time with modules and live classes. Bootcamps are becoming more and more popular in a variety of industries, such as technology, fitness, business, and more, because of how well they work at helping people quickly pick up new abilities.
Bootcamps provide an effective means of achieving your objectives, whether they are related to personal growth, skill improvement, or job transition. Dedication, a strong work ethic, and a willingness to learn in a fast-paced setting are essential for success in a boot camp.
Admin’s Guide
Add New Bootcamp
To use the Academy LMS Bootcamp Addon, you must have Academy LMS installed, and the addon purchased. As an admin who wants to create Bootcamp courses, log in to your Academy LMS using your credentials first.
To create a boot camp course, follow the steps below:
-
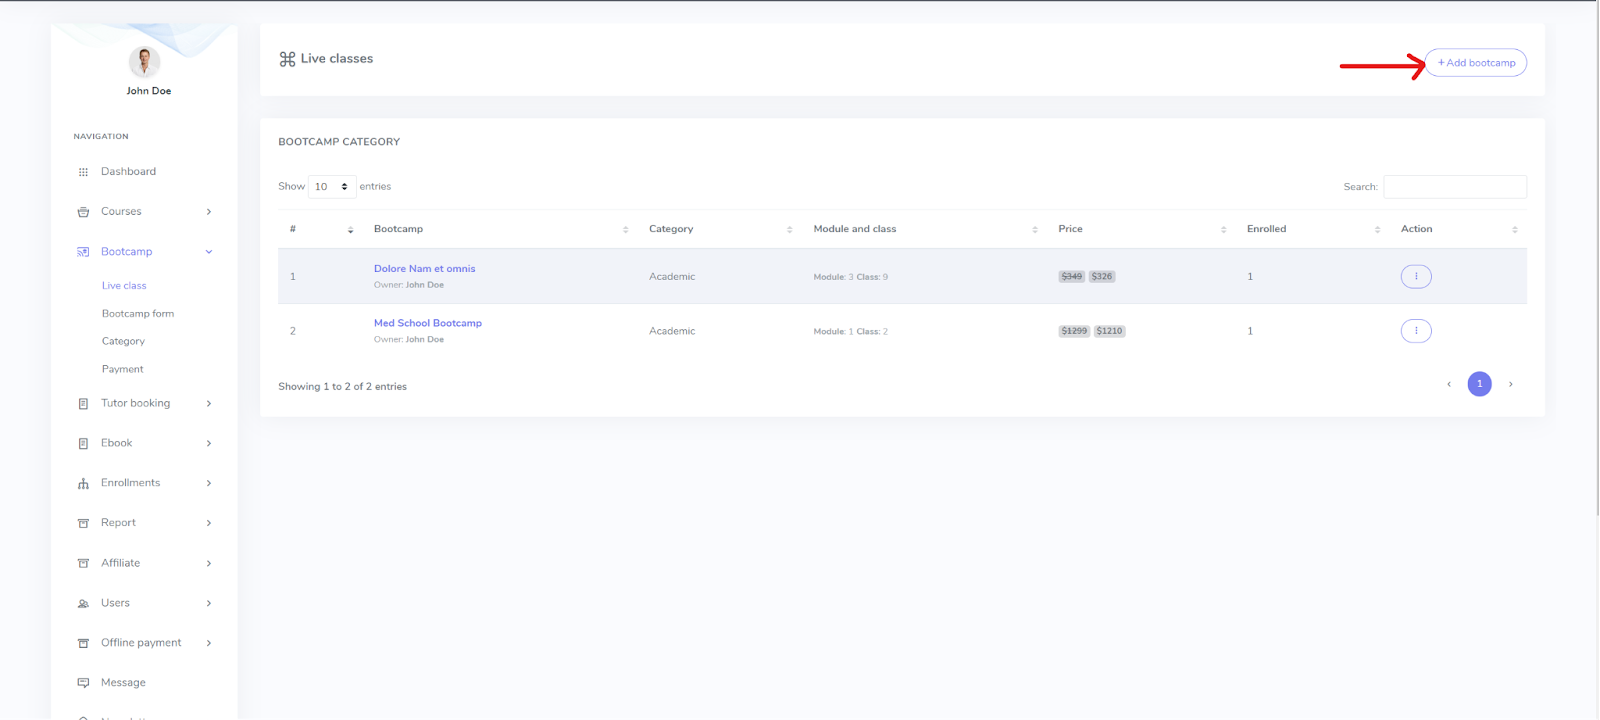
Find the Bootcamp option on the navigation window of your profile on the left side of the screen.
-
Click on Live Class under the Bootcamp dropdown menu.
-
Click on +Add Bootcamp on the top right of the window.
-
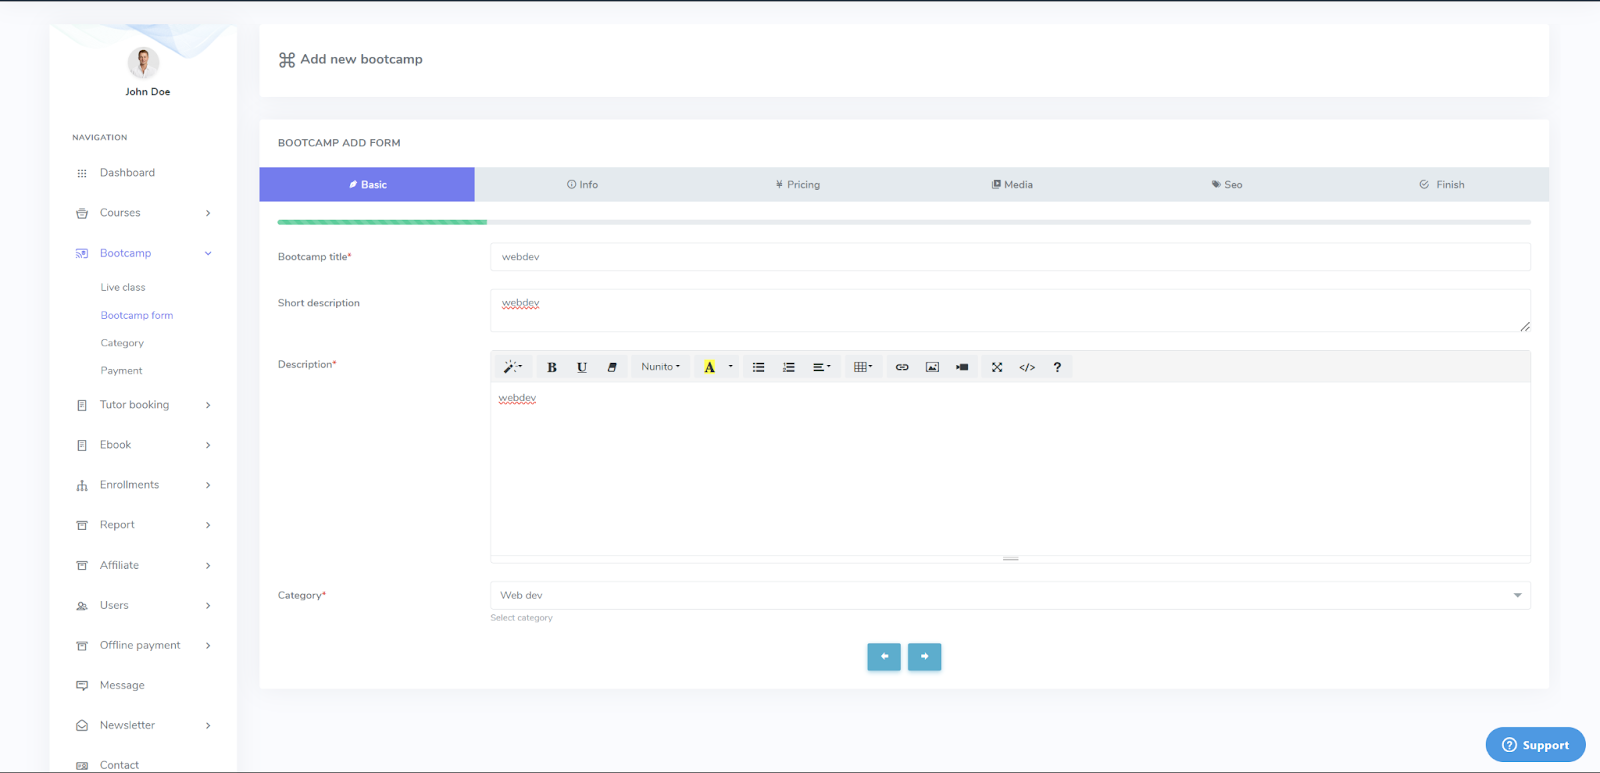
In the bootcamp form window, fill up the basic information regarding your bootcamp.
-
Click on the empty field for Bootcamp Title.
-
Enter the title of your Bootcamp course.
-
Click on the empty field for Short Description.
-
Enter a short description of your bootcamp course.
-
Click on the empty field for description.
-
Enter a detailed description of your bootcamp course. You can format the text for the detailed description with the formatting tools provided.
-
Select the category of your bootcamp course from the Category dropdown option.
-
Click on the Right Arrow to go to the next section of the form.
-
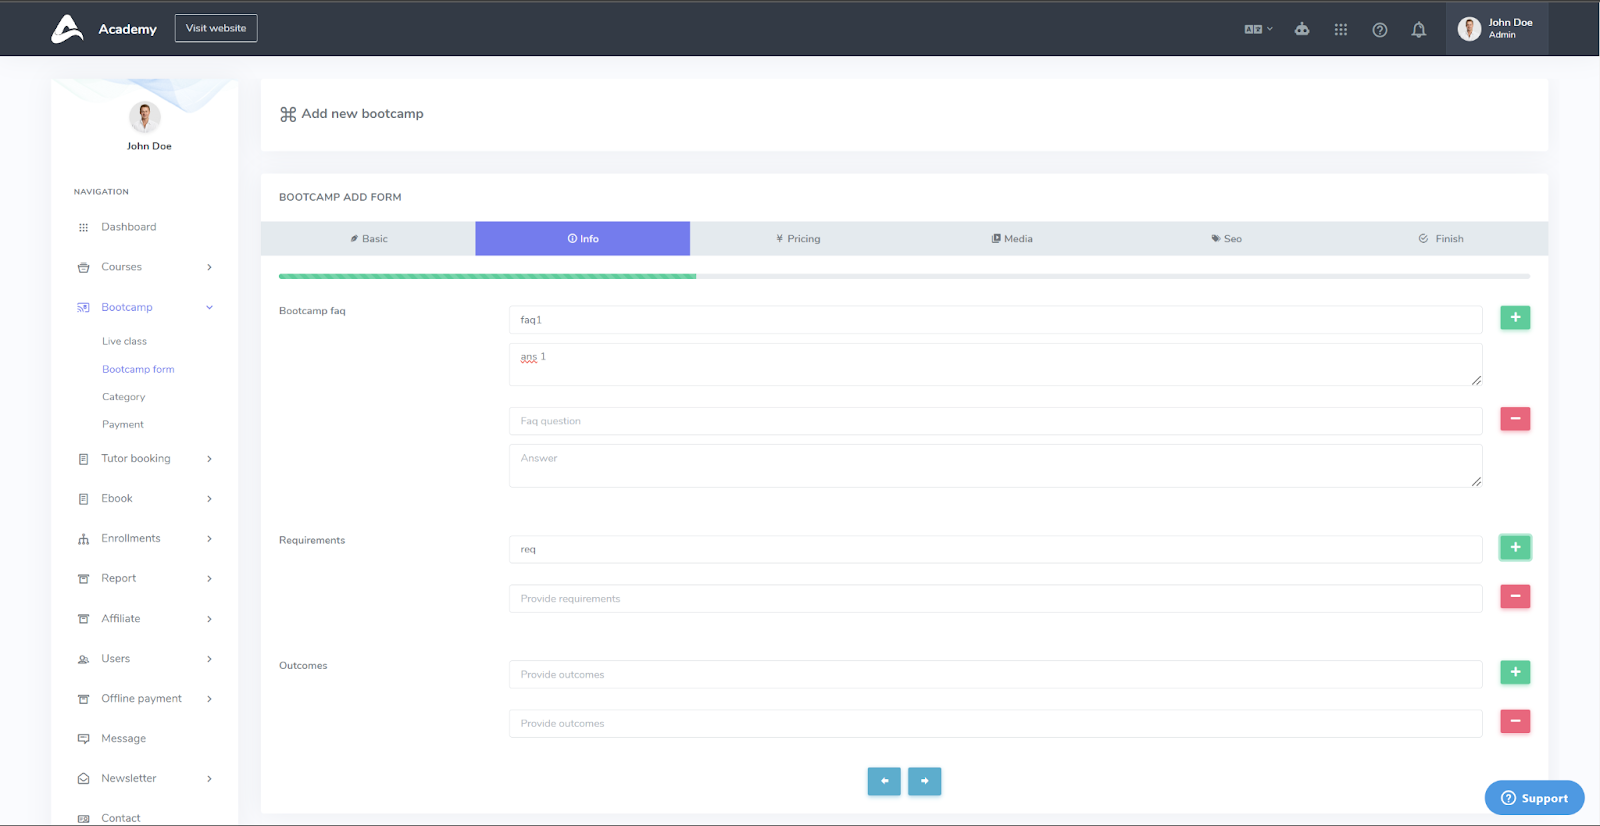
In the next window, fill up the required information regarding your bootcamp.
-
Click on the empty field for Bootcamp Faq.
-
Enter a Faq question in the Faq question field.
-
Enter the answer to the question in the Answer field.
-
Click on the green ‘+’ sign next to the empty field of the Faq question to add more questions.
-
Next, click on the empty field for Requirements.
-
Enter the requirements needed for taking your bootcamp course.
-
Click on the green ‘+’ sign next to the empty field of requirements to add more.
-
Next, click on the empty field for Outcomes.
-
Enter the expected outcome of your bootcamp course.
-
Click on the green ‘+’ sign next to the empty field of outcomes to add more.
-
Click on the Right Arrow to go to the next section of the form.
-
If you want to delete the extra Faqs, Requirements and Outcomes, you can simply click on the red “-” icon beside the field you want to delete, and it will automatically be deleted.
-
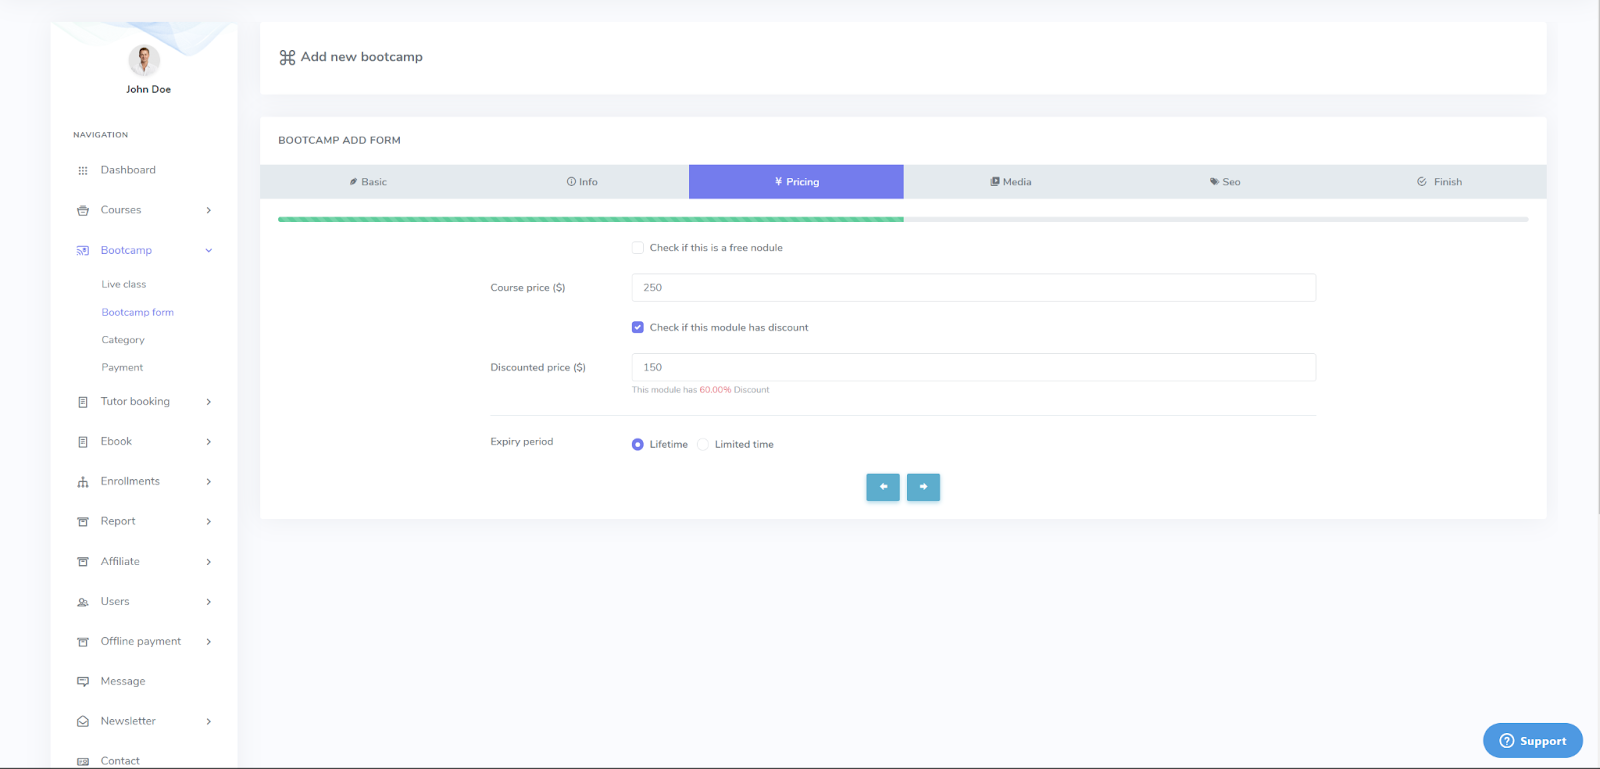
In the next window, fill up the pricing details regarding your bootcamp.
-
If you are providing a free module, click on the checkbox for Check if this is a free module option.
-
Click on the empty field for Course Price ($).
-
Enter the price for your bootcamp course in US Dollars.
-
If your module has any discounts, click on the checkbox to Check if this module has a discount.
-
For setting up the expiry period, click on the checkbox for Lifetime if your course is always available, or click on the checkbox for Limited Time if your course is available to the students for a limited time.
-
Click on the Right Arrow to go to the next section of the form.
-
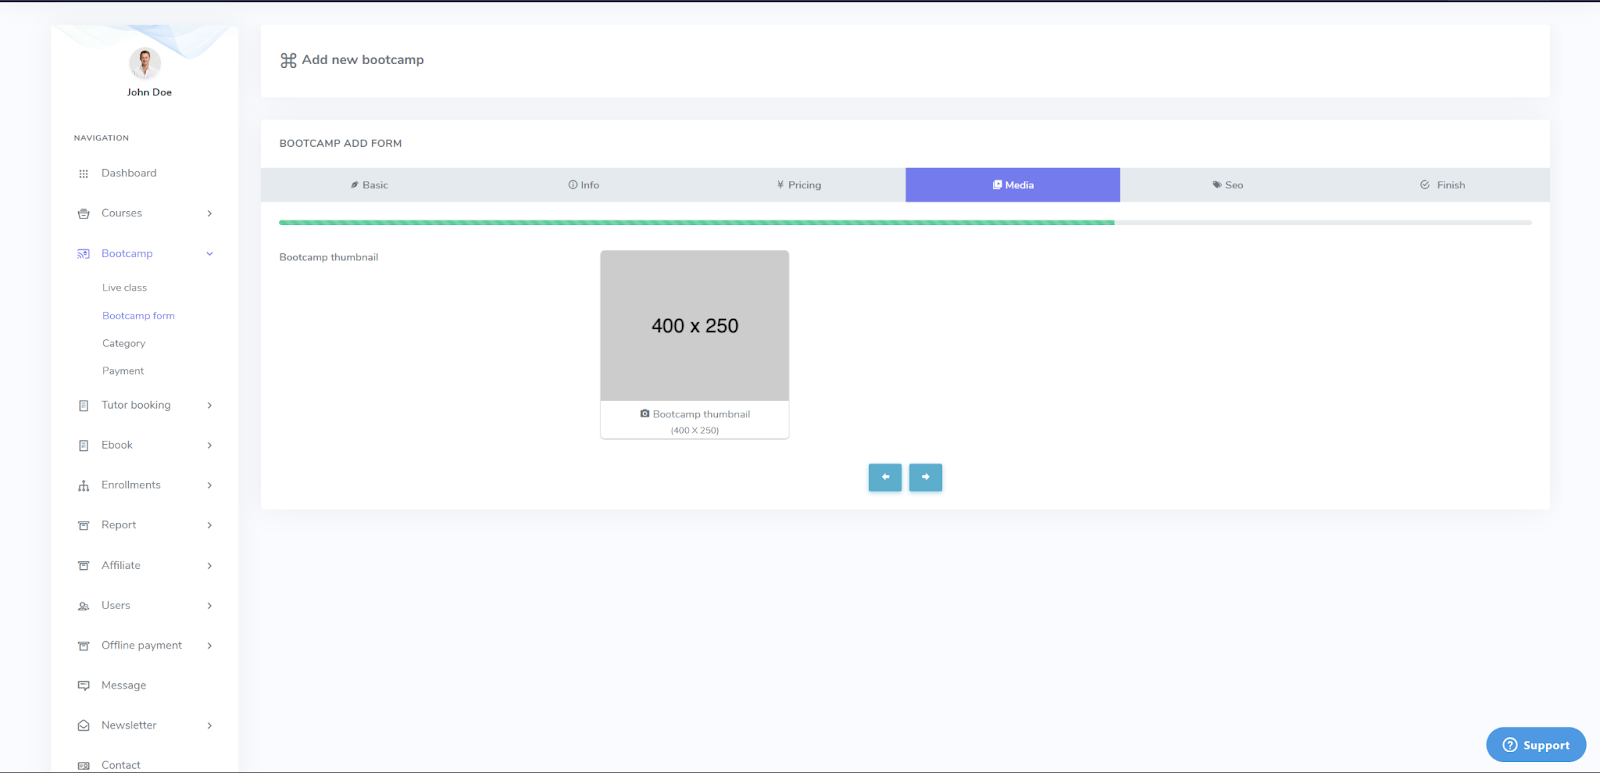
In the next window, share a media thumbnail for your bootcamp.
-
Click on the “Bootcamp Thumbnail” image upload grid.
-
Select an image from your file directory.
-
Click “Open”. The image will be uploaded as your bootcamp thumbnail picture.
-
Then, click on the Right Arrow to go to the next section of the form.
-
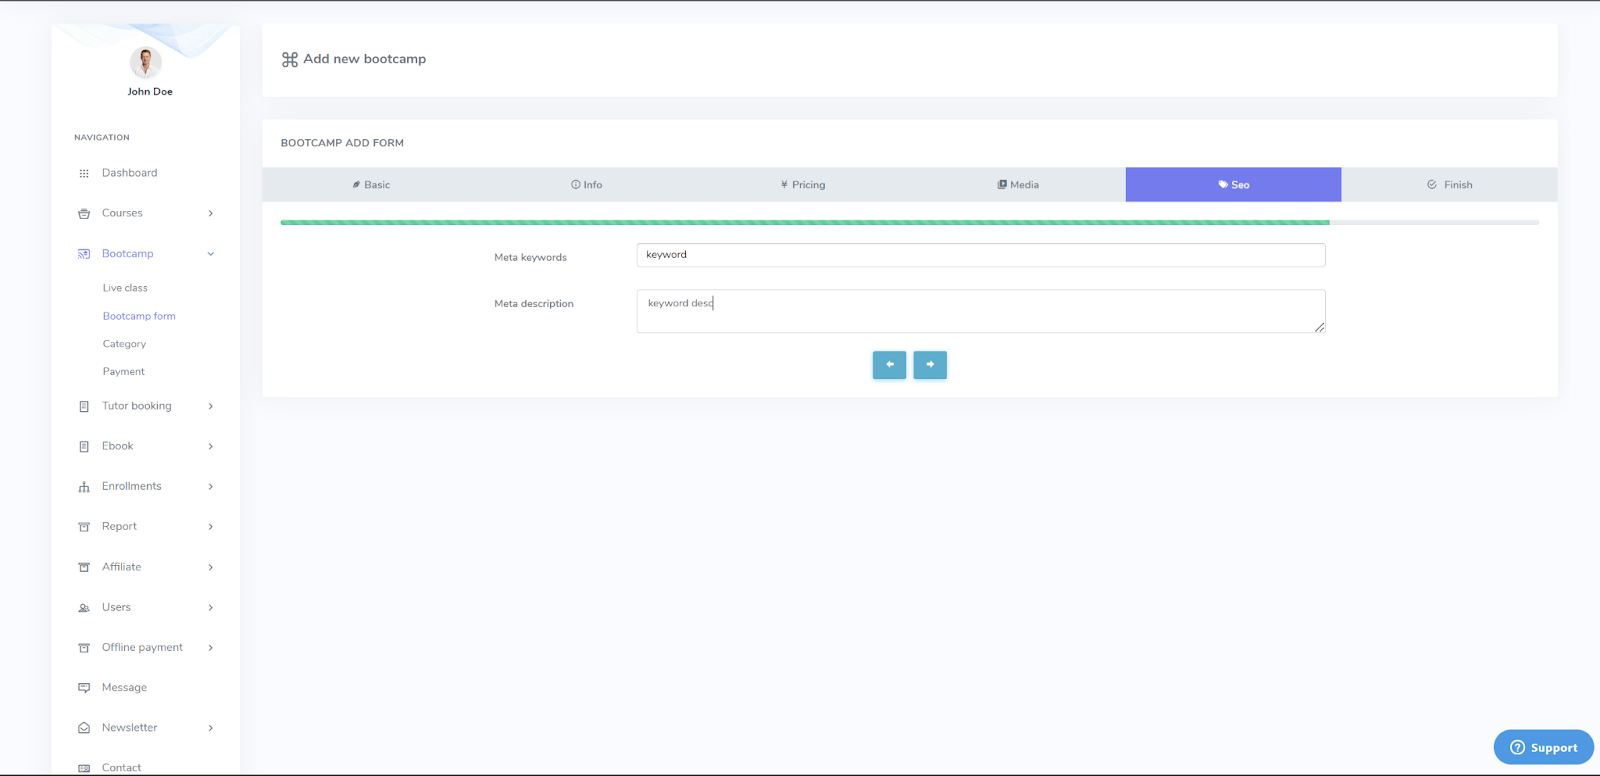
In the next window, set up the SEO details for your course:
-
Click on the empty field for “Meta keywords”.
-
Enter meta keywords related to your bootcamp. You can add multiple keywords separately.
-
Click on the empty field for “Meta description”.
-
Enter the meta description related to your bootcamp.
-
Click on the Right Arrow to go to the next section of the form.
-
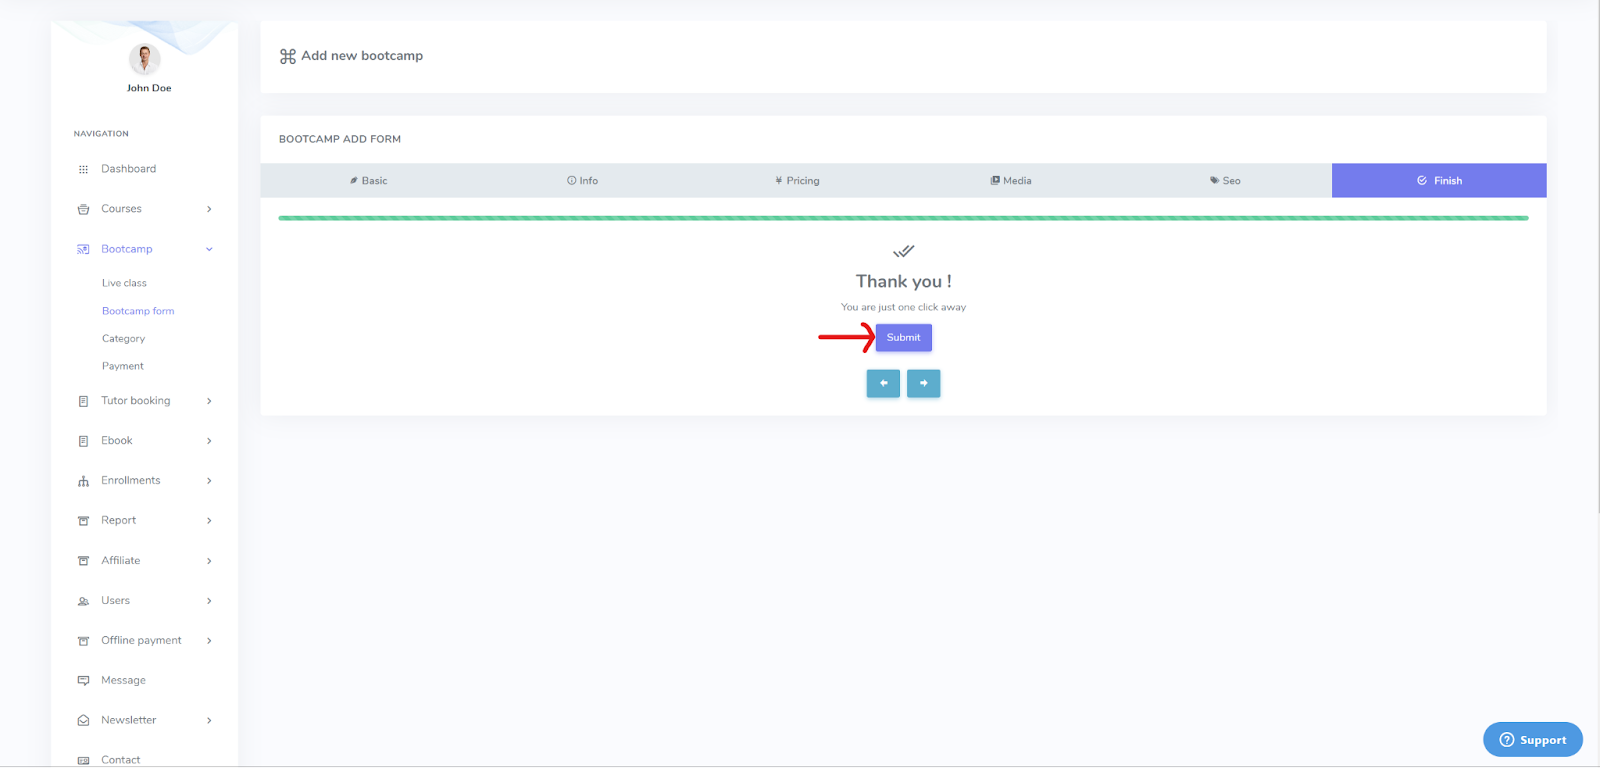
In the next window, confirm and submit your details.
Edit Bootcamp
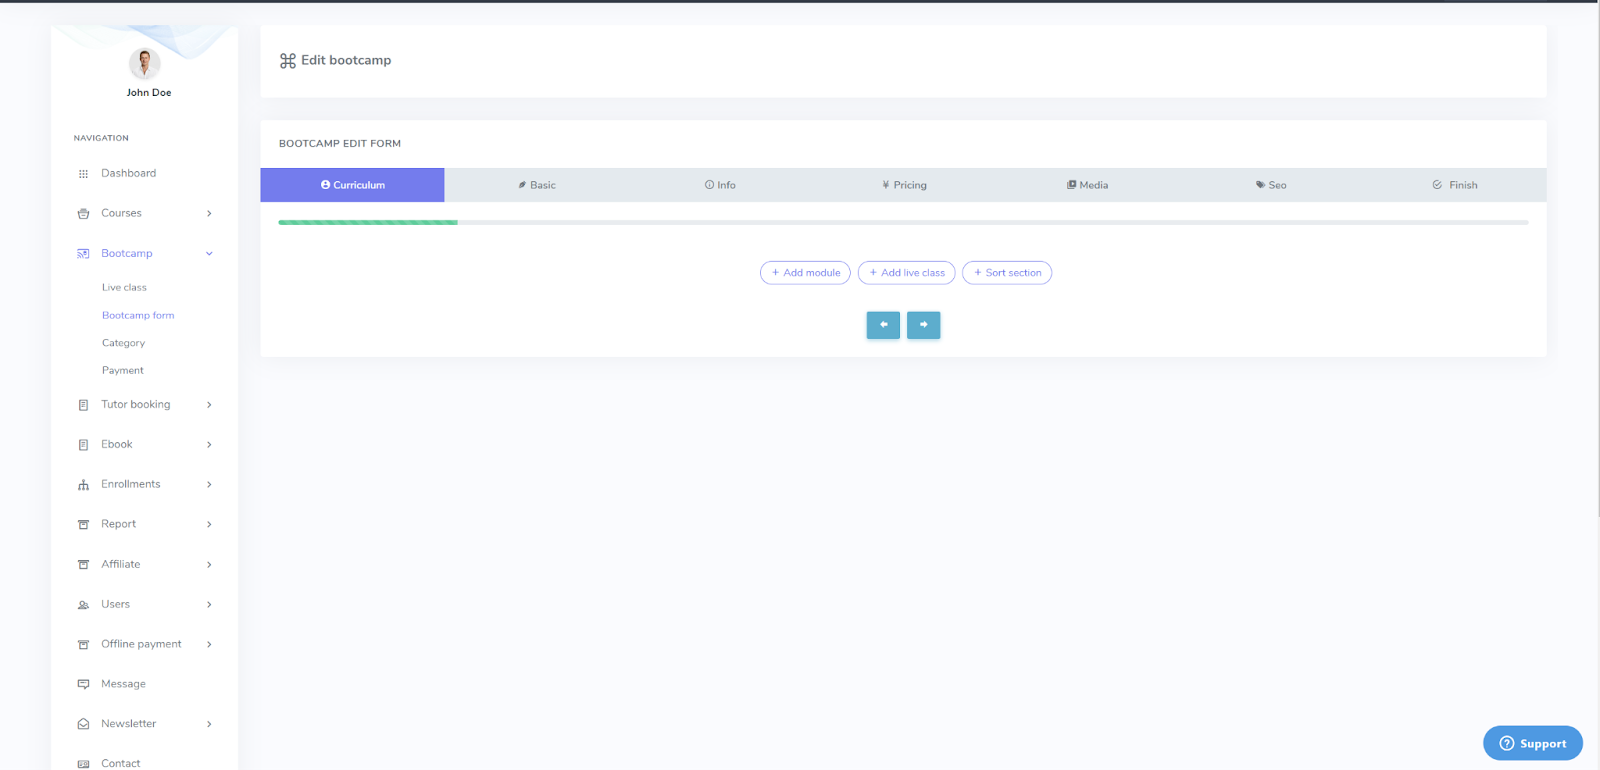
After you finish submitting the details for adding a bootcamp course, you are redirected to the forms for editing your bootcamp course.
Follow the steps below to edit your bootcamp course:
-
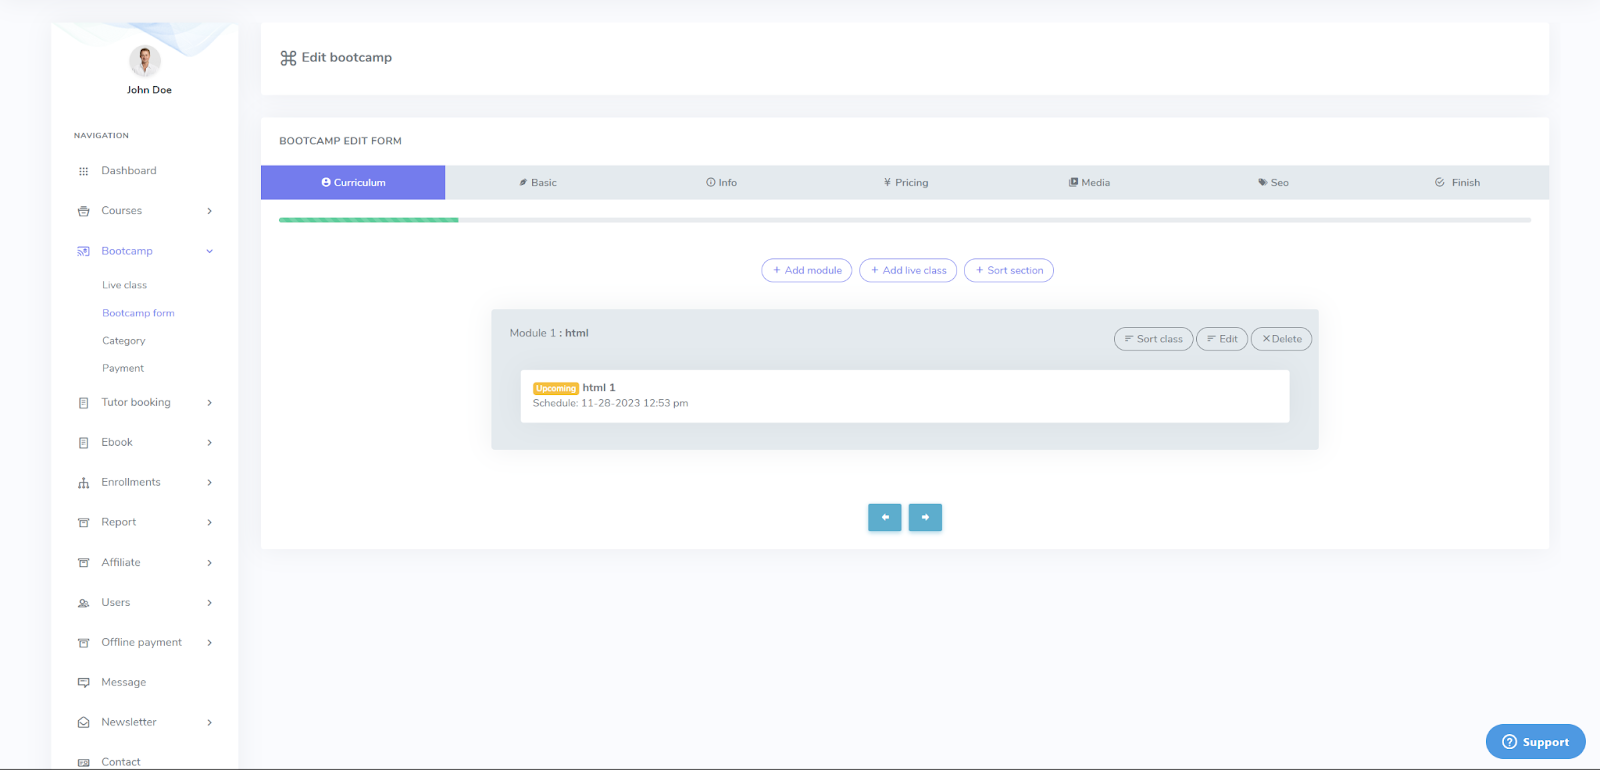
In the Curriculum window, you can add modules, add live classes and sort sections.
-
Click on the “+ Add module” button. It will open an Add New Module window.
-
Click on the empty field for “Module Name”.
-
Enter the name of your module.
-
Click on the empty field for “Study Plan”.
-
Enter the duration length dates for the module. Click Apply.
-
Check the appropriate box regarding your study plan for applying access restrictions.
-
Click on Save. Then, your module is successfully added to the Bootcamp.
-
Follow the same steps to create as many modules as you need.
-
Next, you can add live classes by following the steps below.
-
Click on the “+ Add Live Class” button.
-
Click on the empty field for “Title”.
-
Enter the title of your live class.
-
Click on the empty field for “Class Schedule”.
-
Enter the class date from the calendar and set up the time for the live class.
-
Click on the dropdown menu for “Module”.
-
Select the module which will contain your live class.
-
Then click on the empty field for Summary.
-
Enter a summary of the live class. You can format the text as you wish.
-
Click Save. Then, your live class is successfully added to the Bootcamp.
-
Follow the same steps to create as many live classes as you need.
-
For Deleting a Live Class, follow the steps below.
-
Hover over the live class and then click on the “x” sign beside the live class.
-
A pop-up window will show regarding the confirmation of the deletion. Click the Continue button to delete the class, or click Cancel if you don’t want to delete the class.
-
To add resources for each live class, follow the steps below.
-
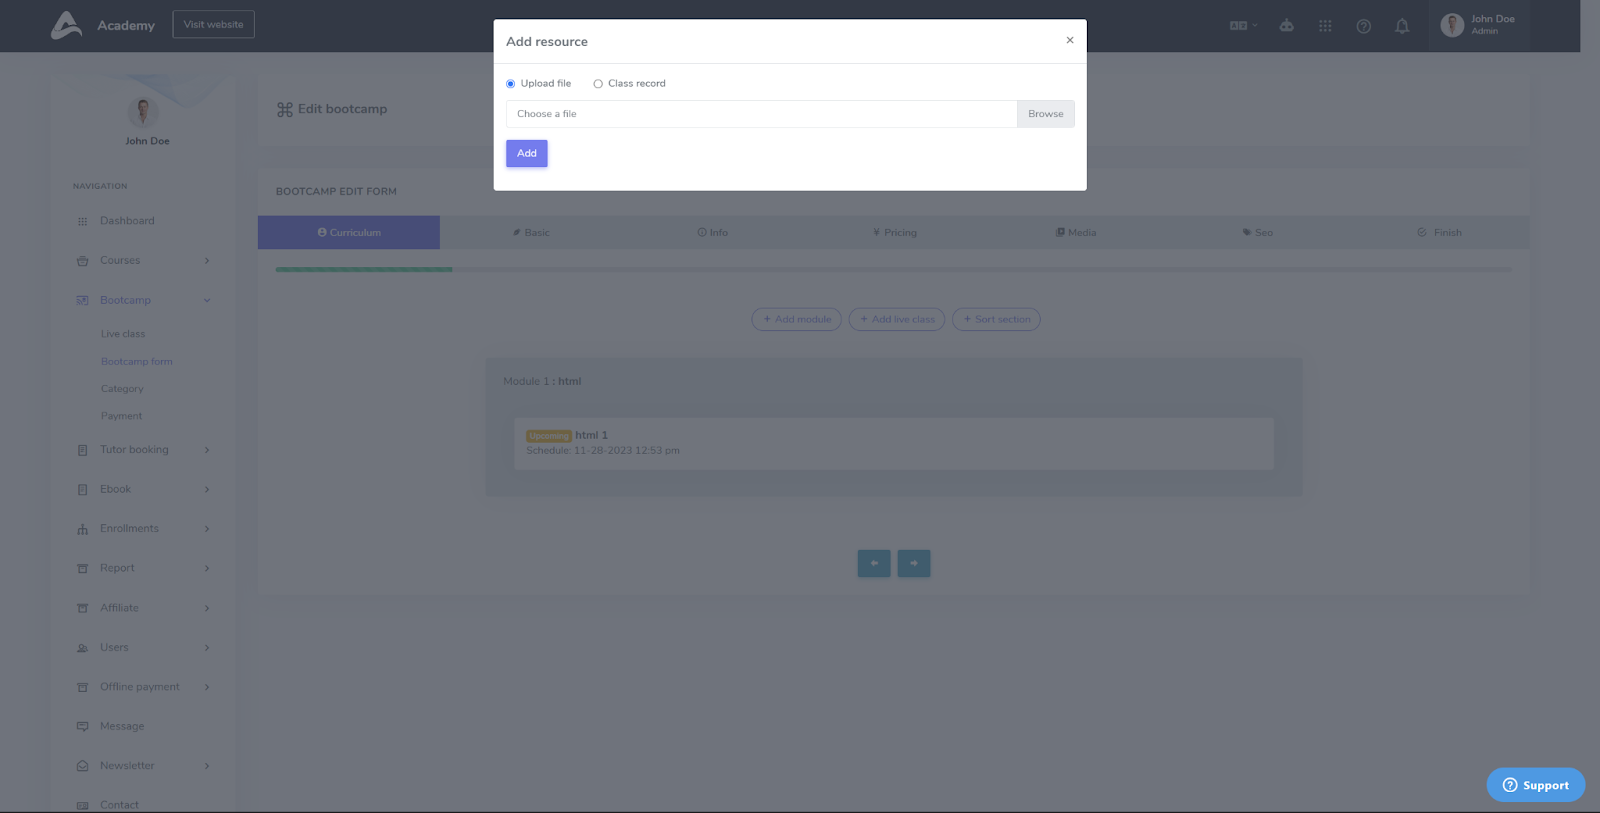
Select Upload file.
-
Then click on the Add button.
-
Choose the file you want to upload from the file browser. Click Open.
-
Then click Add. The file is now uploaded to the live class resources.
-
You can upload as many files as you want for resources.
-
Select Class Record.
-
Then click on the Add button.
-
Choose the file you want to upload from the file browser. Click Open.
-
Then click Add. The class recording is now uploaded to the live class resources.
-
-
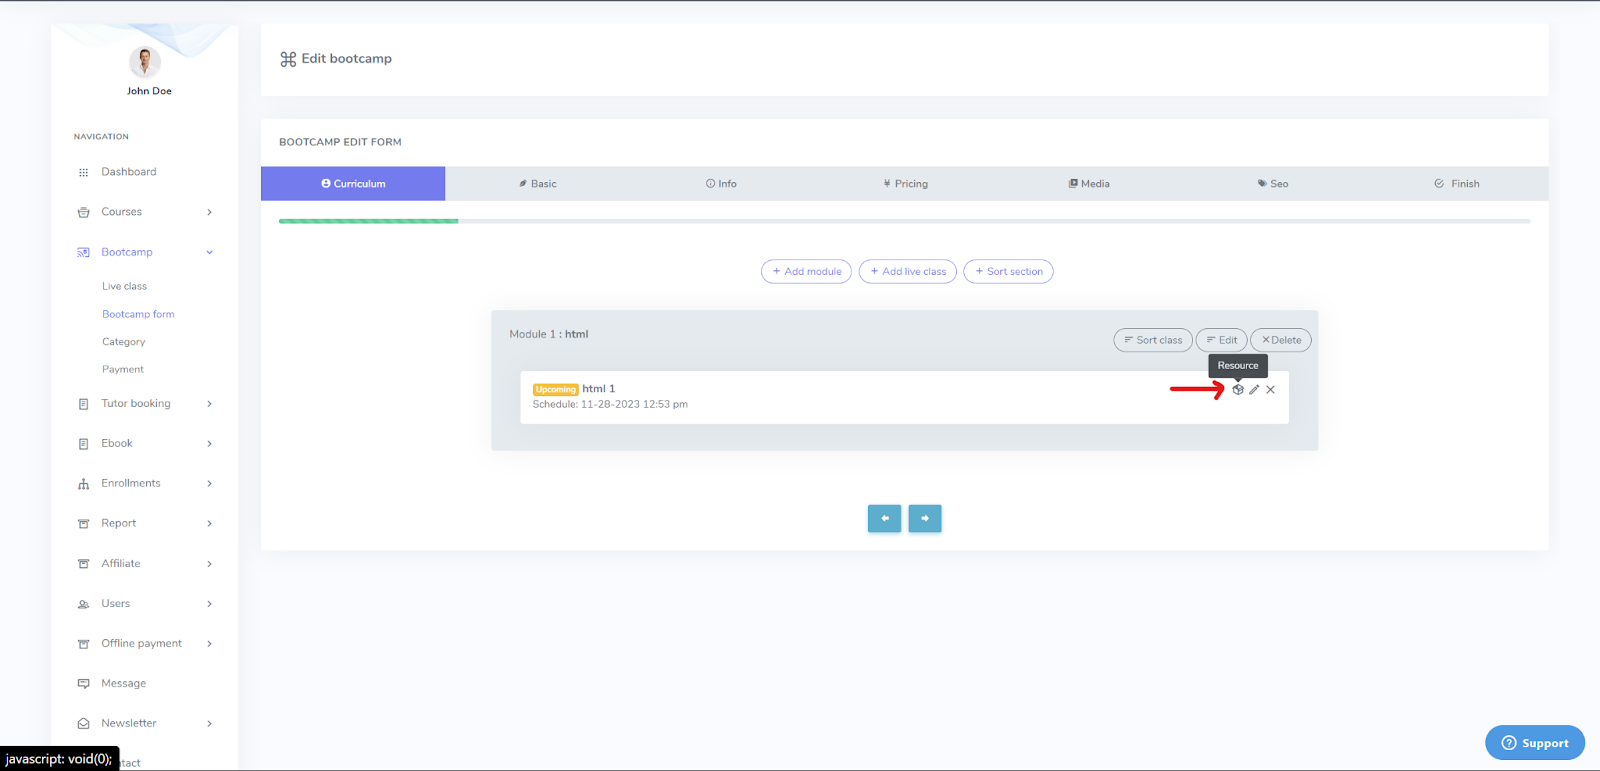
Hover over the live class and then click on the Resources icon on the right. It will show an Add Resource window.
-
If you want to upload study resources (e.g. PDF files, slides), follow the steps below:
-
If you want to upload the live class recording, follow the steps below:
-
For Deleting resources, follow the steps below:
-
Hover over the live class and then click on the Resources icon on the right. It will show an Add resource window.
-
Then, under the Resources section, you will see the files that are added as resources.
-
Hover over the file you want to delete, then click on “x”.
-
A pop-up window will show regarding the confirmation of the deletion. Click the Continue button to delete the resource, or click Cancel if you don’t want to delete the resource.
-
For Downloading Resources, follow the steps below:
-
Hover over the live class and then click on the Resources icon on the right. It will show an Add resource window.
-
Then, under the Resources section, you will see the files that are added as resources.
-
Hover over the file you want to delete, then click on the icon for Download on the right side.
-
The file will be downloaded.
-
For Sorting Sections, follow the steps below:
-
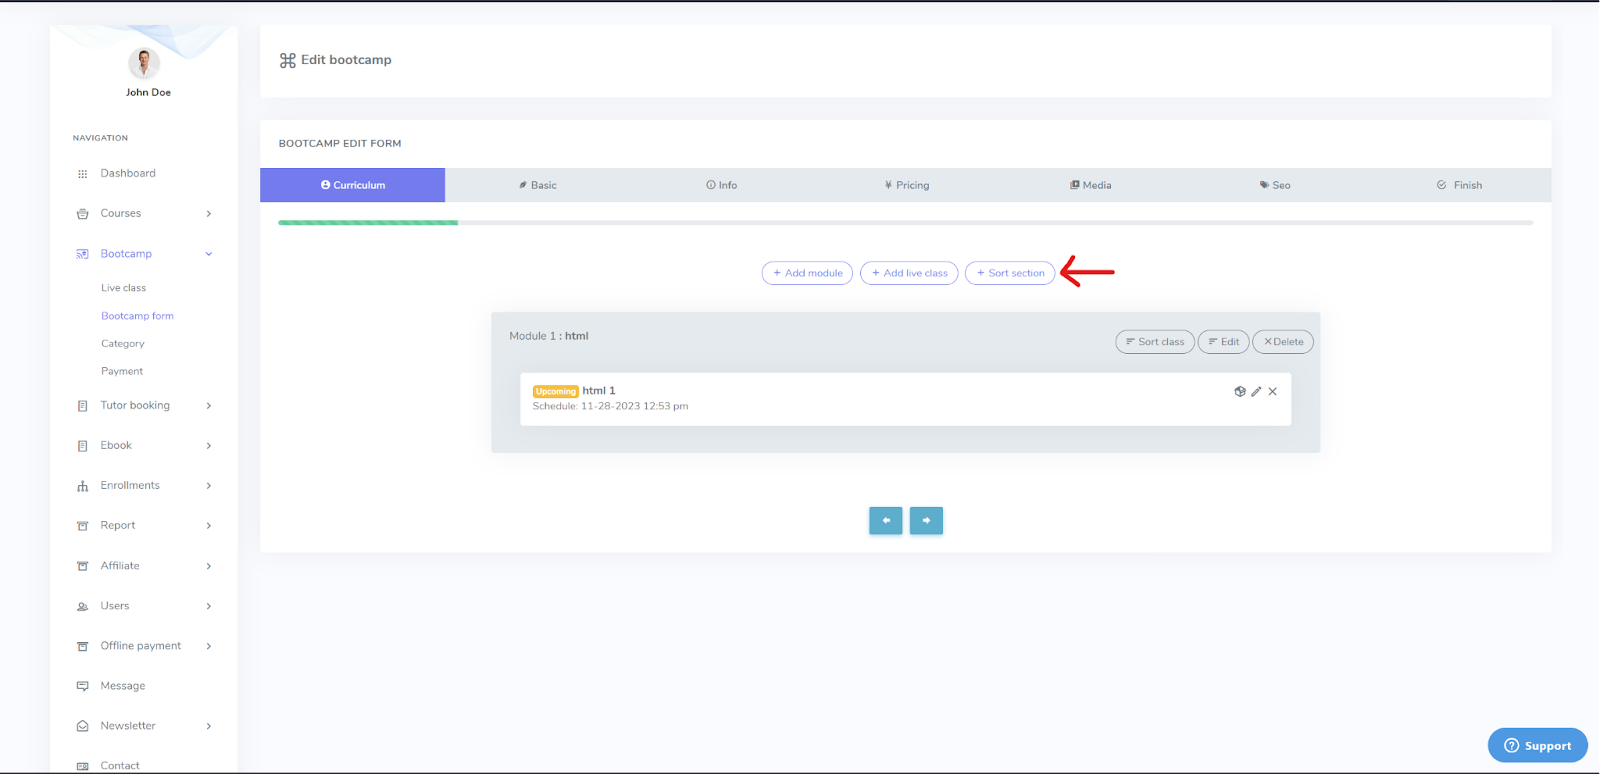
Click on the “+ Sort Section” button.
-
A window will pop up named List of sections with all the modules listed.
-
Drag the modules back and forth to sort the sections as you want.
-
Click on Update Sorting.
-
Then, the sections will be updated accordingly.
Manage Live Classes
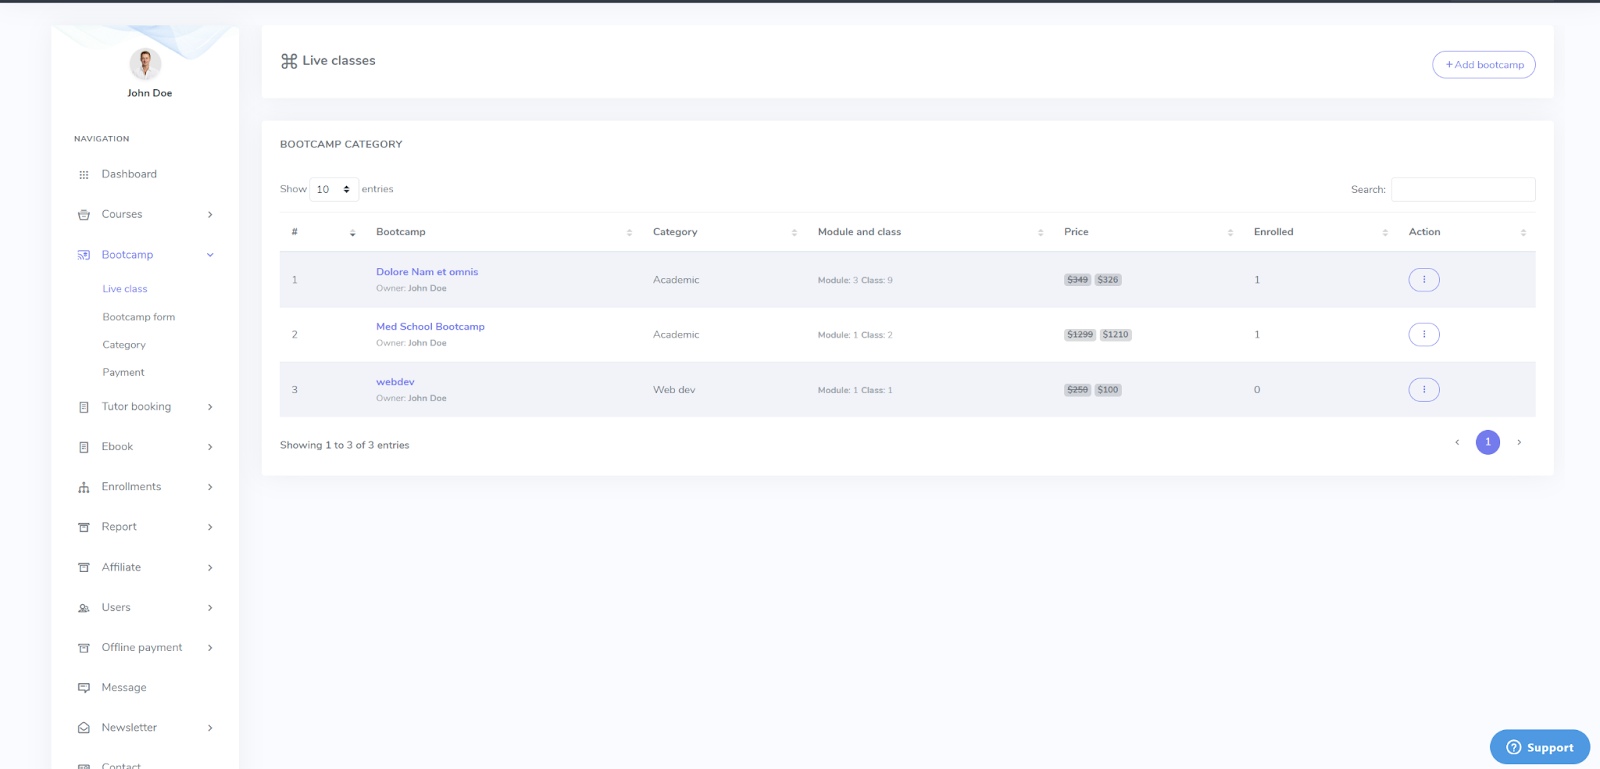
After you have created modules and live classes, you can manage your live classes from the navigation panel of your profile.
Follow the steps below to manage the live classes:
-
Click on the Live Class option from the Bootcamp dropdown menu on the navigation panel.
-
Next, you can see all of the live classes listed under the Bootcamp Category panel.
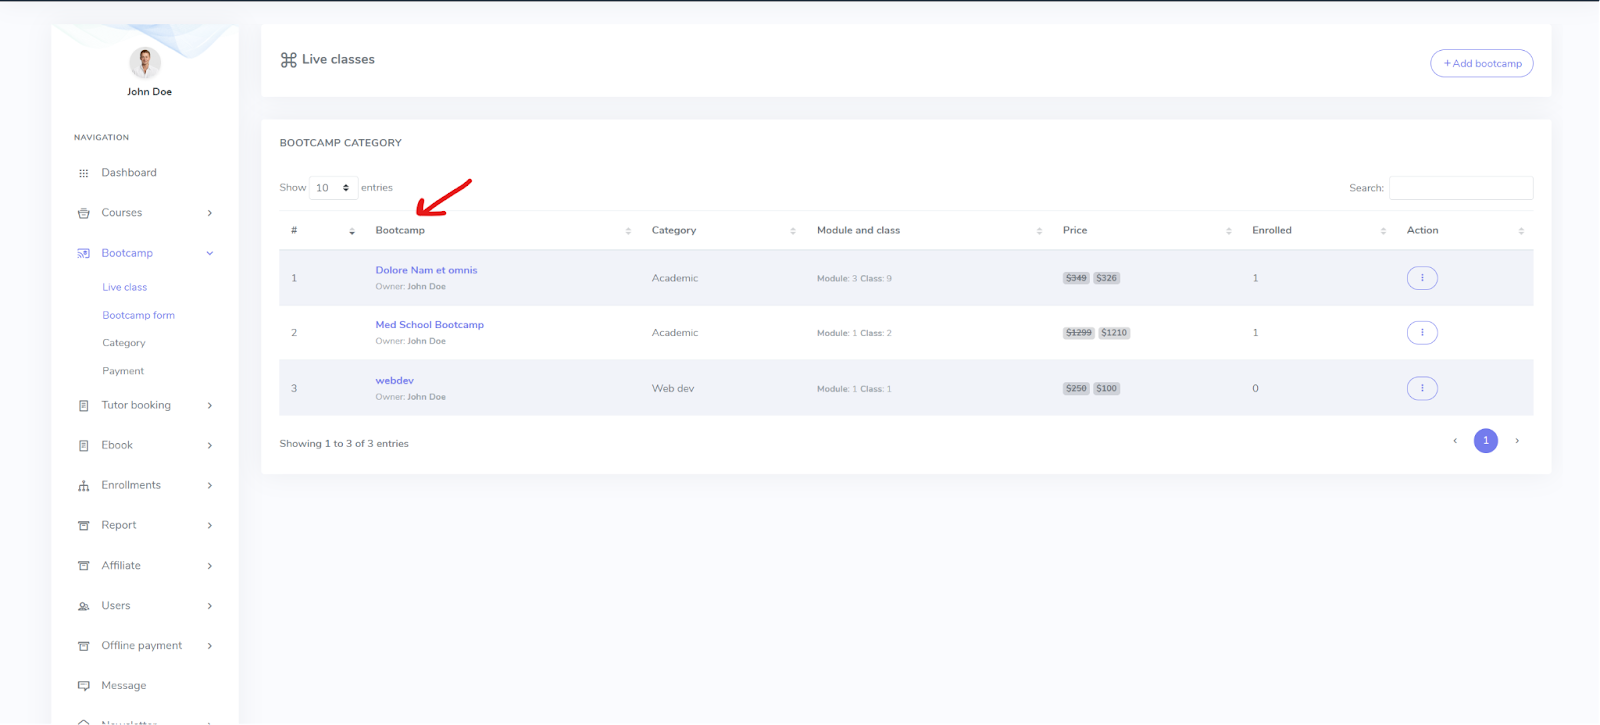
-
For editing any Bootcamp, you can either Click on the Bootcamp or Click on the Action Icon.
-
For editing or deleting the bootcamp live classes, follow the steps below:
-
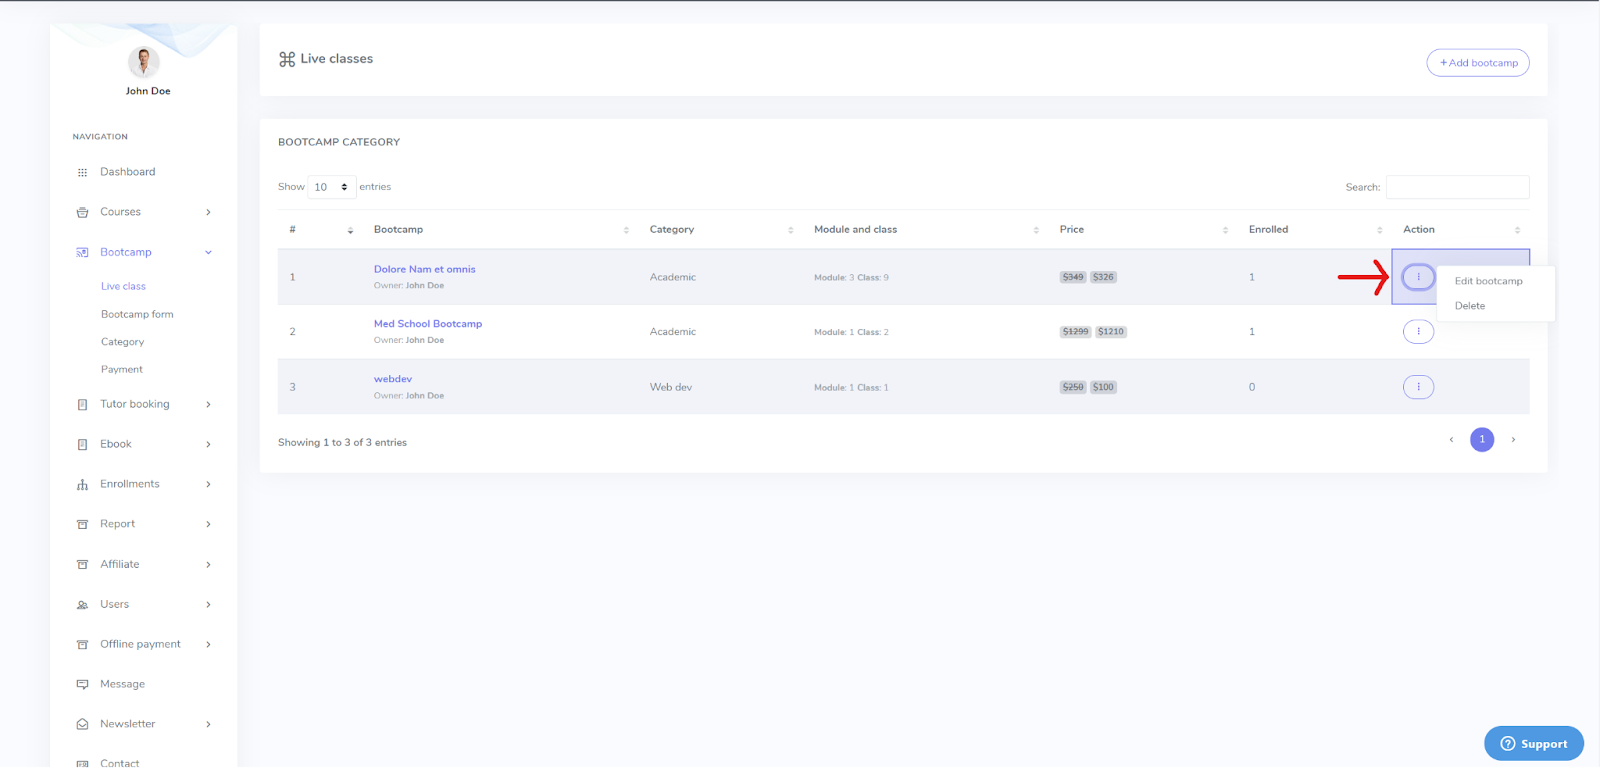
Click on the Action icon for the bootcamp that you want to edit.
-
If you want to edit the bootcamp, click Edit Bootcamp.
-
Follow the steps mentioned in the Edit Bootcamp section earlier to add changes to your bootcamp.
-
If you want to delete the bootcamp, click Delete Bootcamp.
-
A deletion confirmation window will pop up.
-
Click “Continue” if you want to delete. Otherwise click Cancel.
-
After clicking continue your bootcamp will be successfully deleted.
-
You can edit the number of entries you want to display on top of the Bootcamp Category panel.
-
Select the dropdown menu for Show _ entries.
-
Then select how many bootcamp entries you want to display in the window at a time.
-
You can search for a specific Bootcamp in the Search bar inside the Bootcamp Category Panel.
-
Click on the empty Search Bar and enter the bootcamp you are looking for.
-
The search results will appear on the window.
-
You can see the categories of the bootcamp, module numbers and class numbers, students enrolled in the bootcamp, price of the bootcamp, status of the bootcamp for all the entries in the Bootcamp Category Panel.
Categorize The Bootcamps
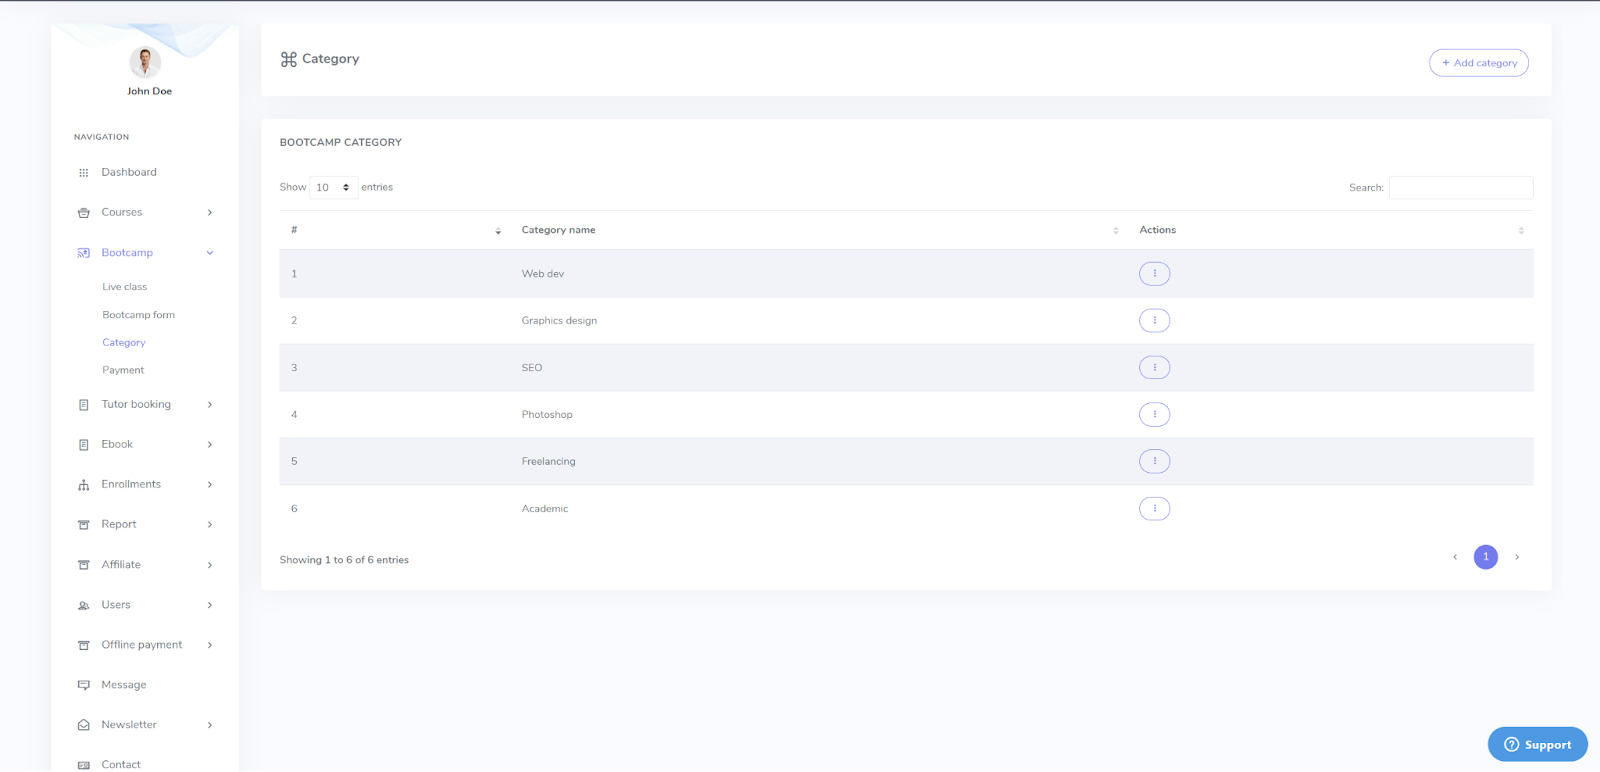
When you are providing multiple bootcamp courses to the students, you can find your bootcamps organized according to categories.
Follow the steps below for managing categories:
-
Click on the Category option from the Bootcamp dropdown menu on the navigation panel.
-
The available bootcamps will be shown according to categories.
-
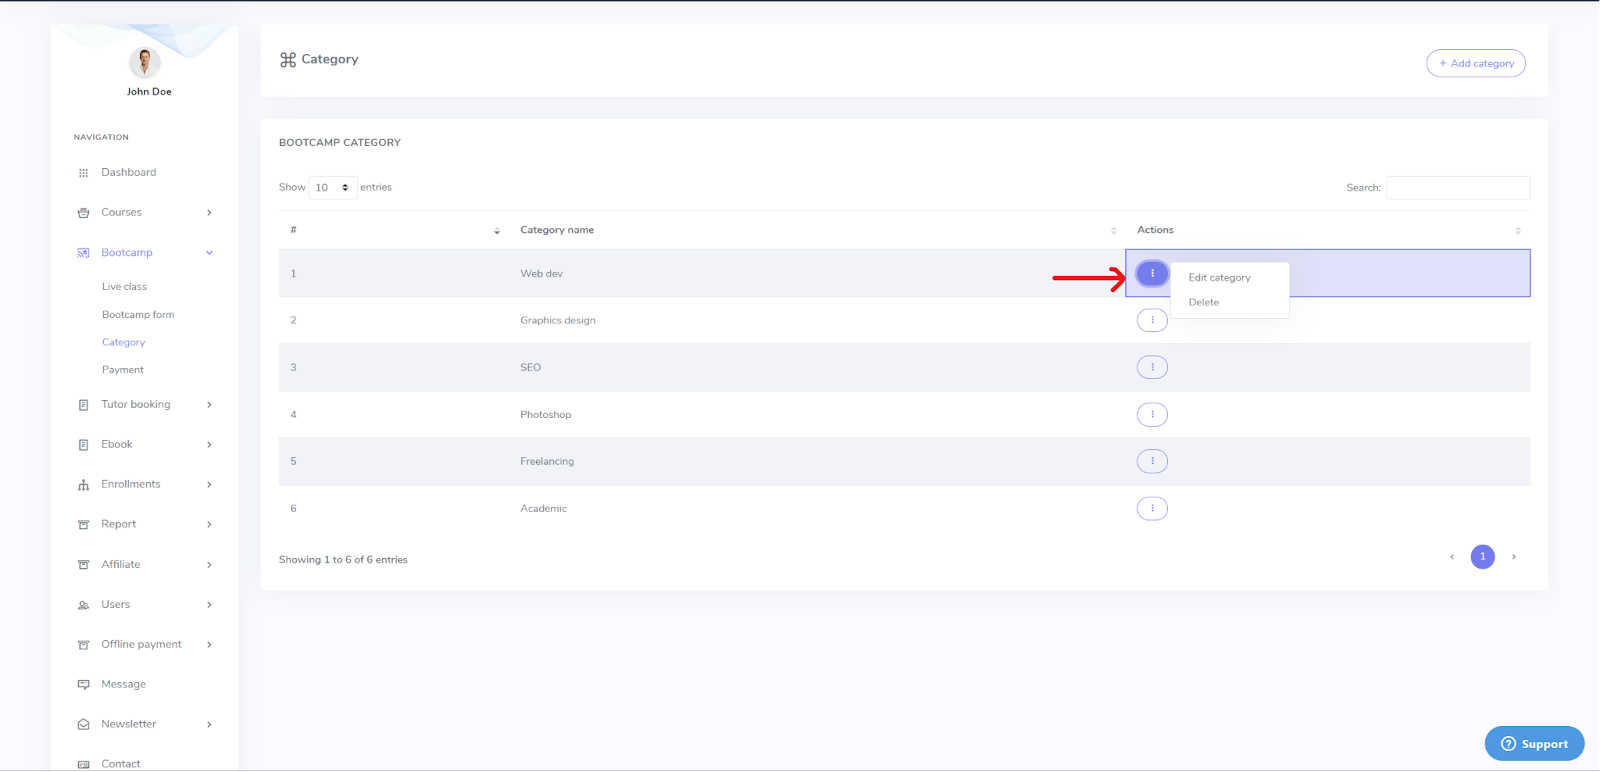
If you want to edit or delete a category, follow the steps below:
-
Click on the Action icon for the bootcamp that you want to edit.
-
If you want to edit the category, click Edit Category.
-
A window will pop up for editing the bootcamp category.
-
Click on the empty field for Bootcamp Name.
-
Enter the new name of the bootcamp category.
-
Save changes by clicking on Save.
-
If you want to delete the bootcamp, click Delete.
-
A deletion confirmation window will pop up.
-
Click “Continue” if you want to delete. Otherwise click Cancel.
-
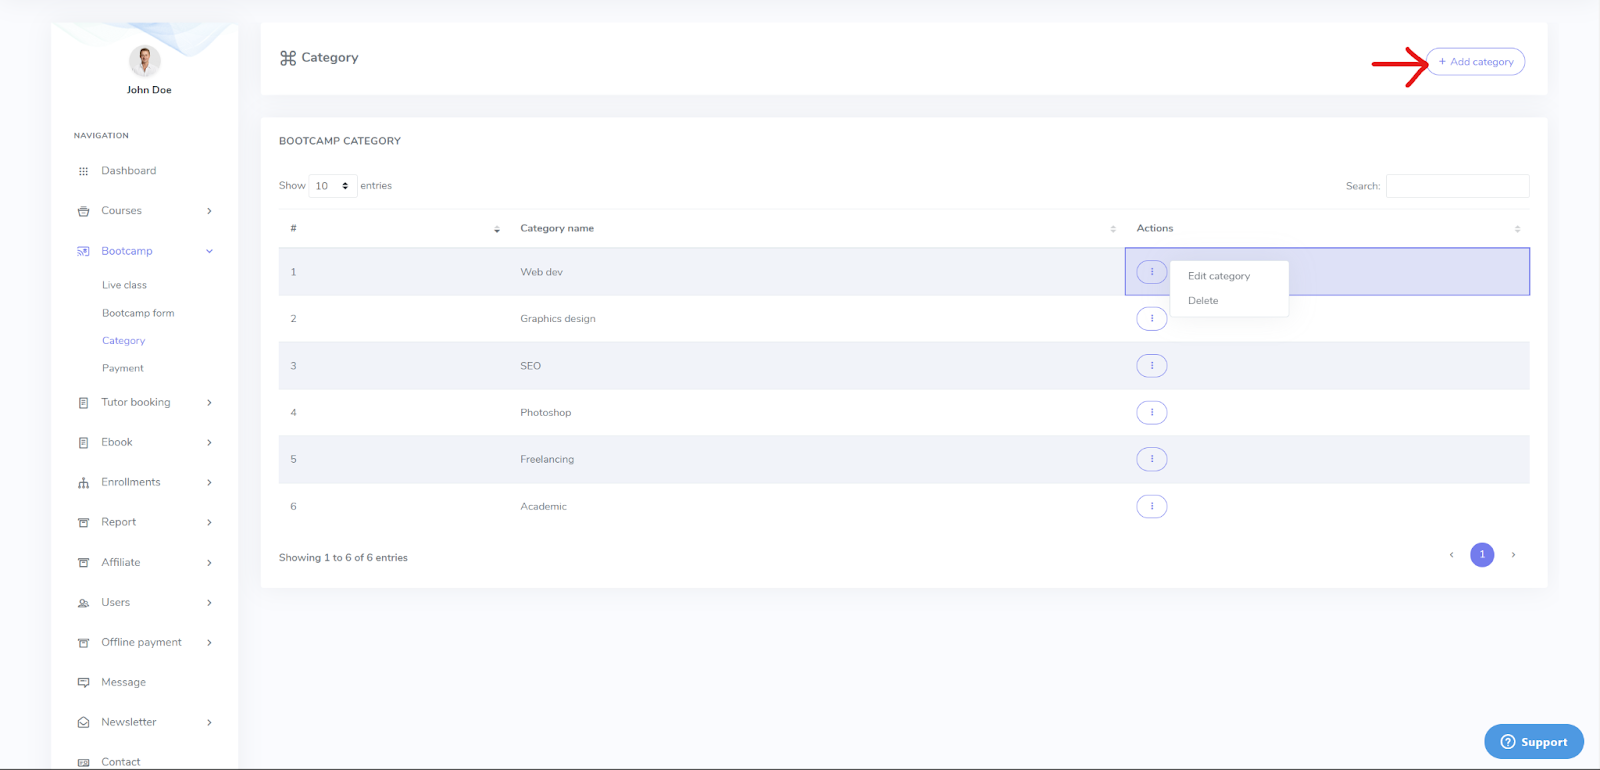
If you want to Add Category, click on the “+ Add Category” button on the top right.
-
A window will pop up for adding the bootcamp category.
-
Click on the empty field for Bootcamp Name.
-
Enter the name of the bootcamp category.
-
Click on Save.
-
The new category will be added to the existing category list.
-
You can edit the number of entries you want to display on top of the Bootcamp Category panel.
-
Select the dropdown menu for Show _ entries.
-
Then, select how many category entries you want to display in the window at a time.
-
You can search for a specific Category in the Search bar inside the Bootcamp Category Panel.
-
Click on the empty Search Bar and enter the category you are looking for.
-
The search results will appear in the window.
Manage Payment
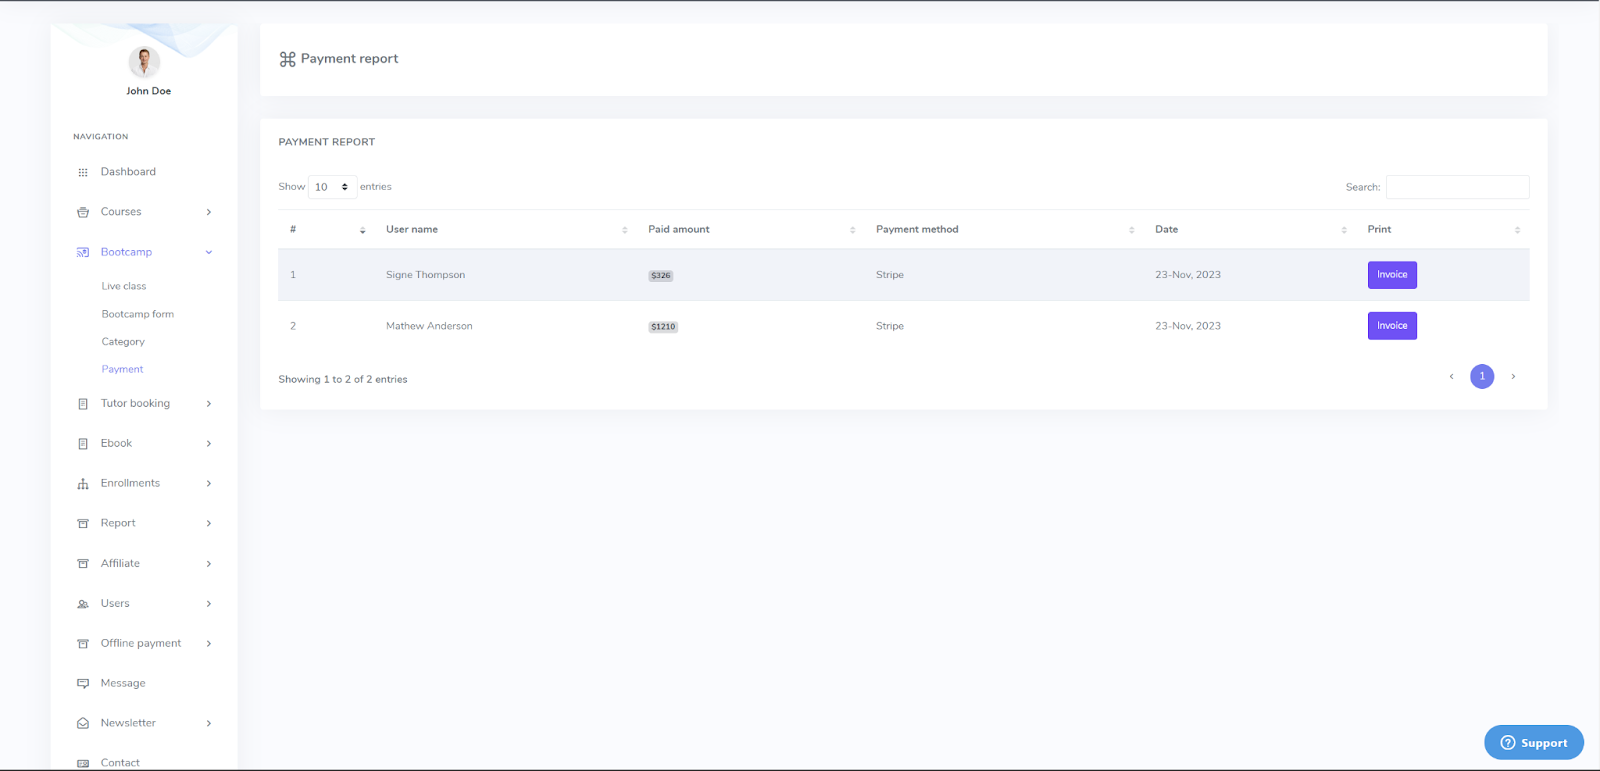
For managing and viewing payment reports, follow the steps below:
-
Click on the Payment option from the Bootcamp dropdown menu on the navigation panel.
-
The payment report will be shown sorted according to user names.
-
You can search for a specific user in the Search bar inside the Bootcamp Category Panel.
-
Click on the empty Search Bar and enter the user’s name you are looking for.
-
The search results will appear in the window.
-
You can edit the number of entries you want to display on top of the Payment Reports panel.
-
Select the dropdown menu for Show _ entries.
-
Then, select how many user entries you want to display in the window at a time.
-
The user entries will show the following details in each row for each user: User name, Paid Amount, Payment Method, Date, and Print.
-
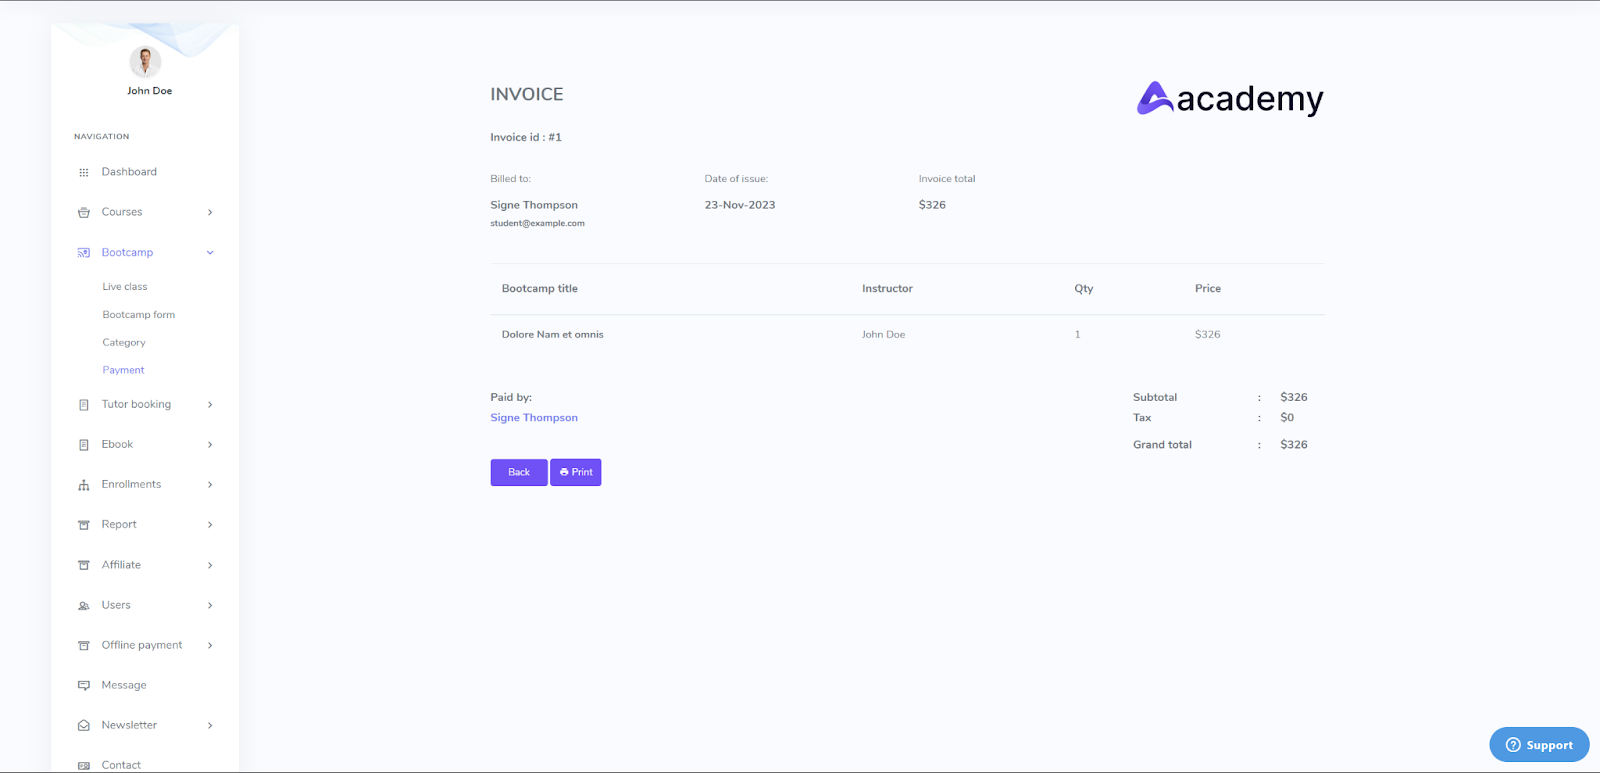
If you want to Print the invoice for a user payment, click on the Invoice button.
-
The invoice will appear on the screen, click the Print option for printing the invoice. Otherwise, you can view the invoice and then click Back to go back to the previous page.
Student’s Guide
Join Bootcamp Courses
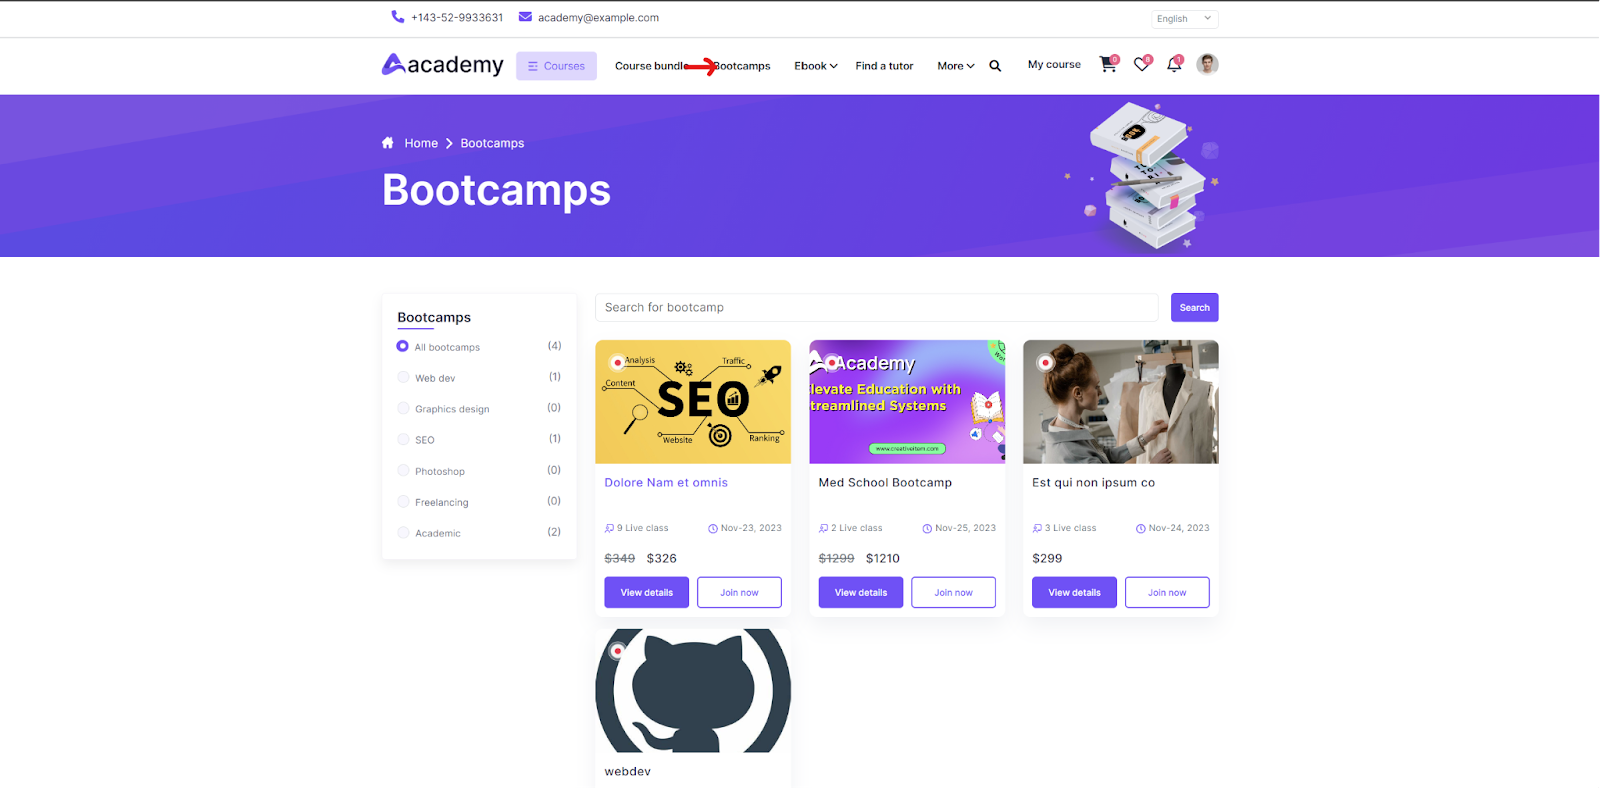
As a student who wants to join bootcamp courses, log in to your Academy LMS using your credentials first.
To join a boot camp course, follow the steps below:
-
From the main menu of Academy LMS, choose the Bootcamps option beside the Courses option.
-
The page will show all the available bootcamps for you to enroll in.
-
On the left side of the page, there are categorized Bootcamps options. If you want to see all bootcamps together, click on the checkbox for All Bootcamps. If you want to browse bootcamps according to categories, you can click on the checkbox for the category you want to see. E.g. Web dev-related or Data Science-related.
-
If you want to Search for a Bootcamp, follow the steps below:
-
Click on the Search Bar and type the name related to the bootcamp you are looking for.
-
Click on Search.
-
The related bootcamps will appear.
-
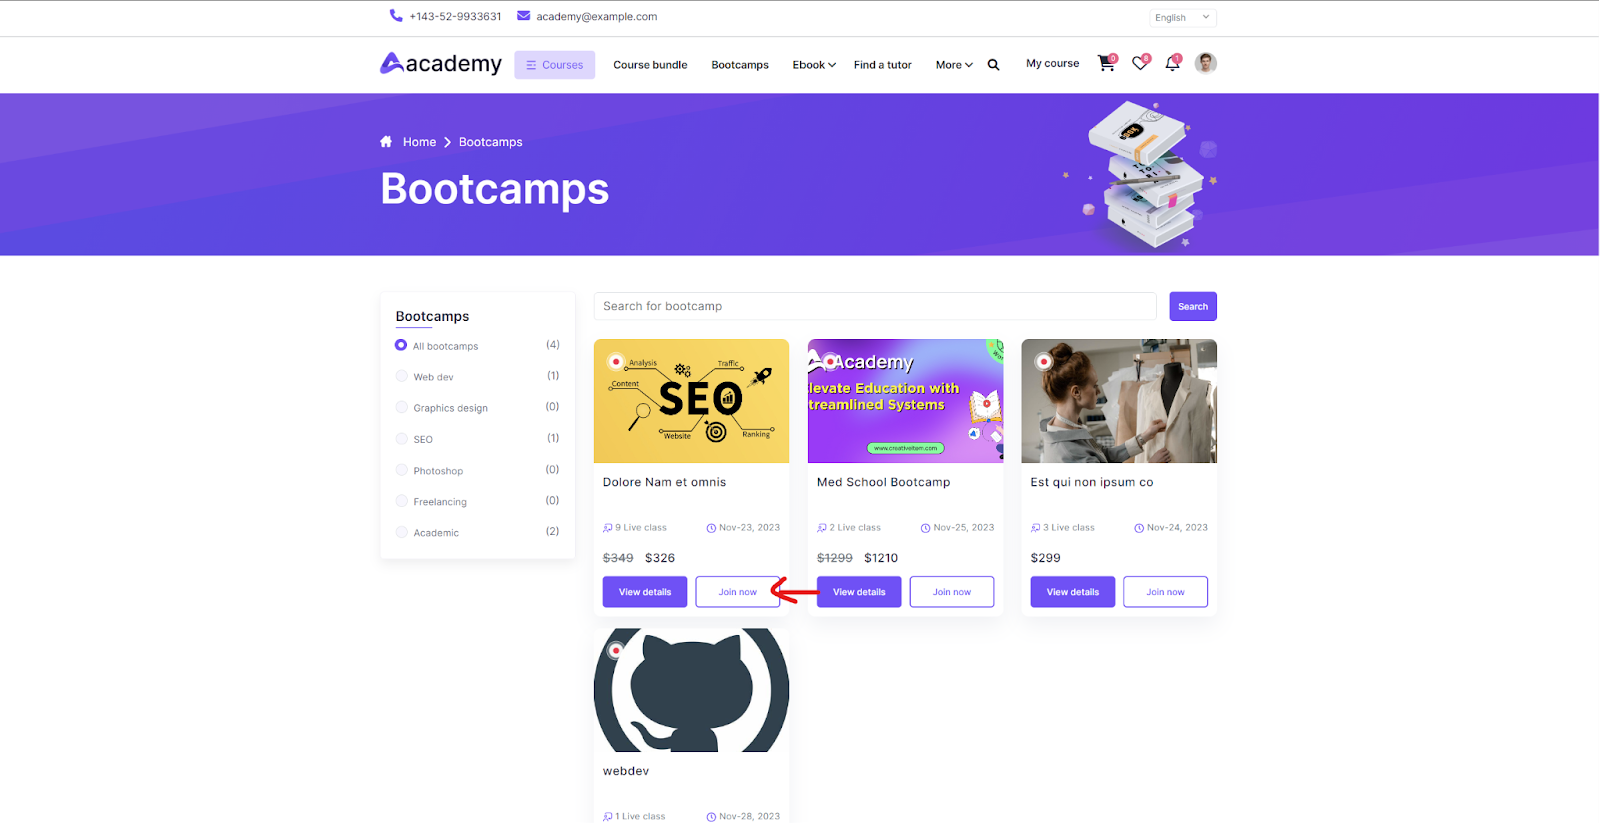
The available bootcamp courses will be shown on the screen. Click on any Bootcamp you like, and click on View Details to see the detailed description regarding the Bootcamp. After clicking on view details for a specific bootcamp, a window regarding the bootcamp information will show up, where you can check the overview, curriculum, instructor and pricing details.
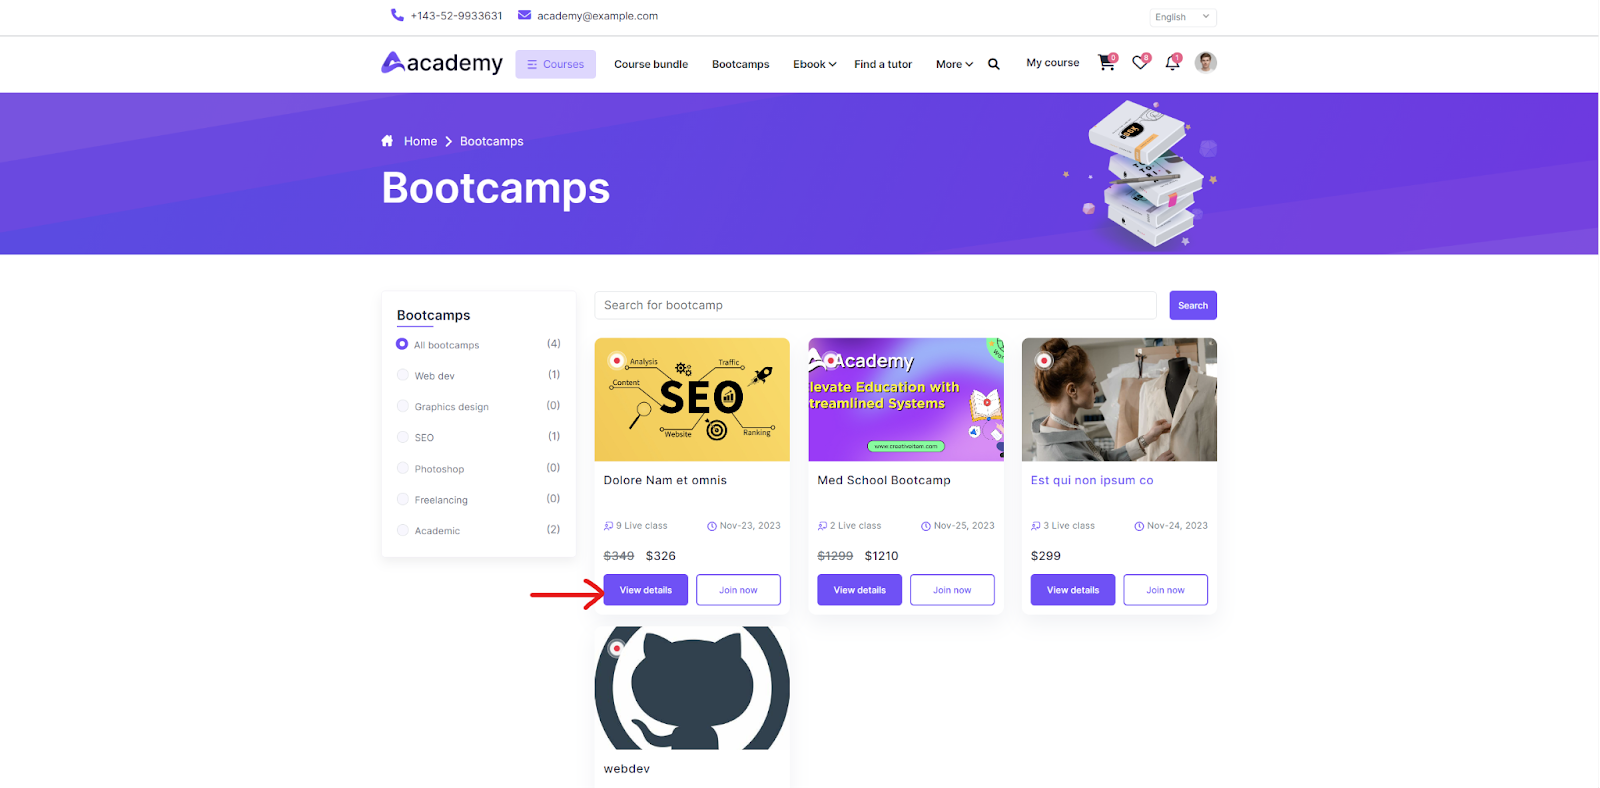
-
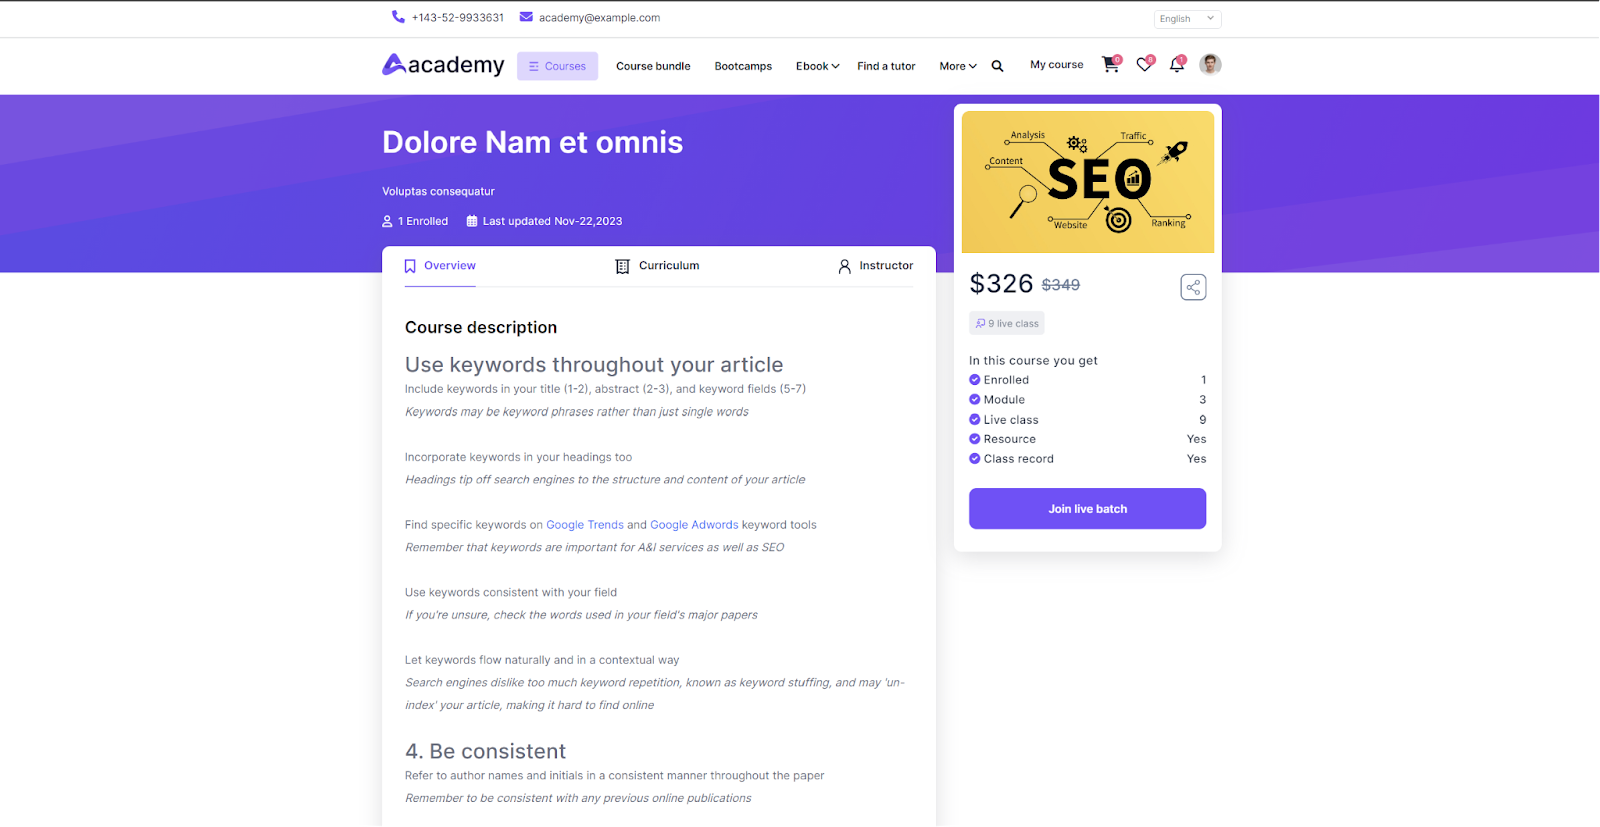
The banner of the Bootcamp course will show on the window; under the title of the bootcamp inside the banner, you can check the number of students enrolled and the duration of the bootcamp course.
-
Click on Overview, and a detailed description of the course will be shown. You can browse through Course Description, What will you learn, Requirements and the Frequently asked questions in this section.
-
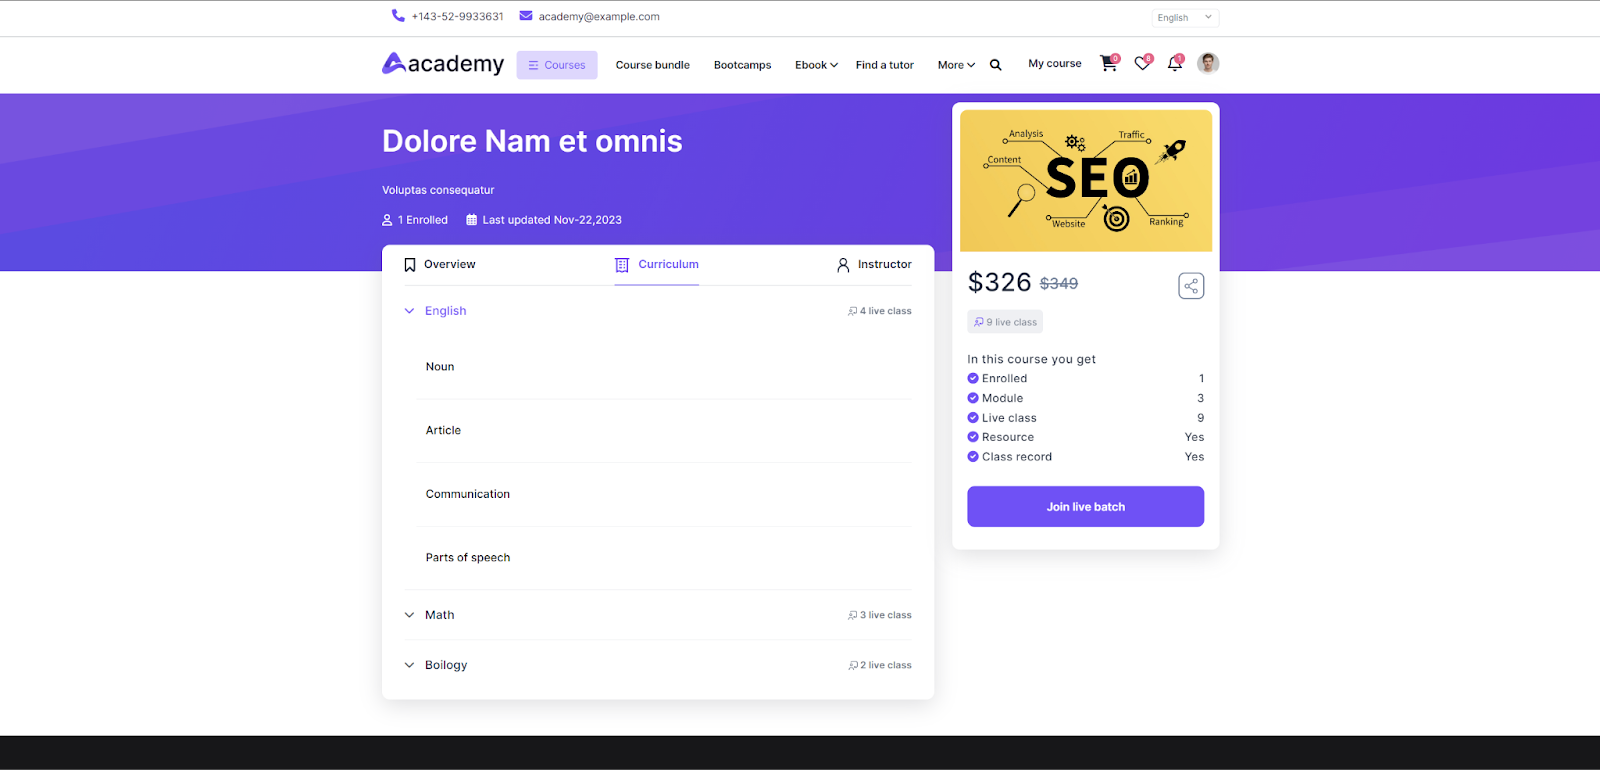
Click on Curriculum, and the modules and live class planning for the course will be shown.
-
Click on any module that you want to check out. Click on the dropdown option for the module, and all the live classes available for that module will show up.
-
You can check all the live classes available for all the modules throughout the course.
-
Beside every module option, the number of live classes are mentioned.
-
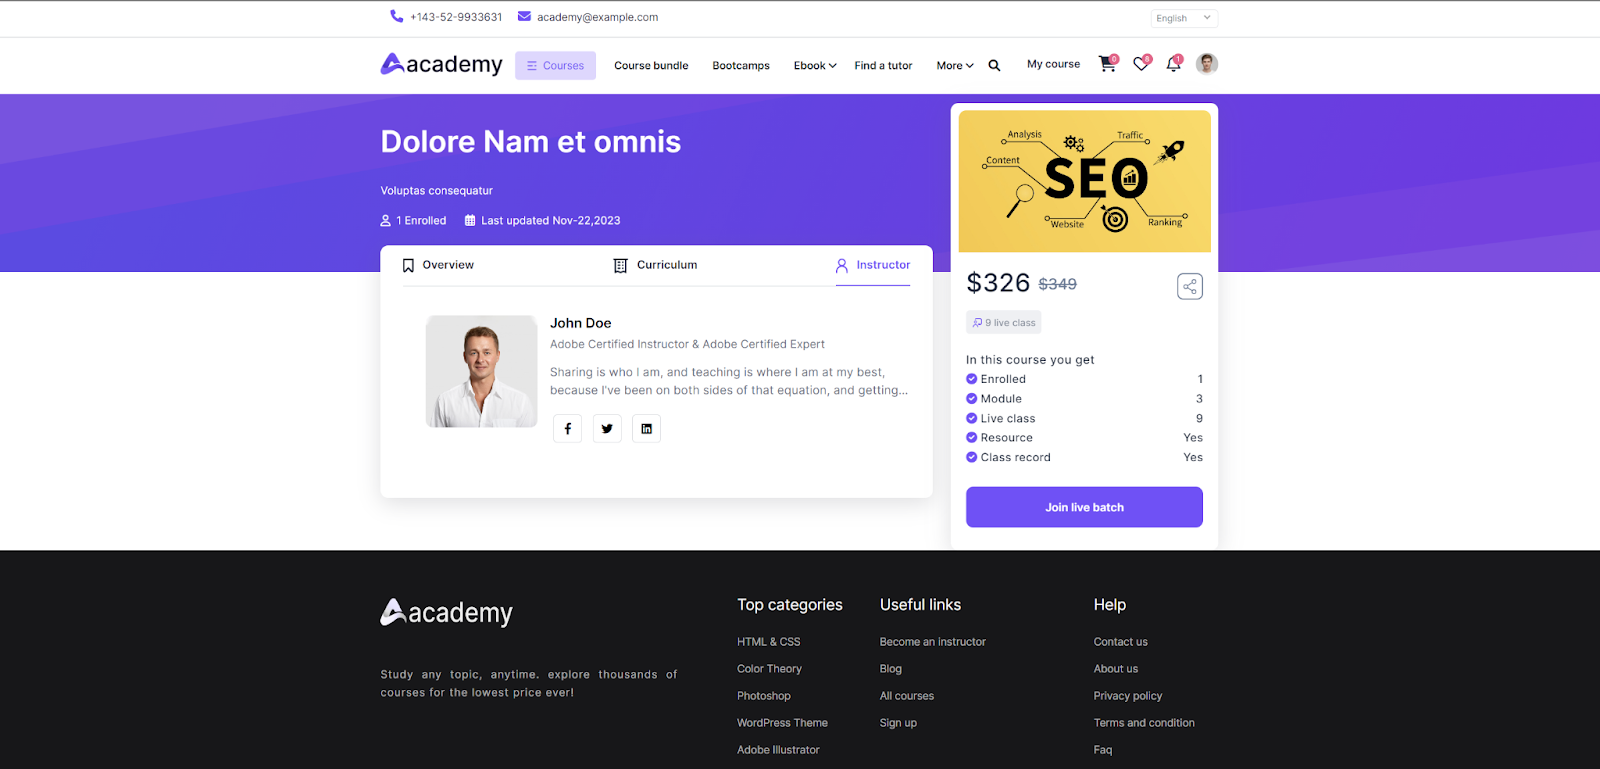
Click on Instructor for checking out the details of the bootcamp instructor. You can check the name of the instructor,their expertise and biography, and their social media accounts embedded.
-
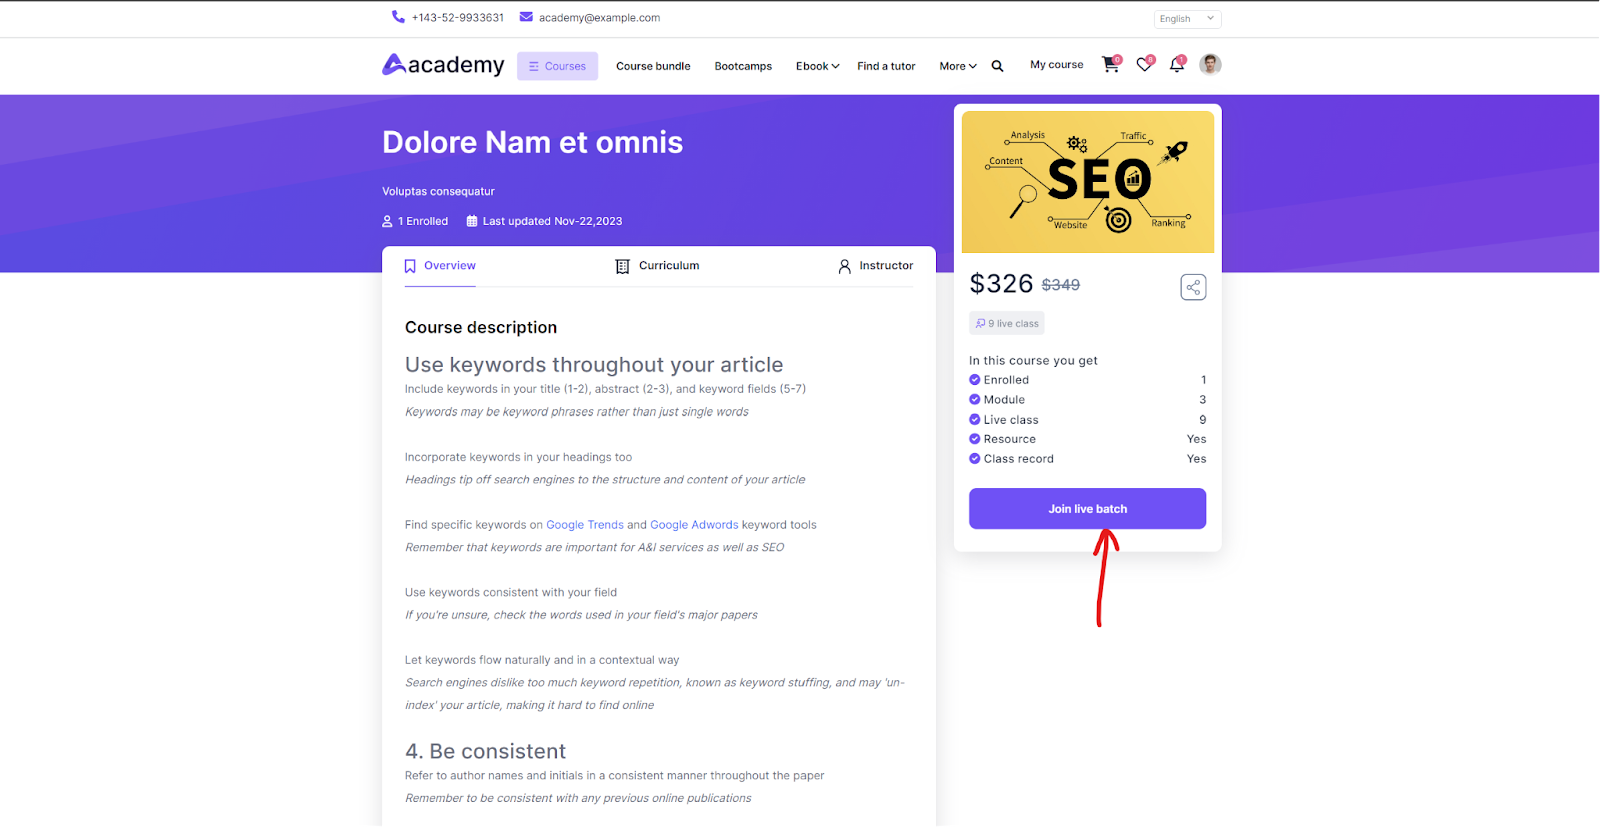
On the right side of the details section, you can see a separate pricing detail section. The price of the bootcamp will be mentioned here, with the total number of live classes, modules, and whether there will be Available resources and recordings.
-
If you have already purchased the bootcamp it will show a “Join Live Batch” button. Click on Join Live Batch to add this bootcamp to your profile.
-
If you have not purchased the bootcamp yet, it will show the “Buy Now” button. Click on it to purchase the bootcamp and add it to your profile.
-
Click on Join now to join the bootcamp course. The bootcamp will be added to your profile.
- If you have not purchased the bootcamp yet, it will show the “Buy Now” button. Click on it to purchase the bootcamp and add it to your profile.
- You can join as many bootcamp courses as you want.
Browse My Bootcamp
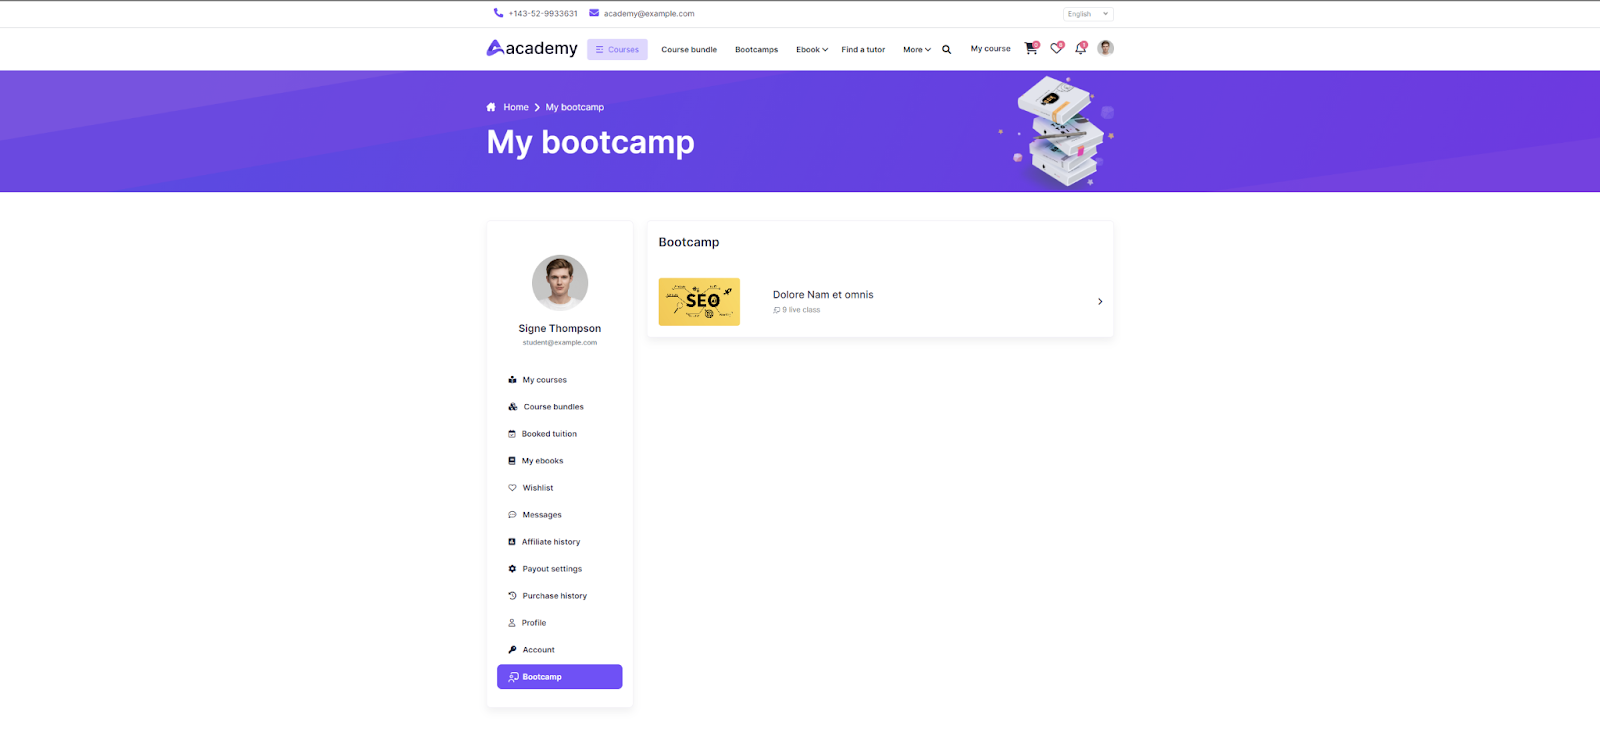
To browse through the bootcamps you are currently enrolled in, follow the steps below:
-
Click on the My Course option from the main menu.
-
From the My Courses panel, choose Bootcamp from the navigation menu on the left.
-
You can see all the bootcamps you are enrolled in in the next window.
-
To browse the content of a course, follow the steps below:
-
Click on the selected Bootcamp course.
-
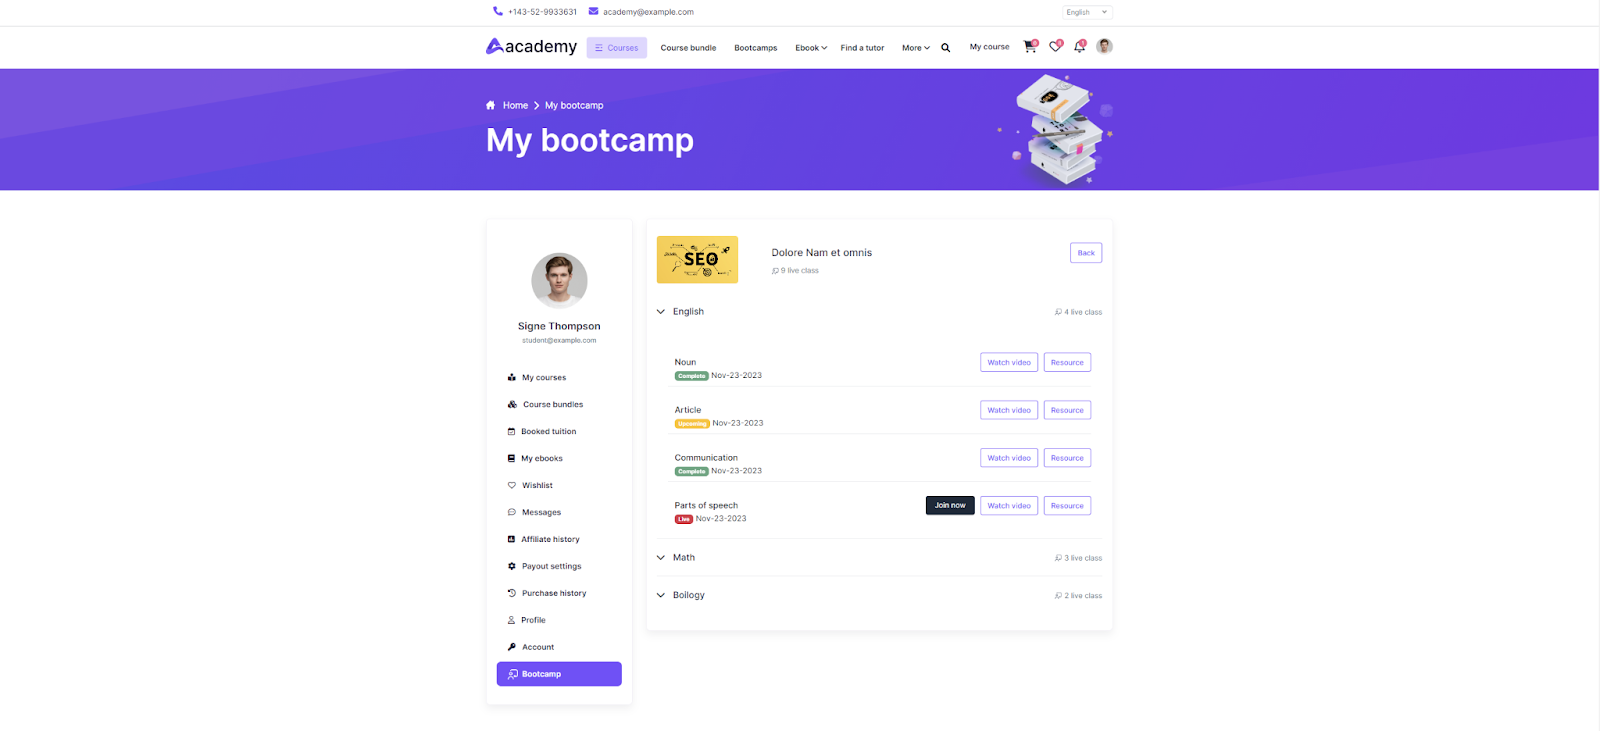
The course will appear with all the available modules, and the number of live classes will be shown under the title of the Bootcamp course.
-
Click on the selected module to expand the contents.
-
If there is a lock icon beside the module, that means it is not available for students to access yet.
-
Otherwise, the number of live classes will be mentioned beside the module name.
-
After expanding the module contents, all the live classes arranged under that module will appear.
-
If the live class is upcoming, you can click on the Join Now button beside the selected live class according to the schedule and join the live class.
-
If the live class has ended, you can click on the Watch Video button beside the selected live class and watch the recorded session.
-
For Downloading the Resources, click on the Resource button beside the live class to download the study materials related to the live class.
2. Similarly, you can browse through all the bootcamps you are enrolled in following the same steps.
Was this article helpful to you?
Contact us and we will get back to you as soon as possible

